It's good there's an off switch for when the novelty wears off, I get tired of hearing "you are over the speed limit" from my satnav
Robsey's Thread of Random Ramblings.
Moderator: Robsey
-
ilovedmymantas

- Registered user
- Posts: 1202
- Joined: Sat Jan 12, 2013 2:54 am
Re: Robsey's Thread of Random Ramblings.
That sounds quite pleasant.
It's good there's an off switch for when the novelty wears off, I get tired of hearing "you are over the speed limit" from my satnav
It's good there's an off switch for when the novelty wears off, I get tired of hearing "you are over the speed limit" from my satnav
" It's not rust. It's age-related patina " 
1980 vauxhall cavalier MK1 1.6L, 1982 opel manta berlinetta 1.8s, 1985 opel manta 2.0 gte, 1990 cavalier 2.0 gl ,1994 cavalier sri x20xev
-1995 cdx x20xev
---------------
Matt
1980 vauxhall cavalier MK1 1.6L, 1982 opel manta berlinetta 1.8s, 1985 opel manta 2.0 gte, 1990 cavalier 2.0 gl ,1994 cavalier sri x20xev
-1995 cdx x20xev
---------------
Matt

Re: Robsey's Thread of Random Ramblings.
The up-side to having the voice unit, is that it gives trip distance information, as well as mpg assuming you can find a working compatible fuel-flow transducer.
The audible warnings are little more than a gimmick, but they can be muted by turning the voume knob to the off position.
The audible warnings could save you from a disaster if left on, but restricted to warnings. Oil pressure, fuel level, brakes, and engine temperature.
The seat-belt warning in the un-restricted mode is purely a reminder, and has no facility to know if you have your belt on or not.
Sadly - in restricted mode, you also lose the lights-on warning. Something I do all the time in the Vectra since the speaker in the CIM module died.
Re: Robsey's Thread of Random Ramblings.
Its a good job that it can be switched off as I know it would drive me mad. Probably great for shows though.
How on earth do you manage to get 10 years out of a washing machine? I'm lucky if I can get 3.
How on earth do you manage to get 10 years out of a washing machine? I'm lucky if I can get 3.
Re: Robsey's Thread of Random Ramblings.
I had to change a rear spider and two dampers about six years ago.
And I rewired the water inlet valve sensor 5 months ago.
On a full load, the washer dances around the kitchen on full spin. I am sure you could probably hear it banging-about if you open your kitchen window - lol.
I am a skin-flint, and from the old school.
I prefer to fix things, than simply replace them when something stops working.
The last fix cost me a spare car radio iso connector and 10 minutes of my time. (free of charge).
Far cheaper than a new washer.
-
James McGrath

- Club Admin
- Posts: 2896
- Joined: Tue Aug 11, 2009 11:35 am
- Location: East Sussex
Re: Robsey's Thread of Random Ramblings.
Don't think that makes you a skint-flint, just sensible and with the technical know how.Robsey wrote: ↑Sun Jul 30, 2023 5:21 pm I had to change a rear spider and two dampers about six years ago.
And I rewired the water inlet valve sensor 5 months ago.
On a full load, the washer dances around the kitchen on full spin. I am sure you could probably hear it banging-about if you open your kitchen window - lol.
I am a skin-flint, and from the old school.
I prefer to fix things, than simply replace them when something stops working.
The last fix cost me a spare car radio iso connector and 10 minutes of my time. (free of charge).
Far cheaper than a new washer.
I really enjoy fixing things when I can and I'm quite sentimental so I tend to keep everything going as long as possible too.
Re: Robsey's Thread of Random Ramblings.
It is hard to get sentimental over a washing machine.
My usual rationale is "blimey the washers broke, I have only had it a couple of years"!
Only to find that it is ten or more years old.
Ooops - amazing how time flies.
------------------
I am doing my bit for the environment, repairing rather than adding to the landfil.
My usual rationale is "blimey the washers broke, I have only had it a couple of years"!
Only to find that it is ten or more years old.
Ooops - amazing how time flies.
------------------
I am doing my bit for the environment, repairing rather than adding to the landfil.
Re: Robsey's Thread of Random Ramblings.
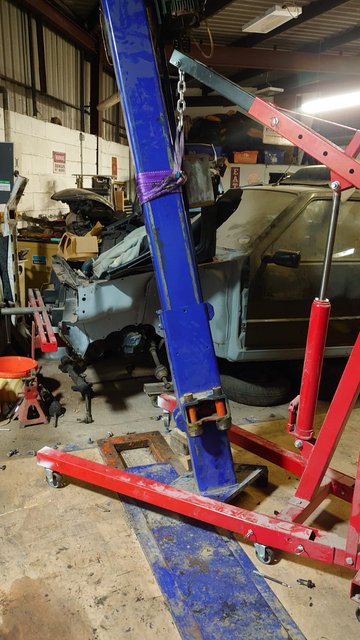
I nearly started a new thread "Down at the Unit".
But as this is my 'Random Thread', I will post here.
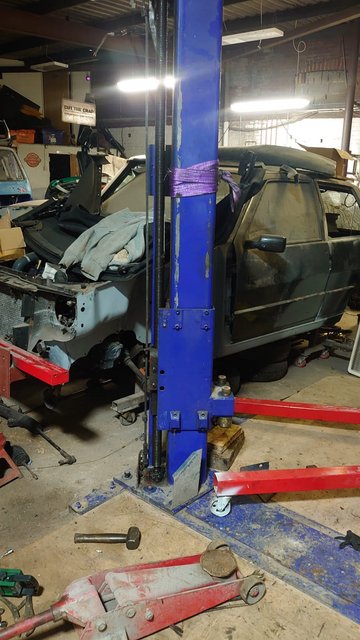
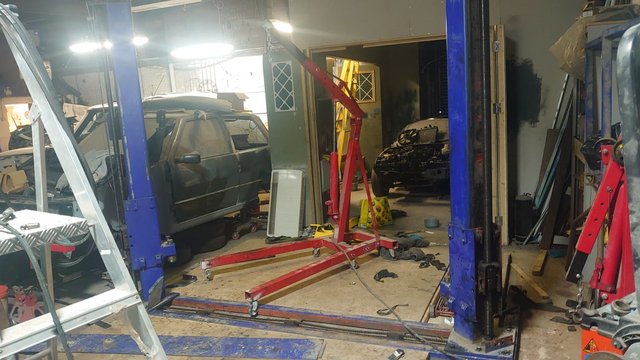
Last night at the unit, I took the lead and decided to get started on the Mazda up on the ramps.
We are both easily distracted and guilty of a significant amount of procrastination.
We had fixed the ramps a few weeks ago - the safety blocks needed to be replaced - Troy did 95% of the work, but he just needed the motivation to get started.
I provided the nudge and a smidge of assistance.
----------------------------
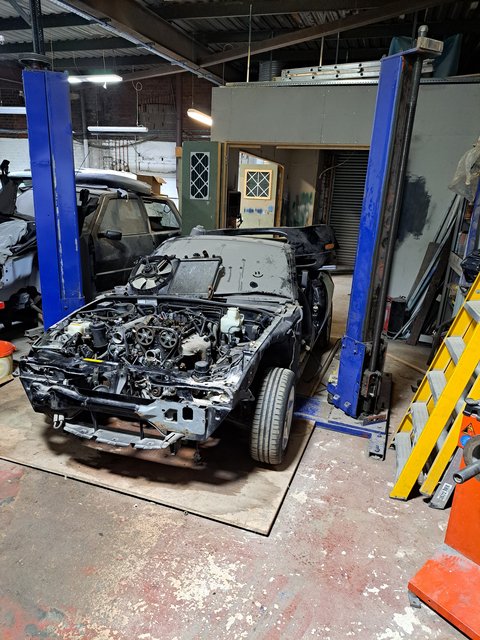
I am glad that I don't do vehicle bodywork for a living.
Especially when someone has been there before.
We knew that the rear corners of the sills were a known rot-spot. Same as many other makes and models.
So I cut away the rear corner to reveal a 'bodgit and scarper special'.
Good metal lap jointed and welded over a rotten panel.

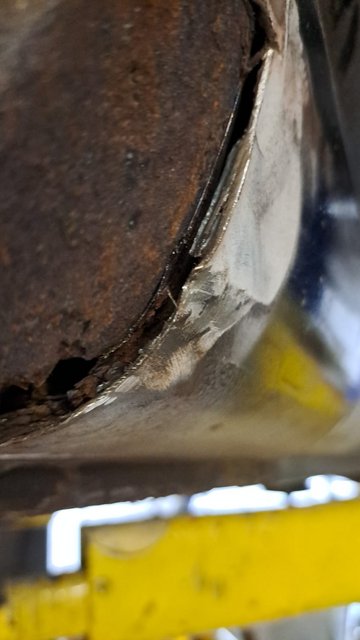
** shakes head in disbelief **
The amount of filler was immense - 1/4" (6mm) thick in patches.

A hot air gun soon softened the filler enough to scrape it off.
I didn't dare go any further until Troy had made an appraisal for himeslf.
He arrived at the unit a while after me...
He was in a philosophical and light mood, and promptly sliced away the whole of the over-laid patch.

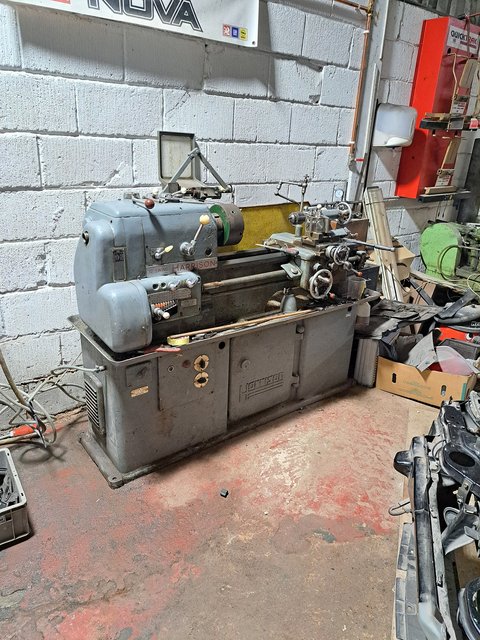
As he was so engrossed, I fitted two new A77 drive belts to the lathe. Tensioned them up, fitted the end covers and tested my handy work.
- another job ticked off the list.
No more flappy-slappy frayed drive belts.
Just some clutch / brake anti-rattle springs to identify, procure and fit.
Anyway - he went off to do some painting, and so I returned to cleaning up the remnants of the Mazda sill.
There is still a fair bit of weld to grind off the bottom of the sill.
Looks like I know what I am doing on Friday night.
But as this is my 'Random Thread', I will post here.
Last night at the unit, I took the lead and decided to get started on the Mazda up on the ramps.
We are both easily distracted and guilty of a significant amount of procrastination.
We had fixed the ramps a few weeks ago - the safety blocks needed to be replaced - Troy did 95% of the work, but he just needed the motivation to get started.
I provided the nudge and a smidge of assistance.
----------------------------
I am glad that I don't do vehicle bodywork for a living.
Especially when someone has been there before.
We knew that the rear corners of the sills were a known rot-spot. Same as many other makes and models.
So I cut away the rear corner to reveal a 'bodgit and scarper special'.
Good metal lap jointed and welded over a rotten panel.
** shakes head in disbelief **
The amount of filler was immense - 1/4" (6mm) thick in patches.
A hot air gun soon softened the filler enough to scrape it off.
I didn't dare go any further until Troy had made an appraisal for himeslf.
He arrived at the unit a while after me...
He was in a philosophical and light mood, and promptly sliced away the whole of the over-laid patch.
As he was so engrossed, I fitted two new A77 drive belts to the lathe. Tensioned them up, fitted the end covers and tested my handy work.
- another job ticked off the list.
No more flappy-slappy frayed drive belts.
Just some clutch / brake anti-rattle springs to identify, procure and fit.
Anyway - he went off to do some painting, and so I returned to cleaning up the remnants of the Mazda sill.
There is still a fair bit of weld to grind off the bottom of the sill.
Looks like I know what I am doing on Friday night.
Re: Robsey's Thread of Random Ramblings.
Tonight's escapades...
Started out by fitting some anti-rattle springs to the clutch discs on the lathe.
This is Matt Chivers doing his on Youtube.

Most videos show only 3 springs being needed, but in typical Robsey style, all six clutch plate location pins required an anti-rattle spring.
But it was worth the effort.
In neutral, the lathe was amazingly quiet.
Even Troy was pleasantly surprised.
---------------------
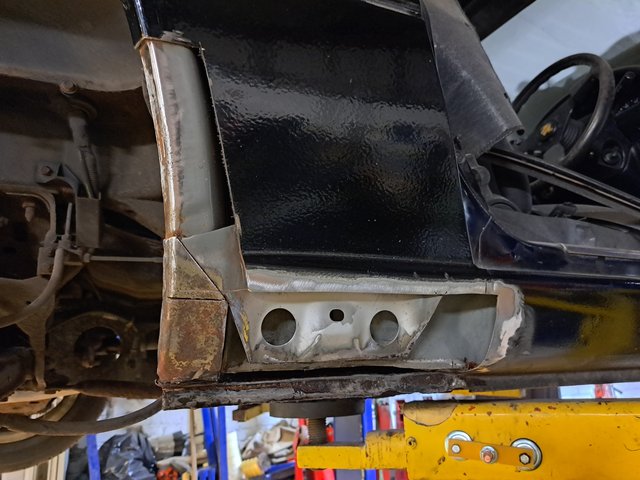
With that done, I moved onto fabricating an inner sill repair panel.
I do like the fabrication work, although it does take a bit of time to achieve a shape I am satisfied with.
A very silly shape that lines up with the curved outer sill to the right. Joggles back, then has an angular taper to meet the section you see with the round holes.
And then a bend across the bottom to line up with the flat vertical edge.
Here you go - tonight's efforts.
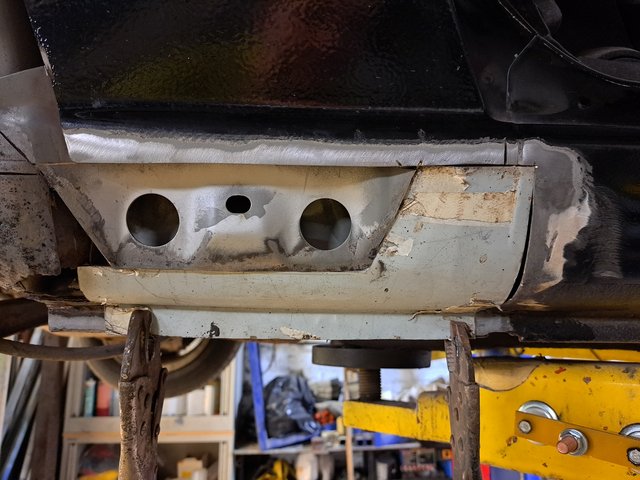
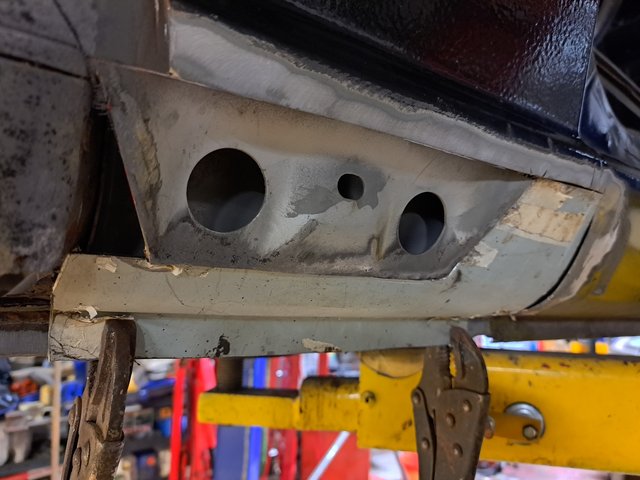
It should be possible to tweak the panel as it is tacked into place.
My welding isn't that good yet, so you can guess who will be doing that bit.
Started out by fitting some anti-rattle springs to the clutch discs on the lathe.
This is Matt Chivers doing his on Youtube.
Most videos show only 3 springs being needed, but in typical Robsey style, all six clutch plate location pins required an anti-rattle spring.
But it was worth the effort.
In neutral, the lathe was amazingly quiet.
Even Troy was pleasantly surprised.
---------------------
With that done, I moved onto fabricating an inner sill repair panel.
I do like the fabrication work, although it does take a bit of time to achieve a shape I am satisfied with.
A very silly shape that lines up with the curved outer sill to the right. Joggles back, then has an angular taper to meet the section you see with the round holes.
And then a bend across the bottom to line up with the flat vertical edge.
Here you go - tonight's efforts.
It should be possible to tweak the panel as it is tacked into place.
My welding isn't that good yet, so you can guess who will be doing that bit.
Re: Robsey's Thread of Random Ramblings.
It was meant to be a night that I work on the MX5, but instead I chose to fit the dash in the van.
Not properly wired up to the van loom as a lot of the van is still not wired up. Too many exposed terminals.
So wired to my trusty power supply.
I used the outer bezel to tidy the edges, and to retain the front panel.
It is a perfect cluster for the van as it has excellent clearance from the brake master cylinder and fluid reservoir.
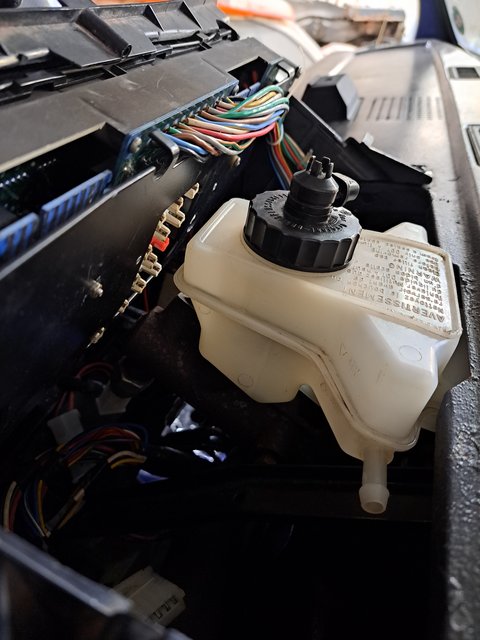
And here is the dash mounted, viewed from the front.
Test Mode
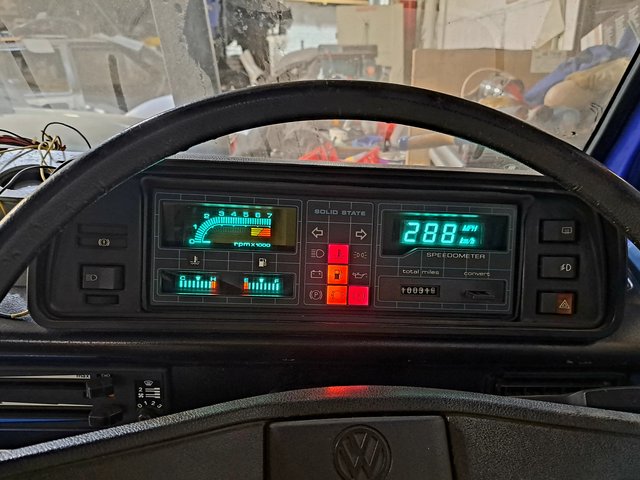
At Rest.
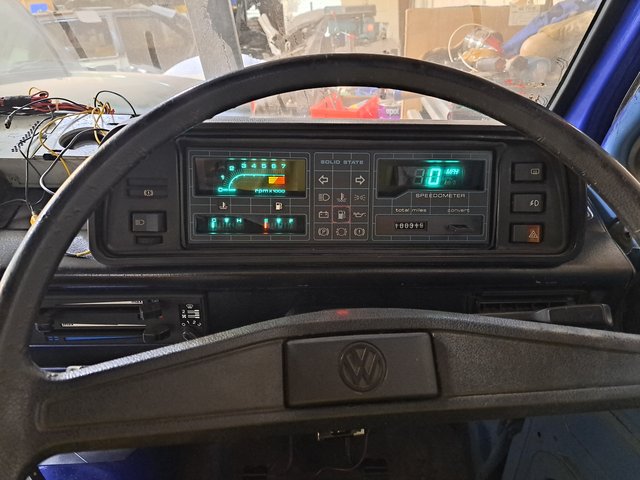
Doesn't look too shoddy, if you ask me.
The only bummer was my hazard switch.
It decided to decapitate itself when I was trying to disconnect the loom plug whilst removing my analogue dash cluster.
Not properly wired up to the van loom as a lot of the van is still not wired up. Too many exposed terminals.
So wired to my trusty power supply.
I used the outer bezel to tidy the edges, and to retain the front panel.
It is a perfect cluster for the van as it has excellent clearance from the brake master cylinder and fluid reservoir.
And here is the dash mounted, viewed from the front.
Test Mode
At Rest.
Doesn't look too shoddy, if you ask me.
The only bummer was my hazard switch.
It decided to decapitate itself when I was trying to disconnect the loom plug whilst removing my analogue dash cluster.
Re: Robsey's Thread of Random Ramblings.
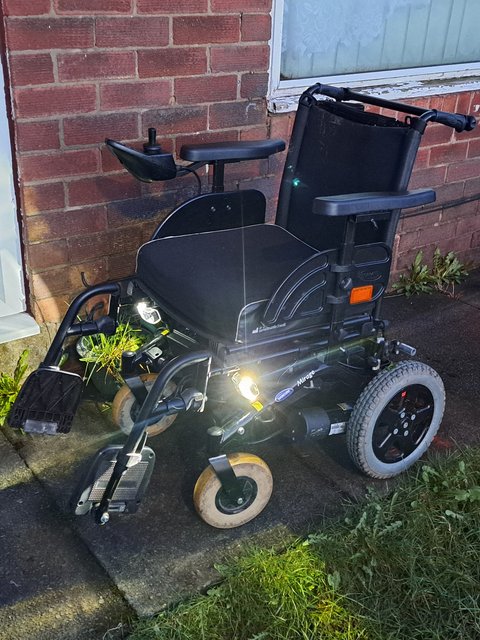
My current "Random" project is to fit lights to the wife's powered wheelchair.
Her chair is an NHS specification Mirage.
Now long since obsolete, but quite reliable and easy to manage.
It helps being the technical lead at the regional wheelchair service.
On one of our returned units, a patient had paid extra for lights... we cannot pass these on as they are not NHS spec. And the previous owner now had a non-compatible fancy-pants wheelchair.
So as such, the lights would be scrapped.
I don't like wasting stuff, so felt compelled to find a use and a home for them.
As with all Robsey projects, there are always a few niggles.
A wheelchair runs at 24 volts.
Strangely most manufacturers fit 12 volt led light units.
So niggle one - convert from 24 volts to 12 volts.
The rough-arse way is to bang in a voltage divider circuit.
Niggle two - indicators and lights are controlled by a joystick control panel.
This would require fitting an upgraded joystick module and power module. Silly money, even on an obsolete set-up.
Indicators need to be manually switched on and off on the control pad... who would be bothered to do that?
So I came up with a very simple solution.
Just like the central locking motor in a car door works by reversing the polarity in the wires to the motor,
The drive motors on the wheelchair have their supply voltage reversed to make the chair turn or back up.
Left motor reverses to turn left.
Right motor reverses to turn right.
Both motors reverse to back-up.
Can you see my simplified logic yet?
Here is my diagram of the circuits.

Amazingly, as simple as my theory was, it actually works.
A test run found the indicators to flash when turning.
And you get hazard lights when reversing.
I had a voltage converter go pop, but I think that was me being clumsy.
New one on the way, and then I can finalise and fit the wiring, enclosure and switch.
Her chair is an NHS specification Mirage.
Now long since obsolete, but quite reliable and easy to manage.
It helps being the technical lead at the regional wheelchair service.
On one of our returned units, a patient had paid extra for lights... we cannot pass these on as they are not NHS spec. And the previous owner now had a non-compatible fancy-pants wheelchair.
So as such, the lights would be scrapped.
I don't like wasting stuff, so felt compelled to find a use and a home for them.
As with all Robsey projects, there are always a few niggles.
A wheelchair runs at 24 volts.
Strangely most manufacturers fit 12 volt led light units.
So niggle one - convert from 24 volts to 12 volts.
The rough-arse way is to bang in a voltage divider circuit.
Niggle two - indicators and lights are controlled by a joystick control panel.
This would require fitting an upgraded joystick module and power module. Silly money, even on an obsolete set-up.
Indicators need to be manually switched on and off on the control pad... who would be bothered to do that?
So I came up with a very simple solution.
Just like the central locking motor in a car door works by reversing the polarity in the wires to the motor,
The drive motors on the wheelchair have their supply voltage reversed to make the chair turn or back up.
Left motor reverses to turn left.
Right motor reverses to turn right.
Both motors reverse to back-up.
Can you see my simplified logic yet?
Here is my diagram of the circuits.
Amazingly, as simple as my theory was, it actually works.
A test run found the indicators to flash when turning.
And you get hazard lights when reversing.
I had a voltage converter go pop, but I think that was me being clumsy.
New one on the way, and then I can finalise and fit the wiring, enclosure and switch.
Re: Robsey's Thread of Random Ramblings.
I should have explained...
Because of the way the circuits work, each requires it's own 24 volt feed.
1 - left indicators - Plus 24 volts when left motor reverses.
2 - Battery Live - Always plus 24 volts. For head and tail lamps.
3 - right indicators - Plus 24 volts when right motor reverses.
Each circuit requires it's own step-down voltage converter.
And each indicator circuit has a two-wire motorcycle flasher module.
As you can see, they all share the same negative rail, and so this is the ideal place to fit the on / off switch.
My usual simple "building block" style of project making can be quite bulky, but effective.
A bit like my posts - lol
-
Envoy CDX

- Club Admin
- Posts: 9681
- Joined: Sun Sep 23, 2007 3:51 pm
- Location: Jarrow, Newcastle Upon Tyne
Re: Robsey's Thread of Random Ramblings.
My brain isn't following it but glad it works.
Re: Robsey's Thread of Random Ramblings.
Ah okay...
On the three voltage converters...with the transistor symbol.
The reds are +24 volts.
The browns are the 24volt circuit return.
The yellows are +12 volts
The blacks are the 12 volt circuit returns.
I colour coded the lighting wires to match VW and Vauxhall colour schemes.
Black / White = left indicator.
Grey / Red = side and tail lights.
Black / Green = right indicator.
I will try to get some pictures up of the electrical enclosure and the lights working by next weekend.
-
Envoy CDX
- Club Admin
- Posts: 9681
- Joined: Sun Sep 23, 2007 3:51 pm
- Location: Jarrow, Newcastle Upon Tyne
Re: Robsey's Thread of Random Ramblings.
Ah, kool beans.
Re: Robsey's Thread of Random Ramblings.
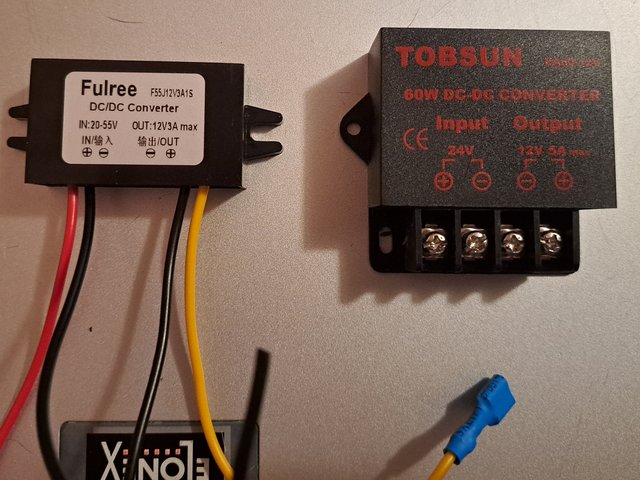
The third DC to DC voltage converter has arrived.
The new one is the one on the right.
Here is everything sat inside the VW van junction box.
2 x flasher units
3 x Voltage converters.
It is a big box, so I am quite surprised at the lack of space. About 6 x 5 x 3 inches (15 x 12.5 x 7.5cm).
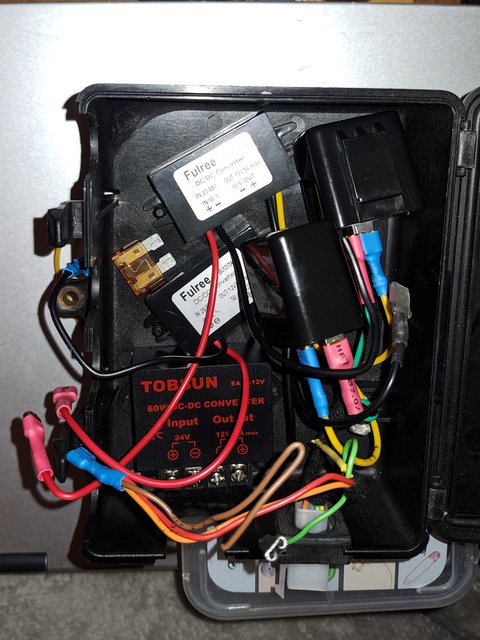
Just need to tidy it all up and make up the necessary power connections.
Easy enough to do, just time consuming.
By the way - that is heat-shrink tubing. Not them horrible hard plastic crimp-through covers that they like us to use.
Nope not for me - crimp the wires, then solder with proper old solder, and then heat-shrink sleeved.
I have already soldered my main battery (24 volt) positive and negative wires inside the main Anderson connector.
I don't like the idea of wires coming loose.
The new one is the one on the right.
Here is everything sat inside the VW van junction box.
2 x flasher units
3 x Voltage converters.
It is a big box, so I am quite surprised at the lack of space. About 6 x 5 x 3 inches (15 x 12.5 x 7.5cm).
Just need to tidy it all up and make up the necessary power connections.
Easy enough to do, just time consuming.
By the way - that is heat-shrink tubing. Not them horrible hard plastic crimp-through covers that they like us to use.
Nope not for me - crimp the wires, then solder with proper old solder, and then heat-shrink sleeved.
I have already soldered my main battery (24 volt) positive and negative wires inside the main Anderson connector.
I don't like the idea of wires coming loose.
Re: Robsey's Thread of Random Ramblings.
I have almost finished up the external looms for the chair.
There are three looms.
1 - External voltage supplies.
Battery +24 volts.
Battery - (ground rail)
Reverse Motor +24 volt inputs (2 off).
2 - External lights
This was wired up and fitted last week.
3 - Control Switch.
This still needs looming up and fitting to the frame out of the way.
Big job tomorrow is to wire up the voltage converters and the flasher units and a fuse of course.
And then mount the box of magic to the frame.
Hopefully post up some new pics and / or videos over the next few days...
Re: Robsey's Thread of Random Ramblings.
All wired up and working. 
Although I had got it wrong at first.
I wired up the switch loop wrong.
I noticed at 1am this morning, that I had wired it up so that the lights were on permanently.
I sussed it and rewired before going to bed 20 minutes later.
When I got up, I checked it all again, then tidied and loom-taped it all ready for fitting.
It is temporarily cable-tied in place for now.
--------------------
I am taking the chair to work tomorrow.
To secure all the converters and flasher relays in place - Velcro strips should do it. It was good enough for the Space Shuttles - lol.
Although there is no movement in the box due to it all being packed in snugly.
And to secure the control box in place.
I need to fit a longer m4 bolt, and a p-clip for the win.
Then I will take a few promo photos and pics.
We all know, "no pictures means it never happened"
Re: Robsey's Thread of Random Ramblings.
Beats me how you can play around with your projects so late at night. Must be a sign that I'm getting old, lol. If I'm not in bed by 11pm I'm no good for anything the next day.
Re: Robsey's Thread of Random Ramblings.
I am sure that I am the oldest git in the village.
(Mid-fifties - closer to 60 in two weeks).
So we cannot blame age - lol.
My brain is at it's most lucid late at night.
From about the time you go to bed.
Even after a full day at work, and two hours commuting.
Besides, once I start a project, I try to keep going until I mess up or finish the job in hand.
Because projects are fun, they are not tiring.
Just exercise for the old grey cells.
I am usually okay with 6 hrs sleep each night.
If I get the recommended 8 or more hrs, I turn into a zombie.
So I try not to stay in bed too long.
Re: Robsey's Thread of Random Ramblings.
Better late than never, but the wheelchair hasn't been used until tonight.
So it's first use of the lights 'in service' so to speak.
It behaved perfectly which is amazing.

We are out again on Sunday, so hopefully get some auto-indicator action.
So it's first use of the lights 'in service' so to speak.
It behaved perfectly which is amazing.
We are out again on Sunday, so hopefully get some auto-indicator action.