Page 1 of 1
Dashboard clock won't light up.
Posted: Wed Dec 02, 2015 9:13 pm
by Lowrider Dave
On my L spec automatic, where the digital clock/temperature display normally is, I have a manually adjustable clock. I noticed it doesn't light up at night so took it out and looked at the back where there is a bulb in a holder and a grey/green supply wire going to it.
Current bulb looks fine but replaced it anyway and found that this doesn't light either. It strikes me as odd that I only have one wire going to the bulb - surely I need an earth? Even though I can't see where it would attach to.
Any thoughts please people?
Re: Dashboard clock won't light up.
Posted: Wed Dec 02, 2015 9:46 pm
by Cavalier342
I think it feeds back to the main loom for an earth, check the brass contacts meet properly, where the bulb sits in the clock unit. Got a voltage tester?
Re: Dashboard clock won't light up.
Posted: Wed Dec 02, 2015 11:47 pm
by Robsey
Agreed - the ground side of the bulb is via the circuit board.
So you may be looking at the illumination feed.
Hmmm - trying to think ......... it is fuse 9.
Does the number plate light work.?
If it does not, then it is fuse 9.
Which is also for dash panel illumination.
I would expect the speedo cluster not to light up either though if it is a general supply issue.
Failing that, try a temporary wire link from the grey wire on the cigarette lighter socket to the grey wire on the clock bulb connector.
If it still does not work, then it is a fault with the bulb, it's holder or clock unit.
if it does now work, make up a more permanent feed wire.
Also -you cannot always assume that a new bulb is not faulty...
New bulbs can indeed be faulty.
Re: Dashboard clock won't light up.
Posted: Thu Dec 03, 2015 1:17 pm
by Lowrider Dave
All good points Robsey - thanks.
The dash clocks etc light up (but the heater section doesn't - may be a usual blown bulb but haven't ripped the dash apart to check yet)
Will check the number plate light, fuse 9 (I'm sure it is too) and a temporary wire test. Out of all my spare bulbs and holders, I don't have one of these but plenty of 1.2 bulbs to check with!
I did note the holder rotated rather too easily when placed back in its hole, perhaps as Andrei suggests the circuitboard contact side of things is not right?
I will investigate...!
Re: Dashboard clock won't light up.
Posted: Thu Dec 03, 2015 1:34 pm
by Cavalier342
Ye, it should sort of push-fit into place, shouldn't be able to twist around too easy.
Re: Dashboard clock won't light up.
Posted: Fri Feb 02, 2018 6:51 pm
by mo_ayman
I have a question.
you mentioned a "grey/green supply wire".
I am facing the same problem and when I removed the clock unit I found that there is only a single wire 10 pin or something that clips into the clock unit which to me looks like a logical board connector rather than a bulb connector. I didn't see gray/green. Is there another wire that goes directly to the bulb itself??
Re: Dashboard clock won't light up.
Posted: Fri Feb 02, 2018 9:58 pm
by Robsey
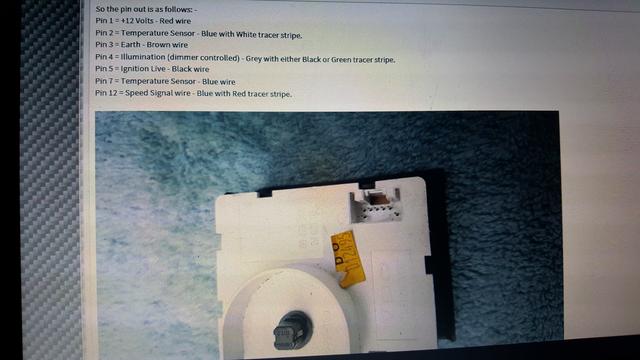
If you have a twelve pin connector,
Then you have a dual info display.
Looks like you are after pin 4.
Re: Dashboard clock won't light up.
Posted: Fri Feb 02, 2018 10:47 pm
by mo_ayman
awesome info!
So um, What can be wrong with it? and how is it actuated?
I thought that the clock module itself switches the bulb on if it is 6pm or more or something along those lines. It now seems like it is actuated by something else. When does the Pin 4 normally work? What triggers it?
Re: Dashboard clock won't light up.
Posted: Fri Feb 02, 2018 10:58 pm
by Robsey
The light switch operates that wire.
It is controlled via the dash dimmer switch.
If you prefer, you can put a separate feed wire to pin 4.
Either from ignition live (black wire) or from a normal light feed. (Grey green wire)
There are circuits available that can use ambient lighting conditions to control the dual info display illumination. (on / off)
Sadly, neither Haynes nor TIS recognise that a dual info display was fitted. So there is no official wiring diagram.
But I would expect the feed to pin 4 (illumination) would have the same start point as the fuel computer illumination.
Just looked in Haynes for fuel computer.
This is the supply route.
From fuse 9 to the dimmer switch.
Light switch pin 1
(Grey Green)
Light switch pin 5 to instrument X21 pin 5
(Grey Black) This is the dimmed output.
There is a junction between the switch pin5 and instrument pin 5.
This goes out to the fuel computer illumination.
Or in your case, dual info display pin 4.
Re: Dashboard clock won't light up.
Posted: Fri Feb 02, 2018 11:16 pm
by mo_ayman
Thanks a lot Robsey.
So um, tomorrow I will be going through putting a RPM cluster along with checking the clock light as well as the heater panel lights. I really with that that post had pictures can you redo it or anything?
viewtopic.php?f=15&t=16126
Re: Dashboard clock won't light up.
Posted: Sat Feb 03, 2018 2:49 am
by Robsey
Images updated via postimages.
For some reason, it took nearly an hour and eight attempts for the next to last picture to upload.

Enjoy.!!
As for input feed - there is nothing wrong with wiring direct to Fuse 9.
I never have my instruments nor board computer set to anything but full brightness.
Re: Dashboard clock won't light up.
Posted: Sat Feb 03, 2018 11:50 pm
by mo_ayman
I have got the clock light to work as well as the glovebox one. Yay!
I though kept myself from taking the heater panel off as I had no vision whatsoever of the cables connected to it.
Thanks for updating the pictures it will definitely be useful when I attempt to do the heater panel.
I now am facing other issues. :/ Post incoming!
Re: Dashboard clock won't light up.
Posted: Sun Feb 04, 2018 12:18 am
by Robsey
The connector plug for the whole heater panel is at the back of the blower motor control switch.
But the bulb holder is half way up and half way across the back of the panel.
It should be easier to see with the glove box and clock removed.
Note that there are two philips No2 screws in the trim behind the clock.
Removing these two screws should be enough to flex the heater panel forward enough to access the single bulb holder.
At least you have some progress.
Hopefully the new issues are easy to resolve.