
This is now a discussion thread about this How 2 Topic.
viewtopic.php?f=70&t=16503&p=166846#p166846
Saloon models.
If you have a boot, then adding the 3rd brake light is a piece of cake, and so if you need a guide for that, you should perhaps look at getting someone else to do it.
See Post #2 for where to wire up to.
So this thread will concentrate on the Hatchback models.
There is an easy, tacky way,
a not so easy, but proper way,
and a damned near impossible way to fit the wiring for a third brake light to your Cavalier.
The easy way
is to run a wire loosely from the nearside rear inner wing, up the d pillar, under the plastic trims of your hatch to the brake light that is mounted centrally above the bottom edge of the tailgate glass.
But this means the feed wire is not buried within the loomage and rubber sleeve as it should be.
So looks unprofessional and leaves the cable at risk to flexing and eventually snapping when you open and close the hatch.
The "damned near impossible" way
is to try and feed a wire through the hatch frame following the existing loom.
Trust me, I tried doing this several times to avoid ripping out the tailgate harness.
But in my opinion, it cannot be done.
So - here is the only proper way to add the wiring.
Warning it is long, slow and tedious, due to the amount of dismantling and refitting of trims,
Plus the hassle of pulling out, modifying and refitting of the tailgate loom.
Adding a 3rd brake light to a Hatchback.
Moderator: Robsey
Re: Adding a 3rd brake light to a Hatchback.
Firstly the wiring diagram..
It is two wires, so no diagram needed.
Wire 1 -
Brake light feed wire.
Officially a black wire with yellow stripe.
If you have the official GM retrofit kit, both supply and return wires are black.
If you are fortunate enough to have a trailer loom connector just inside the load area - approx mid-way across, inside the rear panel, covered by the plastic boot trim, then you do not need to 'splice' into the wiring. Just crimp / solder on a suitable connector pin and plug it in.
You simply connect to the black wire with yellow stripe in the X45 connector.
For everyone else, you will need to splice into a black wire with yellow stripe from either one of your rear light clusters.
Wire 2 -
The earth return / chassis wire.
This simply needs to be connected to any earth tag in the tailgate. There are at least two of these earth tag points on most vehicles.
That is it two wires
Re: Adding a 3rd brake light to a Hatchback.
The first thing to do is open the rear hatch / tail-gate.
Undo the torx screws holding the hatch internal cover to the tail-gate.
The screws are undone with a torx T25 screwdriver or torx profiled allen key type tool.
I had to undo one screw from the off side hatch trim.
And remove all the torx screws, the parcel-shelf strap-hanger bobbin and the plastic trim panel from the nearside hatch frame.
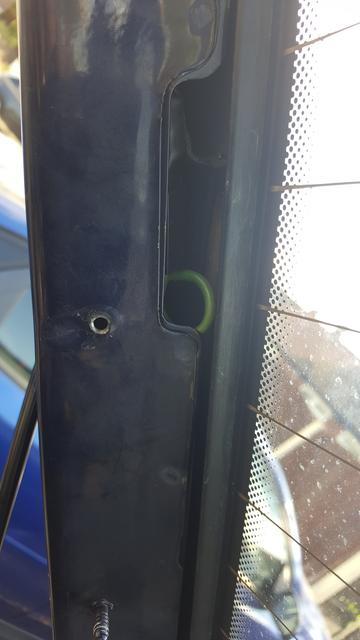
This now exposes where the heated rear window demister connection is.
This is a snug fitting female spade connector.
Carefully un-plug this and tape a strong thin chord or wire to the plug.
I had to press my courtesy light switch pin in to allow the trim panel to fall away from the tail-gate.
You will now be able to see all the tail-gate interior.
There are three connectors to unplug.
1 - for the wiper motor
2 - for the hatch central locking
3 - a female spade connector for the courtesy light switch (it may be easier to undo the No2 philips screw to allow you to get at the connector. I refitted my switch to save losing it.
There is at least one earth tag screwed to the panel, again using a No2 philips screw.
Tape a piece of strong thin chord or wire to one of the main plugs on the loom.
Now that all the plugs etc are disconnected, it will be possible to pull the loom out of the hatch.
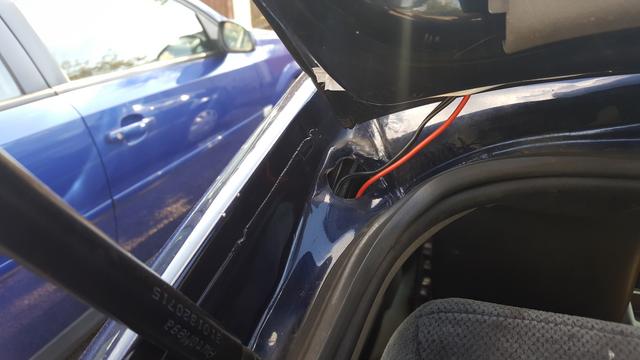
Pull the elephant's trunk / corrugated rubber hose from the top of the tail-gate.
Then gently ease the loom out of the hatch frame. A combination of pulling from the hole where the cable leaves the hatch, and pushing the loom gently on it's way up the side of the hatch frame.
Note that the heated rear window connector has to be fed through a 1/2" (13mm) approx hole before it can be drawn out.
The two chords that you attached will need to be long enough to follow the routes taken by the loom on it's removal.
Then tied in place ready for refitting later.
That is the hatch part done.
Now for the rear inner wing.
Undo the torx screws holding the hatch internal cover to the tail-gate.
The screws are undone with a torx T25 screwdriver or torx profiled allen key type tool.
I had to undo one screw from the off side hatch trim.
And remove all the torx screws, the parcel-shelf strap-hanger bobbin and the plastic trim panel from the nearside hatch frame.
This now exposes where the heated rear window demister connection is.
This is a snug fitting female spade connector.
Carefully un-plug this and tape a strong thin chord or wire to the plug.
I had to press my courtesy light switch pin in to allow the trim panel to fall away from the tail-gate.
You will now be able to see all the tail-gate interior.
There are three connectors to unplug.
1 - for the wiper motor
2 - for the hatch central locking
3 - a female spade connector for the courtesy light switch (it may be easier to undo the No2 philips screw to allow you to get at the connector. I refitted my switch to save losing it.
There is at least one earth tag screwed to the panel, again using a No2 philips screw.
Tape a piece of strong thin chord or wire to one of the main plugs on the loom.
Now that all the plugs etc are disconnected, it will be possible to pull the loom out of the hatch.
Pull the elephant's trunk / corrugated rubber hose from the top of the tail-gate.
Then gently ease the loom out of the hatch frame. A combination of pulling from the hole where the cable leaves the hatch, and pushing the loom gently on it's way up the side of the hatch frame.
Note that the heated rear window connector has to be fed through a 1/2" (13mm) approx hole before it can be drawn out.
The two chords that you attached will need to be long enough to follow the routes taken by the loom on it's removal.
Then tied in place ready for refitting later.
That is the hatch part done.
Now for the rear inner wing.
Re: Adding a 3rd brake light to a Hatchback.
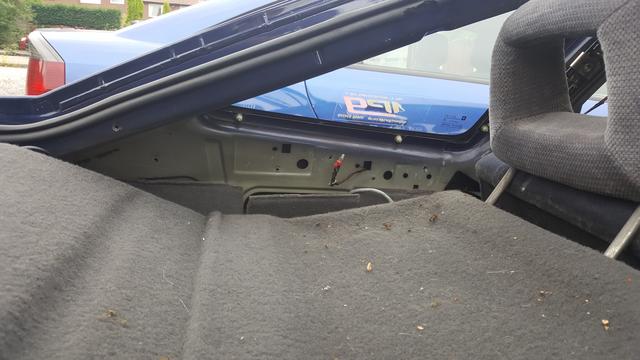
First clear the load area enough to give full access to the nearside cover panel and the rear plastic panel.
It goes without saying that you need to undo the many T25 torx screws that hold the speaker shelf / rear quarter / 'D' pillar covering trim.
Also peel away the rear hatch rubber seal from the nearside hinge, all down the near side, and down across the bottom of the hatch lip.
Pull away the nearside light cluster cover and remove the nearside inner wing cover.
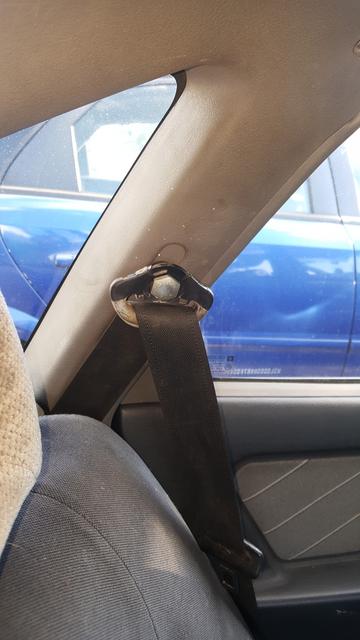
To remove the rear quarter cover, you will also need a 21mm spanner or socket to remove the upper seat belt mount. Access by popping off the plastic cap.
Don't forget to unplug your rear speaker!!
Now that all the trims are off, you will need to unplug two connectors.
1 - round connector for the heated rear window and courtesy light.
2 - a small square plug for the central locking.
Plus one small earth tag held onto the wing by a No2 philips self tapping screw.
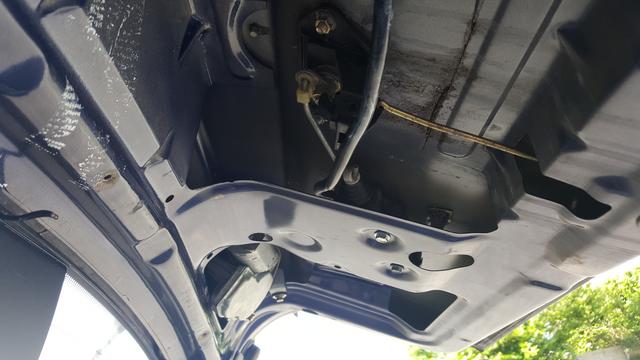
Time to remove the loom.
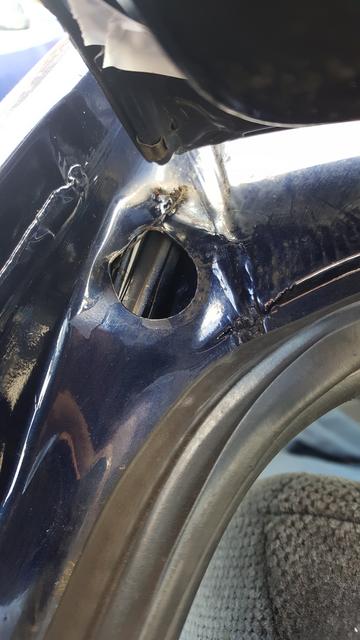
Pull the flange of the corrugated rubber hose from the d pillar.
Carefully ease the loom up the d pillar, whilst drawing out the loom through the big hole.
You will find that the sunroof rear drain hose also runs down the d pillar, so you will need to ease the hose gently to one side whilst you pull the plugs out through the hole.
That is it.
The whole loom is now out.
Now is a good time to look for damage to the insulation or snapped wires.
I had to repair six of the ten wires and add the wire for the 3rd brake light.
Remember this from my WIP?

I unwrapped most of my pvc looming tape before adding the brake light wire
If you are being pedantic, you should use a black wire with a yellow stripe.
But it is up to you -
You could used one of the black twin cores from the brake light kit, or a wire of your colour choice, as long as it is of a decent thickness for the job.
0.75mm or similar should do the trick.
Then I re-wrapped / loomed up the whole cable with Tesa fabric looming tape.
It goes without saying that you need to undo the many T25 torx screws that hold the speaker shelf / rear quarter / 'D' pillar covering trim.
Also peel away the rear hatch rubber seal from the nearside hinge, all down the near side, and down across the bottom of the hatch lip.
Pull away the nearside light cluster cover and remove the nearside inner wing cover.
To remove the rear quarter cover, you will also need a 21mm spanner or socket to remove the upper seat belt mount. Access by popping off the plastic cap.
Don't forget to unplug your rear speaker!!
Now that all the trims are off, you will need to unplug two connectors.
1 - round connector for the heated rear window and courtesy light.
2 - a small square plug for the central locking.
Plus one small earth tag held onto the wing by a No2 philips self tapping screw.
Time to remove the loom.
Pull the flange of the corrugated rubber hose from the d pillar.
Carefully ease the loom up the d pillar, whilst drawing out the loom through the big hole.
You will find that the sunroof rear drain hose also runs down the d pillar, so you will need to ease the hose gently to one side whilst you pull the plugs out through the hole.
That is it.
The whole loom is now out.
Now is a good time to look for damage to the insulation or snapped wires.
I had to repair six of the ten wires and add the wire for the 3rd brake light.
Remember this from my WIP?
I unwrapped most of my pvc looming tape before adding the brake light wire
If you are being pedantic, you should use a black wire with a yellow stripe.
But it is up to you -
You could used one of the black twin cores from the brake light kit, or a wire of your colour choice, as long as it is of a decent thickness for the job.
0.75mm or similar should do the trick.
Then I re-wrapped / loomed up the whole cable with Tesa fabric looming tape.
Re: Adding a 3rd brake light to a Hatchback.
Next phase is to refit the whole loom back into the d pillar and into the hatch using a reversal of the process for getting the loom out.
General gist is...
Tie or tape the draw chords to the two tail-gate connectors that you attached to before.
Be sure the draw chords are secure.
Then pull the chords carefully to draw the wires back into place.
The heated rear window plug will need teasing through the 1/2" access hole.
Once the hatch wires are pulled through, connect everything back up.
Cable tie / Zip tie your cable runs to the hatch to minimise vibration rattles.
Do the same procedure for the d pillar section of the loom.
Again - reconnect the plugs and secure everything in place.
That just leaves connecting up the feed wire.
Remove the rear plastic cover to see if you have the X45 connector, just above the centre line of the rear bumper.
I don't have this plug, so will have to link into one of the rear light clusters.
When that is all done, refit all your trims, seat belt upper mount and the hatch frame rubber seal.
Job done.
Test your work.
Re: Adding a 3rd brake light to a Hatchback.
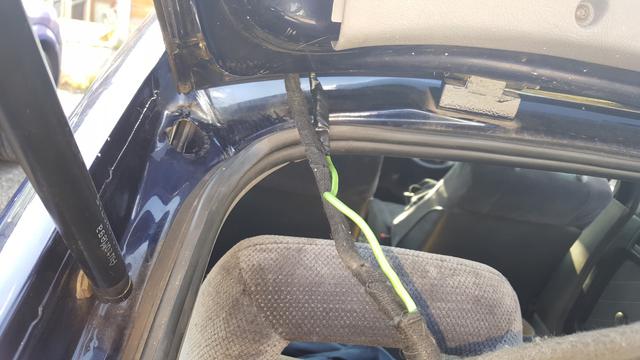
The loom is now re-inserted into the hatch using the 'draw string' method.
Amazingly the hatch was easy to do.
Even the fat green wire for the rear window demister.
The hatch wiring is all connected up,
Cable tied (zip tied) into place

Just the brake light itself to finish wiring in.
The troublesome bit was / is feeding the loom down the 'd' pillar.
A total pain due to having an inaccessible channel to feed the loom down,
And the sunroof drainage pipework.
I think my round connector has kinked over and jammed halfway down.
So I will pull that part back out tomorrow or Sunday, and then re-feed it all back down again.
Hopefully connect up the last three wire ends on Sunday too.
Amazingly the hatch was easy to do.
Even the fat green wire for the rear window demister.
The hatch wiring is all connected up,
Cable tied (zip tied) into place
Just the brake light itself to finish wiring in.
The troublesome bit was / is feeding the loom down the 'd' pillar.
A total pain due to having an inaccessible channel to feed the loom down,
And the sunroof drainage pipework.
I think my round connector has kinked over and jammed halfway down.
So I will pull that part back out tomorrow or Sunday, and then re-feed it all back down again.
Hopefully connect up the last three wire ends on Sunday too.
-
ilovedmymantas
- Registered user
- Posts: 1202
- Joined: Sat Jan 12, 2013 2:54 am
Re: Adding a 3rd brake light to a Hatchback.
Excellent write-up as usual Robsey. You're setting a high bar there 
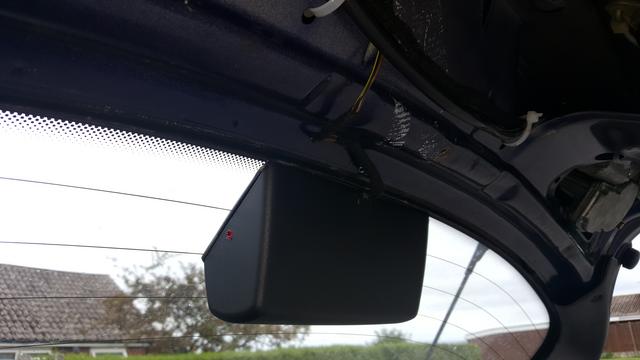
Very helpful, I'm eventually going to fit my number plate surround with camera. Don't know if I want reversing or rear-view yet but this looks like the way to go.
Very helpful, I'm eventually going to fit my number plate surround with camera. Don't know if I want reversing or rear-view yet but this looks like the way to go.
" It's not rust. It's age-related patina " 
1980 vauxhall cavalier MK1 1.6L, 1982 opel manta berlinetta 1.8s, 1985 opel manta 2.0 gte, 1990 cavalier 2.0 gl ,1994 cavalier sri x20xev
-1995 cdx x20xev
---------------
Matt
1980 vauxhall cavalier MK1 1.6L, 1982 opel manta berlinetta 1.8s, 1985 opel manta 2.0 gte, 1990 cavalier 2.0 gl ,1994 cavalier sri x20xev
-1995 cdx x20xev
---------------
Matt
Re: Adding a 3rd brake light to a Hatchback.
If you wish to add ANY additional wiring to the rear hatch, it is the ONLY way to do it.
Unless you want a rough and ready solution that is...
Of course, I do not recommend doing anything half-arsed.
Do it right, do it once to last.
As said the hard bit is potentially refitting the loom down the D pillar due to the presence of the sun-roof drainage hose.
Unless you want a rough and ready solution that is...
Of course, I do not recommend doing anything half-arsed.
Do it right, do it once to last.
As said the hard bit is potentially refitting the loom down the D pillar due to the presence of the sun-roof drainage hose.
Re: Adding a 3rd brake light to a Hatchback.
Okay - got the loom down the D pillar.
Turns out that there is a hidden lip or something at the bottom of the channel within the pillar.
Not easy manipulating the loom over the lip, out of the bottom of the channel.
It is hidden high up inside the inner wing.
Even had to pull out the electric aerial so that I had enough space to get my hand into the void above it and push the sun-roof drain tube out of the way with two fingers whilst I guided the loom through with my thumb and little finger.
Eventually after a lot of cursing and scratches to my arms, I was able to continue pulling the loom down until I could connect the plugs to the main body loom.
Refitted the electric aerial which had been quite insecure anyway.
Now very secure with two self tappers holding the motor body rigidly into place.
Thank goodness that bit is done with !!
Re: Adding a 3rd brake light to a Hatchback.
No pictures means it didn't happen.
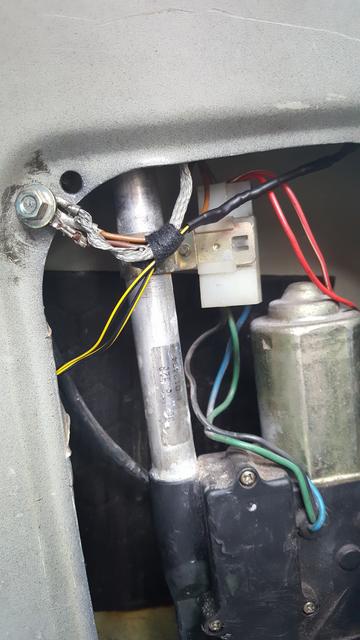
Central Locking Connector (Hatch Solenoid motor).
With freshly wrapped loomage - nice.
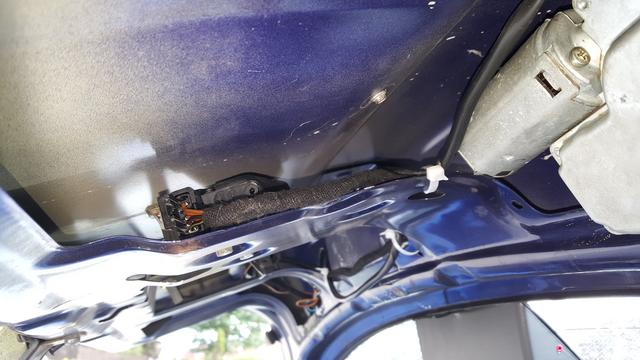
The connector for the Rear Window Wiper Motor.
Just the three tails to wire in and then it is all done and the trims can all go back in.
1 - black / yellow to rear nearside light cluster.
2 - black / yellow (other end) to 3rd brake light.
3 - brown between 3rd brake light and hatch metalwork.
Central Locking Connector (Hatch Solenoid motor).
With freshly wrapped loomage - nice.
The connector for the Rear Window Wiper Motor.
Just the three tails to wire in and then it is all done and the trims can all go back in.
1 - black / yellow to rear nearside light cluster.
2 - black / yellow (other end) to 3rd brake light.
3 - brown between 3rd brake light and hatch metalwork.
Re: Adding a 3rd brake light to a Hatchback.
Wires soldered up for the brake light unit.
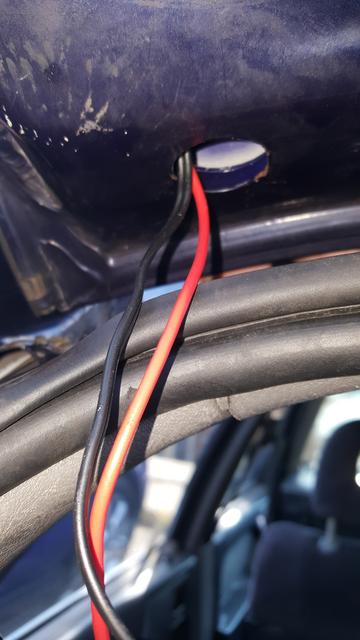
The astute amongst you will see the black twin flex that comes with the retrofit kit, but as soon as the wires exit the light casing they are the correct factory colours.
The light unit without it's cover.
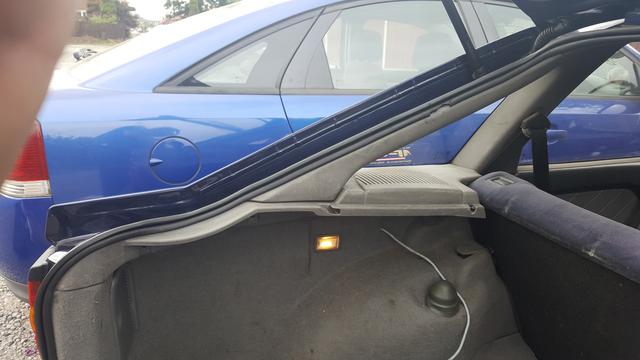
The route of the wiring.
The finished look. Cover fitted.
The hatch is fully open, so the lights point skyward -
only good if being followed by LGVs and aircraft. - tee hee.
The astute amongst you will see the black twin flex that comes with the retrofit kit, but as soon as the wires exit the light casing they are the correct factory colours.
The light unit without it's cover.
The route of the wiring.
The finished look. Cover fitted.
The hatch is fully open, so the lights point skyward -
only good if being followed by LGVs and aircraft. - tee hee.
Re: Adding a 3rd brake light to a Hatchback.
Last three wires were soldered to the car wiring. A bit of a faff getting to the wire I wanted near the light cluster.
All soldered, sleeved and fabric tape wrapped into the loom for tidiness.
Wires reloomed and connected.
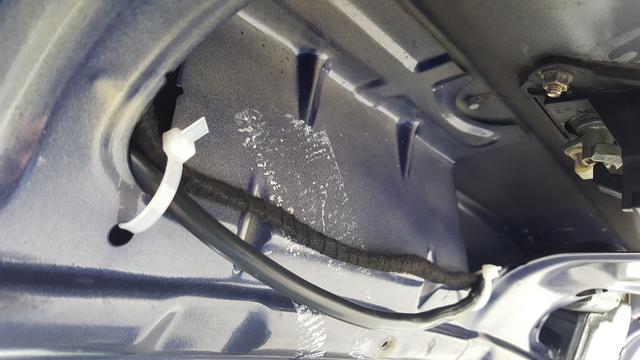
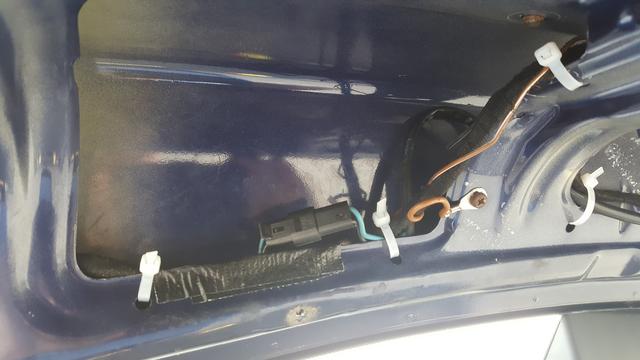
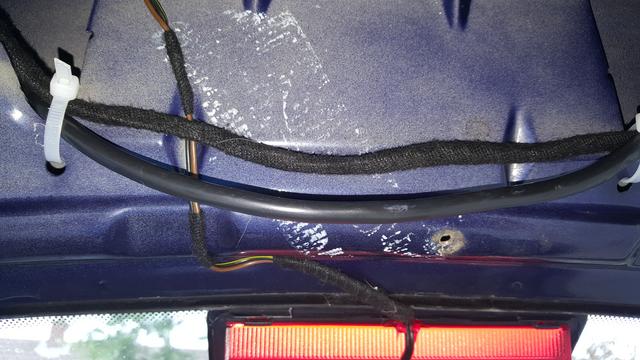
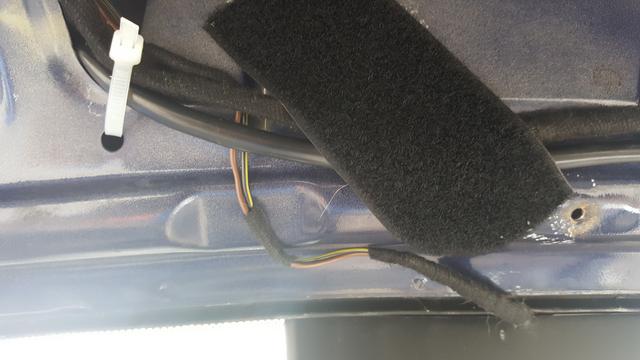
The wiring for the brake light tidied and loomed up to the main loom.
The Velcro wool gives good protection from vibration and sharp panel edges.
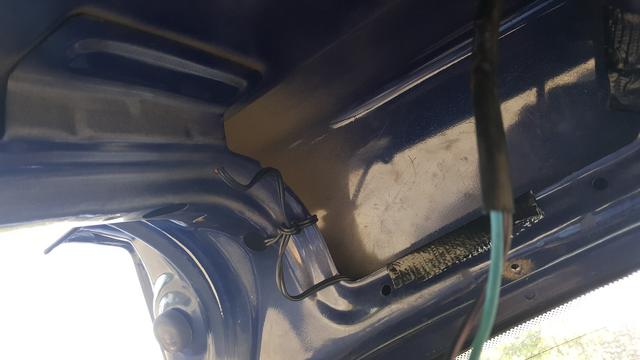
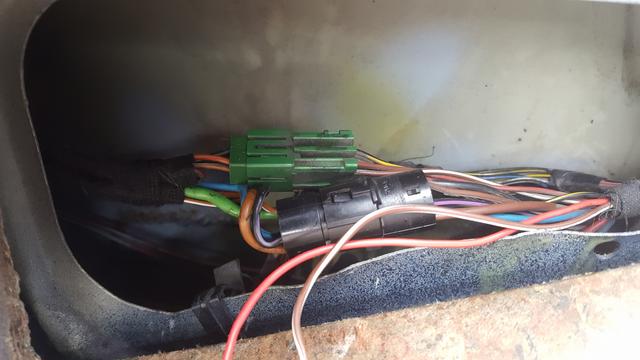
The two main connectors in the wing.
The square green connector and
the black barrel shaped connector.
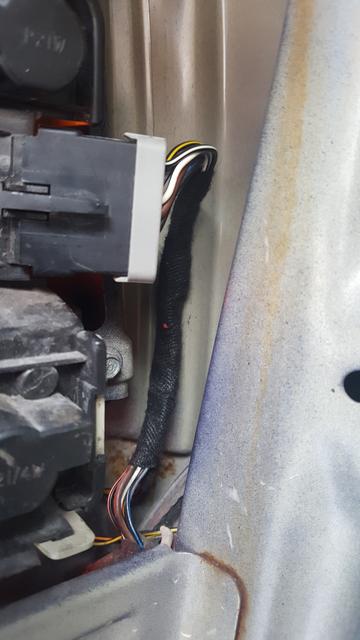
The wiring to the tail light cluster.
You can see two black wires with yellow stripes, because I wasn't sure if a single wire was enough cross section area for the current consumed by the 3rd brake light unit. So I doubled up the wires just to be sure. As it happens, it is from where the loom emerges in the rear quarter to the tail light cluster.
Interior refitted.
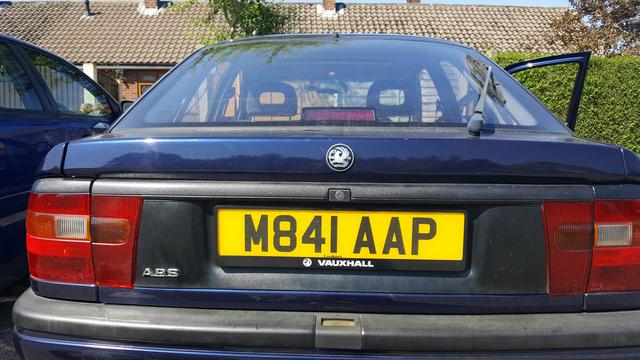
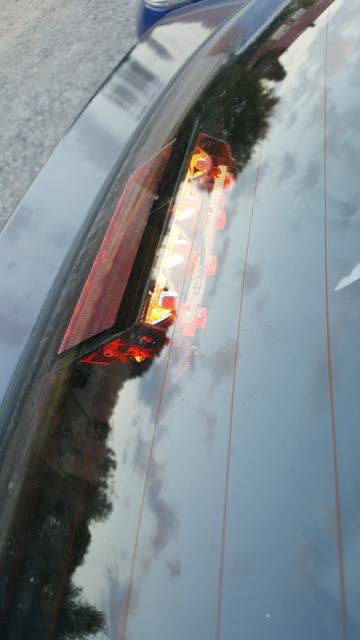
And here you go.
Brake off
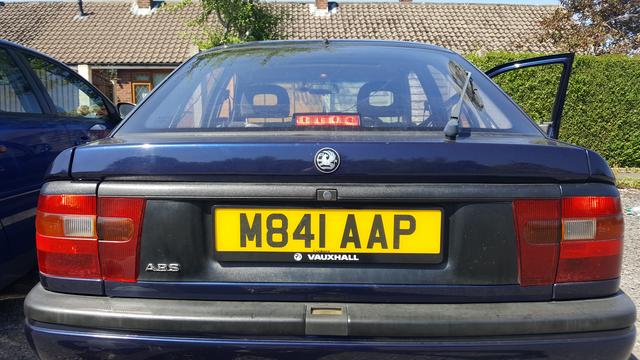
Brake on.
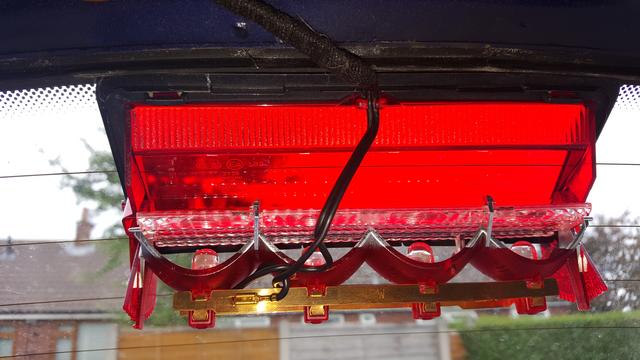
There is a scale on the red plastic lense / bulb holder assembly.
This allows you to set the bulbs and reflector to the preferred angle.
I ended up setting mine as "dipped" as the adjuster scale would allow.
I will have another faff with the angle about 9-ish tonight when it isn't quite so bright and sunny.
All soldered, sleeved and fabric tape wrapped into the loom for tidiness.
Wires reloomed and connected.
The wiring for the brake light tidied and loomed up to the main loom.
The Velcro wool gives good protection from vibration and sharp panel edges.
The two main connectors in the wing.
The square green connector and
the black barrel shaped connector.
The wiring to the tail light cluster.
You can see two black wires with yellow stripes, because I wasn't sure if a single wire was enough cross section area for the current consumed by the 3rd brake light unit. So I doubled up the wires just to be sure. As it happens, it is from where the loom emerges in the rear quarter to the tail light cluster.
Interior refitted.
And here you go.
Brake off
Brake on.
There is a scale on the red plastic lense / bulb holder assembly.
This allows you to set the bulbs and reflector to the preferred angle.
I ended up setting mine as "dipped" as the adjuster scale would allow.
I will have another faff with the angle about 9-ish tonight when it isn't quite so bright and sunny.
Re: Adding a 3rd brake light to a Hatchback.
Looks good, and visible!
One of the first things I fitted to mine (saloon) was a third brake light as I thought the standard lamps didn't seem very bright.
Alan
One of the first things I fitted to mine (saloon) was a third brake light as I thought the standard lamps didn't seem very bright.
Alan
Re: Adding a 3rd brake light to a Hatchback.
Thanks.
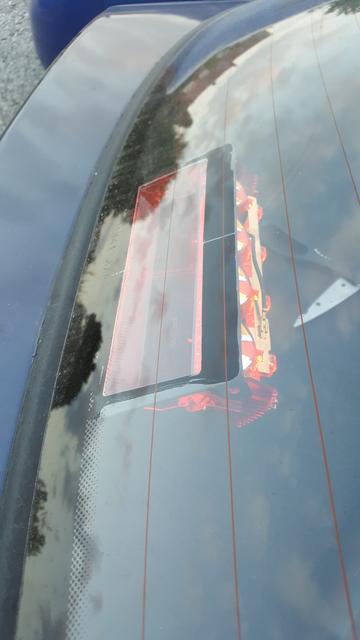
Looks a bit clunky with all the lenses being square, but it does look much brighter than the main tail light clusters.
Changed the bulb carrier angle.
I think the units on the scale go from 1 to 12.
I have moved it from 1 to 5.
(You can just make out the scale with "peg hole" location notches on the bottom right part of the red plastic in the second image).
Both images show the light unit with the black cover removed.
EDIT / UPDATE -
Extra photos added to various posts to give more detail.
Re: Adding a 3rd brake light to a Hatchback.
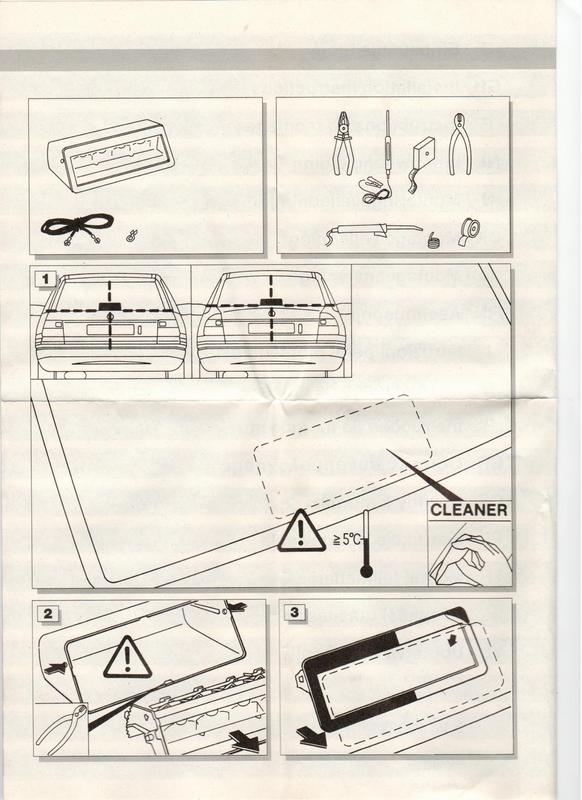
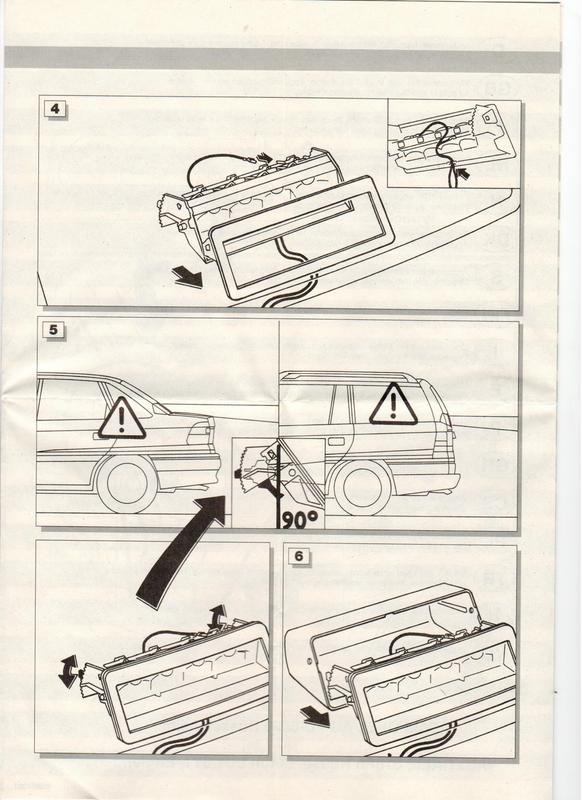
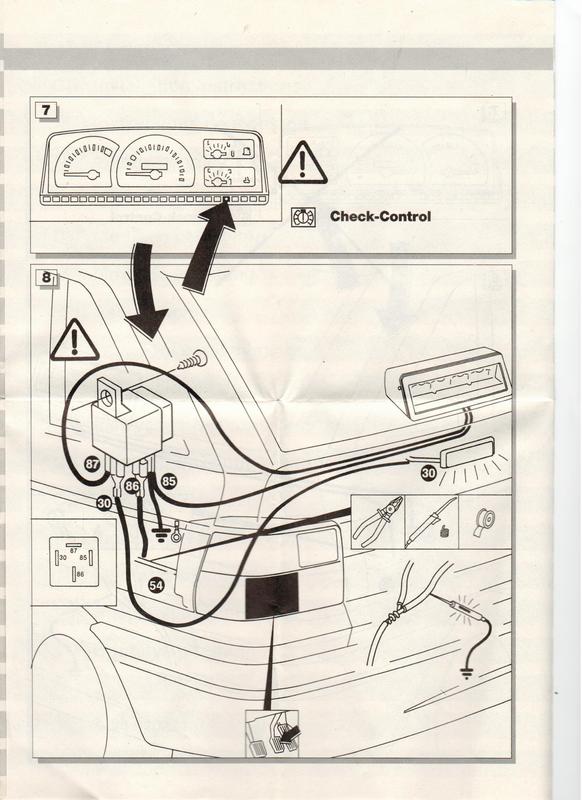
Here are the official GM instruction notes.

Re: Adding a 3rd brake light to a Hatchback.
Where did you get the GM unit from.
Re: Adding a 3rd brake light to a Hatchback.
I got it from Genuine Parts Search.
About 18 months ago.
It just took me forever to wire it up.
Part number is 90513225
It is showing as still available at just over £30.
But do ring up first, as their stock control leaves a lot to be desired.
About 18 months ago.
It just took me forever to wire it up.
Part number is 90513225
It is showing as still available at just over £30.
But do ring up first, as their stock control leaves a lot to be desired.
-
Cavalier342
- Registered user
- Posts: 9818
- Joined: Tue Jul 22, 2008 10:46 pm
- Location: Dorset
Re: Adding a 3rd brake light to a Hatchback.
I remember once adding an extra brakelight to my old auto hatchback, I simply cut down a flexible strip of LEDs to a certain length, fitted them into a makeshift bracket, and I attached it to the rear plastic panel which is at the rear of the headlining, simply ran 2 wires down through the trimwork to the tail light cluster, sqeezed the ends into the correct pins and had an instant LED brakelight. Of course it was totally redneck, credit to you for fitting a genuine bit of kit and doing it properly Robsey. Adds value and extra safety to the car.
Previous:
China Blue 1989 Vauxhall Cavalier L 18SV
Kings Blue 1992 Vauxhall Cavalier LSi Auto C18NZ
Smoke Grey 1994 Vauxhall Cavalier V6 C25XE
Am I a light sleeper or a heavy sleeper? Well that depends on how much I've had to drink...
China Blue 1989 Vauxhall Cavalier L 18SV
Kings Blue 1992 Vauxhall Cavalier LSi Auto C18NZ
Smoke Grey 1994 Vauxhall Cavalier V6 C25XE
Am I a light sleeper or a heavy sleeper? Well that depends on how much I've had to drink...
Re: Adding a 3rd brake light to a Hatchback.
Thanks Andrei,
Redneck is fine as long as it is safe
But then you had a habit of playing very nicely with led ribbons.
Redneck is fine as long as it is safe
But then you had a habit of playing very nicely with led ribbons.
-
Cavalier342
- Registered user
- Posts: 9818
- Joined: Tue Jul 22, 2008 10:46 pm
- Location: Dorset
Re: Adding a 3rd brake light to a Hatchback.
Well having over 500 LEDs in my old car was surely good fun, but as with all things, a fad soon ends, so it was just fun. I like things tidy and original now, maybe I'm getting old, who knows..
Previous:
China Blue 1989 Vauxhall Cavalier L 18SV
Kings Blue 1992 Vauxhall Cavalier LSi Auto C18NZ
Smoke Grey 1994 Vauxhall Cavalier V6 C25XE
Am I a light sleeper or a heavy sleeper? Well that depends on how much I've had to drink...
China Blue 1989 Vauxhall Cavalier L 18SV
Kings Blue 1992 Vauxhall Cavalier LSi Auto C18NZ
Smoke Grey 1994 Vauxhall Cavalier V6 C25XE
Am I a light sleeper or a heavy sleeper? Well that depends on how much I've had to drink...
Re: Adding a 3rd brake light to a Hatchback.
Sounds normal to me.Cavalier342 wrote:I like things tidy and original now, maybe I'm getting old, who knows..
We all go through gadget and gimmick phases.
And then we mature / grow up-
We start acting and thinking like our parents.
Scarey - lol.
How many of us drove around with 4 big Cibie spots on the front bumper or General Lee air horns, Dukes of Hazard style... ?
And perish the thought of those super- crazy sweeping body kits with whopping wheel arches like 1980's shoulder pads.
-
Cavalier342
- Registered user
- Posts: 9818
- Joined: Tue Jul 22, 2008 10:46 pm
- Location: Dorset
Re: Adding a 3rd brake light to a Hatchback.
I've unfortunately not had the General Lee airhorns, but I did have a cheap 12v louspeaker once with a wired remote which enabled different "sounds" to play, everything from a cow to a barking dog and an American style police siren, was good fun back in the day. But I've never had a bodykit
Previous:
China Blue 1989 Vauxhall Cavalier L 18SV
Kings Blue 1992 Vauxhall Cavalier LSi Auto C18NZ
Smoke Grey 1994 Vauxhall Cavalier V6 C25XE
Am I a light sleeper or a heavy sleeper? Well that depends on how much I've had to drink...
China Blue 1989 Vauxhall Cavalier L 18SV
Kings Blue 1992 Vauxhall Cavalier LSi Auto C18NZ
Smoke Grey 1994 Vauxhall Cavalier V6 C25XE
Am I a light sleeper or a heavy sleeper? Well that depends on how much I've had to drink...
-
ilovedmymantas
- Registered user
- Posts: 1202
- Joined: Sat Jan 12, 2013 2:54 am
Re: Adding a 3rd brake light to a Hatchback.
I'm still at the flux stage. I don't know from one month to the next whether I want original or mixedRobsey wrote:Cavalier342 wrote:I like things tidy and original now, maybe I'm getting old, who knows..Robsey wrote:Sounds normal to me.
We all go through gadget and gimmick phases...
How many of us drove around with 4 big Cibie spots on the front bumper ... ?
I didn't have cibies but I would have if I could have afforded them.
Years ago I was on a quiet straight country road that only dipped occasionally. The oncoming car was dazzling me from the distance so I flashed him. Turns out it was a pickup with a set of spots .
I was so impressed when he flashed his high beam. I'm surprised I didn't get arc eye!
That sparked my interest so I bought what I could afford, a rectangular ring driving light kit with wiring, relay etc. Best buy ever!
They were fitted to my first manta and it was night & day! It did help the age of the car allowed 100/130 w bulbs for headlights, considered off-road now
I used to tow a caravan all-season and having that amount of light made it so much easier to spot hazards and slow down from further away, mainly deer in my case.
It didn't hurt that on twisting roads I could forewarn an oncoming driver from a greater distance - and if they chose to ignore it close up.....lesson learned
I've been poring over the GM instruction notes, although very generic, they take me back to my airfix modelling days many moons ago
In my efforts to learn I have a couple of questions;
Does your car not have the brake check/control light wired or is the relay unnecessary?
" It's not rust. It's age-related patina "
1980 vauxhall cavalier MK1 1.6L, 1982 opel manta berlinetta 1.8s, 1985 opel manta 2.0 gte, 1990 cavalier 2.0 gl ,1994 cavalier sri x20xev
-1995 cdx x20xev
---------------
Matt
1980 vauxhall cavalier MK1 1.6L, 1982 opel manta berlinetta 1.8s, 1985 opel manta 2.0 gte, 1990 cavalier 2.0 gl ,1994 cavalier sri x20xev
-1995 cdx x20xev
---------------
Matt
Re: Adding a 3rd brake light to a Hatchback.
In it's original, standard 1994 LSi condition, my car never had the check control wiring installed.
Just to be really awkward, I have had an Astra Mk2 digital dash fitted for about ten years now.
On such cars, it was necessary to add a supplementary warning display pod for check control functions.
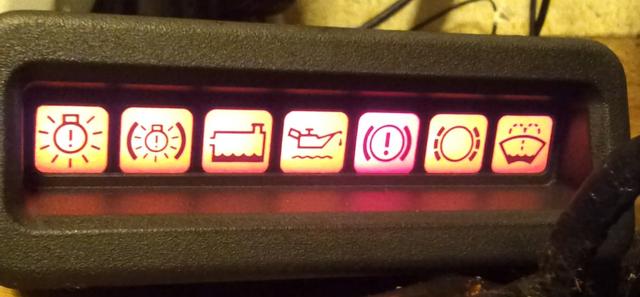
I do have one of each of these supplementary displays in my box of spare parts,
One with 6 images and one with 7 images...
along with a Cavalier mk3 check control module and one that suits the earlier cars.
As my car is now more or less standard inside other than the digi-dash, I have never really opted to fit the extra parts / wires.
In fact - just to be really random, I was thinking of fitting it to my 1983 VW wedge camper van, because those flat four wasser-boxers were notoriously prone to leaks and other issues that could be detected if a check control panel had been fitted.
But that is another saga waiting in the wings.
Do you need a relay?
Only if you have check control.
Due to the way that an additional brake light affects the currents and resistances through the entire brake light circuit.
(In the same way adding caravan / trailer wiring would potentially cause check control issues).
If you have no light on the dash, you do not need a relay as there is nothing to indicate a false error.
If you wanted to, you could still fit the relay, but that would be giving you more un-necessary work.
Just to be really awkward, I have had an Astra Mk2 digital dash fitted for about ten years now.
On such cars, it was necessary to add a supplementary warning display pod for check control functions.
I do have one of each of these supplementary displays in my box of spare parts,
One with 6 images and one with 7 images...
along with a Cavalier mk3 check control module and one that suits the earlier cars.
As my car is now more or less standard inside other than the digi-dash, I have never really opted to fit the extra parts / wires.
In fact - just to be really random, I was thinking of fitting it to my 1983 VW wedge camper van, because those flat four wasser-boxers were notoriously prone to leaks and other issues that could be detected if a check control panel had been fitted.
But that is another saga waiting in the wings.
Do you need a relay?
Only if you have check control.
Due to the way that an additional brake light affects the currents and resistances through the entire brake light circuit.
(In the same way adding caravan / trailer wiring would potentially cause check control issues).
If you have no light on the dash, you do not need a relay as there is nothing to indicate a false error.
If you wanted to, you could still fit the relay, but that would be giving you more un-necessary work.