Strip and Clean an Electric Aerial. Discussion

Post queries regarding your Mk3 Cavalier's ICE and electrical components (head units, wiring, retro-fit toys, upgrades etc.) here

Moderator: Robsey

User avatar
Robsey
Club Admin
Posts: 10619
Joined: Fri Dec 12, 2008 1:42 pm
Location: East Manchester

Strip and Clean an Electric Aerial. Discussion

Post by Robsey »

This is where we can discuss the How 2, found here.

viewtopic.php?f=15&t=16651

Just for info, I used "Flash" wet-wipes / surface cleaner wipes to clean every part of the aerial.

Amazingly it was possible to remove every type of crud, muck, grease and clag from the interior and exterior of the aerial assembly.

Only the verdi-gris on the contact finger needed an implement to scrape off the green crustiness.

And as a bonus, it now has 99.9% fewer germs and smells of clementine and clove fragrance... hmmm nice!
:lol:
User avatar
ilovedmymantas
Registered user
Posts: 1203
Joined: Sat Jan 12, 2013 2:54 am

Re: Strip and Clean an Electric Aerial. Discussion

Post by ilovedmymantas »

Pictures tell a thousand words

Great write-up Rob, very clear and surely a candidate for the 'How2/to' pages?

What grease do you use?
" It's not rust. It's age-related patina " ;)

1980 vauxhall cavalier MK1 1.6L, 1982 opel manta berlinetta 1.8s, 1985 opel manta 2.0 gte, 1990 cavalier 2.0 gl ,1994 cavalier sri x20xev

-1995 cdx x20xev

---------------
Matt
User avatar
Robsey
Club Admin
Posts: 10619
Joined: Fri Dec 12, 2008 1:42 pm
Location: East Manchester

Re: Strip and Clean an Electric Aerial. Discussion

Post by Robsey »

I have had a look through a few forums and general discussions / blogs.

The most popular gear lubricant is "White Silicon Grease".

Ordinarily, it is said that the old grease eventually becomes hard or lumpy.
If yours does this, then you need to clear out as much of the old grease as possible, and lightly smear contact areas with fresh grease.

My grease appeared to be as fresh as the day it was put on the cogs and motor worm drive, so I did not mess with it.

The black cog was a bit mucky, but there was plenty of clean grease left in there after I had cleaned everything up.

As for the mast, the main task is simply to keep dirt at bay.
So extend the aerial, and wipe upwards only with a rubbing alcohol / isopropyl alcohol.
Then dry wipe with a clean lint free cloth.

A clean dry mast is less likely to attract dust and so will hopefully take much longer before problem could arise.

I did notice a kink on my mast, where it looks like it has been bent back a little.
I have eased it back into shape with my hands, carefully coaxing the mast straight again.
User avatar
Robsey
Club Admin
Posts: 10619
Joined: Fri Dec 12, 2008 1:42 pm
Location: East Manchester

Re: Strip and Clean an Electric Aerial. Discussion

Post by Robsey »

ilovedmymantas wrote:Pictures tell a thousand words

Great write-up Rob, very clear and surely a candidate for the 'How2/to' pages?

What grease do you use?
Topic now split to create a How 2 and separate discussion thread.

Thanks for your kind words Matt.
User avatar
James McGrath
Club Admin
Posts: 2896
Joined: Tue Aug 11, 2009 11:35 am
Location: East Sussex

Re: Strip and Clean an Electric Aerial. Discussion

Post by James McGrath »

Nice write up rob. :thumb
One day I'll get round to doing mine.
User avatar
Robsey
Club Admin
Posts: 10619
Joined: Fri Dec 12, 2008 1:42 pm
Location: East Manchester

Re: Strip and Clean an Electric Aerial. Discussion

Post by Robsey »

Thanks James,

It takes longer to get the aerial out of the wing, than to clean up the aerial innards.

Definitely nothing to worry about, for those who lack confidence.
It is good old-fashioned electricals and gears.
Not tiny fiddly parts or micro-electronics.
:ugeek:
User avatar
vectra1903
Registered user
Posts: 167
Joined: Fri Sep 27, 2019 8:44 pm
Location: Poland

Re: Strip and Clean an Electric Aerial. Discussion

Post by vectra1903 »

I want to try to clean my electric aerial but the problem is that it is stuck at the half retracted position which probably makes it impossible to remove without destroying it. Is there any way to manually slide the aerial down?
User avatar
Robsey
Club Admin
Posts: 10619
Joined: Fri Dec 12, 2008 1:42 pm
Location: East Manchester

Re: Strip and Clean an Electric Aerial. Discussion

Post by Robsey »

It will push down into the body...
Just push firmly, but ensure that you only push straight down, otherwise you risk bending the aerial.

It may be better to pull it fully up - extended, then use a very thin oil like plusgas or wd40.
Use a rag to clean upwards to wipe off any dirt and grit.

Wiping the rag downwards would push dirt into the joints.

This is where you should now repeat the process with isopropyl alcohol, carb cleaner or brake cleaner spray.

When happy - now wipe with clean paper towel or similar.
You will be surprised how much more dirt will come off onto the paper.

When you are happy that the aerial is clean, you can then push the aerial down into the body.
User avatar
vectra1903
Registered user
Posts: 167
Joined: Fri Sep 27, 2019 8:44 pm
Location: Poland

Re: Strip and Clean an Electric Aerial. Discussion

Post by vectra1903 »

Robsey wrote: Sun Apr 18, 2021 4:46 pm It will push down into the body...
Just push firmly, but ensure that you only push straight down, otherwise you risk bending the aerial.

It may be better to pull it fully up - extended, then use a very thin oil like plusgas or wd40.
Use a rag to clean upwards to wipe off any dirt and grit.

Wiping the rag downwards would push dirt into the joints.

This is where you should now repeat the process with isopropyl alcohol, carb cleaner or brake cleaner spray.

When happy - now wipe with clean paper towel or similar.
You will be surprised how much more dirt will come off onto the paper.

When you are happy that the aerial is clean, you can then push the aerial down into the body.
I have tried to push it down with no luck. Didn't try pulling it up though, maybe that is possible.
But thanks anyway, now I know that I won't break it by trying to move it manually.
User avatar
Robsey
Club Admin
Posts: 10619
Joined: Fri Dec 12, 2008 1:42 pm
Location: East Manchester

Re: Strip and Clean an Electric Aerial. Discussion

Post by Robsey »

If it won't move, then the mast tubing may not be properly round. There may be a crease in the mast or it may be oval in shape.
User avatar
vectra1903
Registered user
Posts: 167
Joined: Fri Sep 27, 2019 8:44 pm
Location: Poland

Re: Strip and Clean an Electric Aerial. Discussion

Post by vectra1903 »

My electric aerial is a completely different model than the one in this How2.

Some info about it:
It is made by Hirschmann - the model is Auta 6000 EL - part no 90 228 323.
The aerial is controlled by a motor, which drives a belt which spins a worm gear. The worm gear spins a spring loaded gearbox which extends and retracts the antenna.
It is easy to disassemble and assemble if you have experience in dealing with electric gear driven devices.
The aerial cannot be moved manually, it must be controlled by the head unit (or a 12V power source).

It has a thin film of grease around the main plastic shaft which the gearbox is mounted on.
My aerial needs a new mast as my old one is seized. These should be available to buy on the internet and they are fairly easy to replace. It does require disassembling the whole unit though, but as I said, that isn't hard.
User avatar
Robsey
Club Admin
Posts: 10619
Joined: Fri Dec 12, 2008 1:42 pm
Location: East Manchester

Re: Strip and Clean an Electric Aerial. Discussion

Post by Robsey »

If you would like to write a How 2, then that would be great.
But that is only if you want to. :)
User avatar
vectra1903
Registered user
Posts: 167
Joined: Fri Sep 27, 2019 8:44 pm
Location: Poland

Re: Strip and Clean an Electric Aerial. Discussion

Post by vectra1903 »

Robsey wrote: Mon Apr 19, 2021 8:02 pm If you would like to write a How 2, then that would be great.
But that is only if you want to. :)
If I ever disassemble my unit again I will definitely consider that :thumb
User avatar
Telegram Sam
Registered user
Posts: 1134
Joined: Tue Mar 13, 2012 7:03 pm
Location: Brigadoon (Co Durham)

Re: Strip and Clean an Electric Aerial. Discussion

Post by Telegram Sam »

I was hoping that by now the How 2 Fixit might have appeared which would help me with the following:

1995 N-reg LSi hatchback. Aerial mounted on rear nearside wing. The sections have each jammed solid at half mast. Little visible sign of rust, it looks like the interior of the sections has seized up. I have rather optimistically tried the obvious WD-40 followed by GT 85 but I suspect that neither is able to penetrate to the root of the problem. I tentatively tried pliers, mole wrench and rags but I reckon too much force would be required to break the blockages but not the aerial itself.
The seized up unit is loose in its holder and only the base of the aerial is visible. I was trying to find a YouTube showing the steps involved in replacing this particular model - so far no joy, a job which the local garage said would take 2 hours in the workshop re-threading the cable via the interior through to the radio unit.
I can of course just continue applying the above solutions + hope long term. There may be a better way given a bit of know-how? I don't fancy taking all the interior panels out in order to gain access.
'91 H-reg SRi "130" manual hatch 8-valve non cat with mods
User avatar
Robsey
Club Admin
Posts: 10619
Joined: Fri Dec 12, 2008 1:42 pm
Location: East Manchester

Re: Strip and Clean an Electric Aerial. Discussion

Post by Robsey »

There is a How 2 available... but it depends which exact aerial model you have.

Avoiding stripping out the boot hatch lining.

It is possible to pull the aerial into full-extension and look for surface corrosion, scrapes or defects.
I believe the term "gently squash the aerial. back into shape using pliers - pad the jaws to prevent damage" was used somewhere.

also - when lubricating the mast, wipe upwards - away from the joint to minimise the ingress of dirt or grit into the mast joints.
---------------------------------
Otherwise it is a lining removal job.
not too bad if you have a torx T25 tool to hand.

The aerial motor body assembly is quite simple to strip and clean.
It is also possible to buy just the mast.

If you are desperate and not too concerned about being OEM, then MayStar still make motorised aerials to suit the Cavalier.
about 1/10th the cost of a GM manufactured part - if still available.

The moulded rubber seal isn't quite the correct shape, but will do the job nicely.
consider sealing the hole with black sealant or Sikaflex to prevent the ingress of rain through the mounting hole.
User avatar
Telegram Sam
Registered user
Posts: 1134
Joined: Tue Mar 13, 2012 7:03 pm
Location: Brigadoon (Co Durham)

Re: Strip and Clean an Electric Aerial. Discussion

Post by Telegram Sam »

That was indeed a very explicit How-2 guide for those with the inclination and ability to repair the motor itself. I think I personally would be looking at a replacement instead if that was the solution. Rather my problem is gaining access to below the aerial in order to do any work. This is as far as I can get from the outside ...
- I can't now figure out how to insert a jpg pic, illustrating the problem, stored on my hard drive into the body of this text -
without as I suspect having to delve into the interior or underneath of the car in order to remove (and refit) panels and things. Even with a replacement aerial the job could be complicated.
In the interim I will try to follow the Flash wipe tip mentioned previously.
'91 H-reg SRi "130" manual hatch 8-valve non cat with mods
User avatar
Robsey
Club Admin
Posts: 10619
Joined: Fri Dec 12, 2008 1:42 pm
Location: East Manchester

Re: Strip and Clean an Electric Aerial. Discussion

Post by Robsey »

The only thing you need to remove is the load area lining on the left (near side) rear wing.

About a dozen torx screws, and remove the interior cover from the left tail light cluster.

That will leave you with this.

Image

I am sure the pictures explain it all.
Two self tappers retain the motor.
The upper screw also has the grounding ring.

Unscrew the knurled nut to remove the aerial wire.
If the aerial mast will nut push down into the motor, then you may have to snap it anyway.

And you will be left with this.

Image

Image
User avatar
Telegram Sam
Registered user
Posts: 1134
Joined: Tue Mar 13, 2012 7:03 pm
Location: Brigadoon (Co Durham)

Re: Strip and Clean an Electric Aerial. Discussion

Post by Telegram Sam »

I have now seen that there is a How 2 upload pictures so I will update my comments with illustration of what I am faced with.
I take it that the work that you describe is carried out from within the boot area (and not underneath the wheel arch as advised by the garage that I spoke to)
Torx screws require presumably a Torx screwdriver (or drill bit) and not a Phillips.
'91 H-reg SRi "130" manual hatch 8-valve non cat with mods
User avatar
Robsey
Club Admin
Posts: 10619
Joined: Fri Dec 12, 2008 1:42 pm
Location: East Manchester

Re: Strip and Clean an Electric Aerial. Discussion

Post by Robsey »

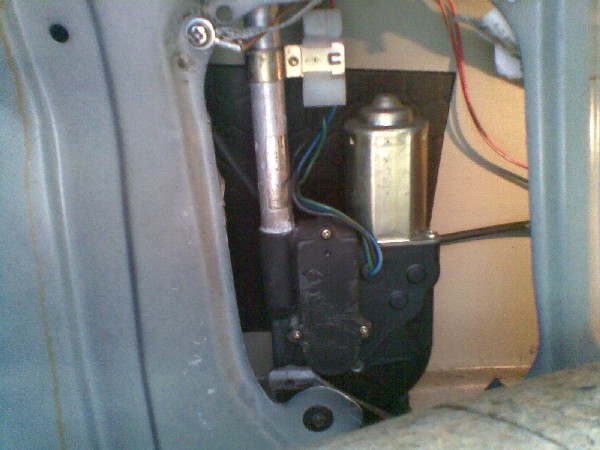
I am sure the boot and the hatch side-walls / inner wings are the same construction - so yes, access is from inside the near-side inner wing.

Torx is like a star shaped drive. They are very easy to get hold of these days.
Either torx screw-driver or a 1/4" hexagon ratchet drive screwdriver with a variety of Torx bits.
A powered screwdriver may help, as there a quite a few screws to undo around the interior lining, which can be a bit tedious or can give your wrist and fore-arm muscles a good work-out if you are usually lazy like me. :roll:

From memory, all the rear trims are held on with T25 torx screws. Especially if you have a hatch like me.

The aerial itself - like the rest of the car, should be held in place with Philips No2 headed screws.

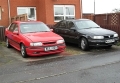
My Vectra-C on the other hand has nothing but Torx throughout. :shock:

I am not sure if my 3rd brake light thread gives more photos of stripping out the side of a load area.
From a hatchback perspective.

viewtopic.php?f=70&t=16503&p=166846#p166846

Well not really, but it may help.

Just so you know, you do not have to remove everything.
The rear quarter trim / speaker grill moulding can stay in place, just remove enough screws to allow you to "peel out" the side wall lining to the suspension / wheel inner arch hump.
User avatar
Telegram Sam
Registered user
Posts: 1134
Joined: Tue Mar 13, 2012 7:03 pm
Location: Brigadoon (Co Durham)

Re: Strip and Clean an Electric Aerial. Discussion

Post by Telegram Sam »

Well, I established that I had a "female star socket" but which is probably not what is required. So I set to work with Flash Surface Wipes - Crispy Lemon aroma to be precise. But before they had a chance to work their magic, the lower end of the lower metal tube became detached from whatever it fitted in to which dropped out of sight into the rear wing. At which point a voice inside said to me: Replace aerial, stop frigging around with one that is past it. Looking on google / eBay revealed a huge selection of aerials new and used, but none that said it was specifically for an 89 Vaux Cav Mk3 hatch.
Could someone kindly give me an online link (or two) to a replacement aerial that they in my place would use to do the job with whatever accessories that are necessary. It sounded like the bit that dropped out of sight was still attached to the cable, even if in the end I get a proper electrician to fit the thing up. Tks
'91 H-reg SRi "130" manual hatch 8-valve non cat with mods
User avatar
Telegram Sam
Registered user
Posts: 1134
Joined: Tue Mar 13, 2012 7:03 pm
Location: Brigadoon (Co Durham)

Re: Strip and Clean an Electric Aerial. Discussion

Post by Telegram Sam »

Car electricians round here happy to do an aerial refit job seem to be few and far between - Halfords didn't want to know - and one said to me that it was essential to replace like for like. Whilst I had guessed that within reason I could use a different type / fitting, even if it was not electrically operated.
'91 H-reg SRi "130" manual hatch 8-valve non cat with mods
User avatar
Robsey
Club Admin
Posts: 10619
Joined: Fri Dec 12, 2008 1:42 pm
Location: East Manchester

Re: Strip and Clean an Electric Aerial. Discussion

Post by Robsey »

Try this...

https://www.ebay.co.uk/itm/260780410734 ... %7Ciid%3A1

It does not have to be like for like.
But it wants to be fully compatible.
User avatar
Telegram Sam
Registered user
Posts: 1134
Joined: Tue Mar 13, 2012 7:03 pm
Location: Brigadoon (Co Durham)

Re: Strip and Clean an Electric Aerial. Discussion

Post by Telegram Sam »

Interesting. In the interim I had come up with provisionally
1.)https://www.ebay.co.uk/itm/402763208641
2.)https://www.ebay.co.uk/itm/283884415541
3.)https://www.ebay.co.uk/itm/172248848631
4.)https://www.ebay.co.uk/itm/402105792657
I have been trying to confirm with the vendors if what they offer is compatible.
1.) Unclear
2.) Compatible
3.) Not compatible?
4.) OK
Not easy
'91 H-reg SRi "130" manual hatch 8-valve non cat with mods
User avatar
Robsey
Club Admin
Posts: 10619
Joined: Fri Dec 12, 2008 1:42 pm
Location: East Manchester

Re: Strip and Clean an Electric Aerial. Discussion

Post by Robsey »

I would only say Item 4 is compatible.
But no good having the ferrule without the mast, and the ball shaped moulding thst the ferrule fits over.

The rest are more for an early car, like a mk2 Cavalier, Astra or Nova.
But they do not look Vauxhall specific.
User avatar
Telegram Sam
Registered user
Posts: 1134
Joined: Tue Mar 13, 2012 7:03 pm
Location: Brigadoon (Co Durham)

Re: Strip and Clean an Electric Aerial. Discussion

Post by Telegram Sam »

I will ask the vendor for assurance that what he is offering will do the job complete before placing an order. To me it is not important if the unit is "specific" to my N-reg, or even to Vauxhall, as long as it "fits" and works. In other words includes all the bits south of the end of the cable(s) - mast, ferrule, rubber moulded grommet, the lot (but not the motor?). I don't know if you think that one of the options 1 - 3 is better than the rest in this respect? I might buy No 4 if it would "convert" one of the others with a different grommet to the correct fitting.
I'm just guessing that the original motor is still working. Could be wrong ...
'91 H-reg SRi "130" manual hatch 8-valve non cat with mods
Post Reply