The 94 CD facelift Cavalier has a broken bracket on the n/s headlamp so I am trying to sort a replacement. The existing one shows GM and Corello on the lens. It has electric levelling. I have found a new one advertised and it states that it is suitable for both manual and electric levelling. It goes on to say that the existing electric mover can be transferred over. I have had a look at my unit and although the mover turns 75 degrees in the headlamp housing it does not seem to want to come out.
The control has 90377512 between the 3 pin plug and the turn knob with an hexagonal in it's centre.
Does this shifter come out and can it be transferred over?
Thanks for looking.
Facelift headlamp.
Moderator: Robsey
-
dorsetdave
- Registered user
- Posts: 160
- Joined: Thu Jan 21, 2016 9:32 pm
- Location: Bournemouth
Facelift headlamp.
1993 LS 2.0 8V auto Saloon. Satin Red
1994 CD 2.0 8V auto Hatch. Nautilus
1986 1.8i auto cabrio only 8000 miles. Polar white
1994 CD 2.0 8V auto Hatch. Nautilus
1986 1.8i auto cabrio only 8000 miles. Polar white
Re: Facelift headlamp.
The motor does come out it's attached to the reflector by a ball & socket arrangement so should just pull off.

Re: Facelift headlamp.
As Ian says,
It should just pull out once you have twisted it to the "unlatched" position.
In a similar fashion to a twist in bulb.
These things have to be snug to keep water ingress to a minimum.
It has probably never been touched since leaving the factory, so will be a bit reluctant to pull out too easily. (Stuck in).
But a good pull should get it out.
You should not be able to break it unless you are really heavy handed or rough with it.
You could give the motor body a bit of a wiggle to break any seal, as you pull the motor out of the reflector.
-
dorsetdave
- Registered user
- Posts: 160
- Joined: Thu Jan 21, 2016 9:32 pm
- Location: Bournemouth
Re: Facelift headlamp.
Thanks each for your quick response.
I never know how hard to heave on these things just in case! WD40 and a sharp tug has released it. I will order the headlamp unit on eBay and hope that my electric fitting is compatible.
Thanks again.
I never know how hard to heave on these things just in case! WD40 and a sharp tug has released it. I will order the headlamp unit on eBay and hope that my electric fitting is compatible.
Thanks again.
1993 LS 2.0 8V auto Saloon. Satin Red
1994 CD 2.0 8V auto Hatch. Nautilus
1986 1.8i auto cabrio only 8000 miles. Polar white
1994 CD 2.0 8V auto Hatch. Nautilus
1986 1.8i auto cabrio only 8000 miles. Polar white
Re: Facelift headlamp.
It should be a simple matter of plug and play.
All the plugs attach to the bulbs and beam motor.
Take the bulbs from the old unit,
Fit the bulbs to the new unit,
or fresh bulbs if you do not know when they were last replaced.
Connectors fit straight onto bulbs (H4 head-lamp)
and bulb holder (501 side-light bulb).
And connect up the beam angle adjuster motor in the same way it was connected to the old light assembly.
Even my Angel Eye halos were plug and play except they had no beam adjuster.
Re: Facelift headlamp.
Removal of Beam Adjustment Motor.
Assuming you have unplugged / disconnected all the electrical wiring connectors.
1 - Remove the head-lamp assembly from the car - 3 screws.
2 - Twist the motor clockwise to release it from the head-lamp assembly.
3 - Carefully disconnect the motor from the ball-joint.
Refitting
Refitting is a reversal of removal, but ensure that the motor is correctly engaged with the ball-joint inside the head-lamp assembly.
Adjustment - Setting.
1 - Accurate alignment should be carried out using optical beam setting equipment.
2 - In an emergency, adjustments may be made by turning the adjustment screws shown.
3 - All 1992-on models are fitted with the headlamp aim adjustment system, operated through the facia-mounted switch.
Position ‘0’, is for correct alignment if just the driving seat is occupied.
Position ‘1’, if all seats are occupied.
Position ‘2’, if all seats are occupied and with luggage in the boot.
Position ‘3’, for just driver and luggage.
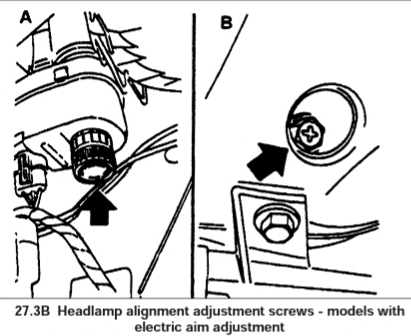
A = Vertical adjustment screw
B = Horizontal adjustment screw
In your case, set the beam, so that the heights match when parked approx 15 feet to 25 feet from a wall.
Park close to and facing a wall or garage door, first to find the position of the "\_" for each beam.
Then reverse back.
Using the unchanged lamp's light unit pattern as a guide.
Set up the new light unit to match the beam height of the other.
Assuming you have unplugged / disconnected all the electrical wiring connectors.
1 - Remove the head-lamp assembly from the car - 3 screws.
2 - Twist the motor clockwise to release it from the head-lamp assembly.
3 - Carefully disconnect the motor from the ball-joint.
Refitting
Refitting is a reversal of removal, but ensure that the motor is correctly engaged with the ball-joint inside the head-lamp assembly.
Adjustment - Setting.
1 - Accurate alignment should be carried out using optical beam setting equipment.
2 - In an emergency, adjustments may be made by turning the adjustment screws shown.
3 - All 1992-on models are fitted with the headlamp aim adjustment system, operated through the facia-mounted switch.
Position ‘0’, is for correct alignment if just the driving seat is occupied.
Position ‘1’, if all seats are occupied.
Position ‘2’, if all seats are occupied and with luggage in the boot.
Position ‘3’, for just driver and luggage.
A = Vertical adjustment screw
B = Horizontal adjustment screw
In your case, set the beam, so that the heights match when parked approx 15 feet to 25 feet from a wall.
Park close to and facing a wall or garage door, first to find the position of the "\_" for each beam.
Then reverse back.
Using the unchanged lamp's light unit pattern as a guide.
Set up the new light unit to match the beam height of the other.
-
dorsetdave
- Registered user
- Posts: 160
- Joined: Thu Jan 21, 2016 9:32 pm
- Location: Bournemouth
Re: Facelift headlamp.
Thanks again for your help. Another problem solved!
1993 LS 2.0 8V auto Saloon. Satin Red
1994 CD 2.0 8V auto Hatch. Nautilus
1986 1.8i auto cabrio only 8000 miles. Polar white
1994 CD 2.0 8V auto Hatch. Nautilus
1986 1.8i auto cabrio only 8000 miles. Polar white
Re: Facelift headlamp.
We aim to please 