
Far far easier than the CC just one wire cut and the stalk spliced in and a different relay... really easy and envoy did a guideRatCav wrote: I hate electrics so wiring in the intermittant wiper stalk is going to be a chore.
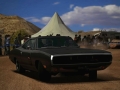
My V6 GLS ... From Chav to Class
Re: My V6 GLS ... From Chav to Class
Elwood Blues: "Our Lady of Blessed Acceleration, don't fail me now!"

Gaz loses sleep for my car and helps me with parts at ungodly hours of the day. Awesome
Gaz loses sleep for my car and helps me with parts at ungodly hours of the day. Awesome

Re: My V6 GLS ... From Chav to Class
Well I found an Omega estate with trip computer controls and variable wiper in a scrappy, so that is the next project. Off to find the How2.

Re: My V6 GLS ... From Chav to Class
just make sure you get the right yellow/black , eh squig
(he went though 3 sets before he realised he had cut the wrong one)
(he went though 3 sets before he realised he had cut the wrong one)

Re: My V6 GLS ... From Chav to Class
Lol ... I got part of the loom from the Omega as well, and have read through the How2 several times as well. Bet I will still get it wrong 
Re: My V6 GLS ... From Chav to Class
best way then you can plug and unplug the connector rather than messing about.
-
kingofthekerb

- Registered user
- Posts: 80
- Joined: Tue Jun 17, 2008 6:29 pm
- Location: Wirral, North West
- Contact:
Re: My V6 GLS ... From Chav to Class
Nice looking Cav you got there mate.
Nice to see another one having some time and effort being put into it.
All the hard work should be well worth it once it's finished
Nice to see another one having some time and effort being put into it.
All the hard work should be well worth it once it's finished
Re: My V6 GLS ... From Chav to Class
You may mock but it works now 
Elwood Blues: "Our Lady of Blessed Acceleration, don't fail me now!"
Gaz loses sleep for my car and helps me with parts at ungodly hours of the day. Awesome
Gaz loses sleep for my car and helps me with parts at ungodly hours of the day. Awesome
Re: My V6 GLS ... From Chav to Class
Cheers buddykingofthekerb wrote:Nice looking Cav you got there mate.
Nice to see another one having some time and effort being put into it.
All the hard work should be well worth it once it's finished
I am focusing on the mechanicals and the interior mainly. The bodywork is way way down on the list. I like my luxuries and doing all i can to tidy up the issues raised by the previous owners.
Re: My V6 GLS ... From Chav to Class
I haven't done mine yet so I am keeping quietSquig wrote:You may mock but it works now
Re: My V6 GLS ... From Chav to Class
If one black/yellow doesn't work, it's the other... I cut the wrong one. 
And Gaz takes a slightly vicious humor in chuckling at my mistakes...
And Gaz takes a slightly vicious humor in chuckling at my mistakes...
Elwood Blues: "Our Lady of Blessed Acceleration, don't fail me now!"
Gaz loses sleep for my car and helps me with parts at ungodly hours of the day. Awesome
Gaz loses sleep for my car and helps me with parts at ungodly hours of the day. Awesome
-
kingofthekerb
- Registered user
- Posts: 80
- Joined: Tue Jun 17, 2008 6:29 pm
- Location: Wirral, North West
- Contact:
Re: My V6 GLS ... From Chav to Class
I like my luxuries too. Got pretty much everything in my sri apart from rear electric windows (have got the stuff for it) and air con (got all the stuff to retro fit it but might be biting off more than i can chew). Also cruise control but i can live without that.RatCav wrote:Cheers buddykingofthekerb wrote:Nice looking Cav you got there mate.
Nice to see another one having some time and effort being put into it.
All the hard work should be well worth it once it's finished
I am focusing on the mechanicals and the interior mainly. The bodywork is way way down on the list. I like my luxuries and doing all i can to tidy up the issues raised by the previous owners.
The body looks ok anyway so your probably right to concentrate on what your doing. End of the day you can't see the outside of the car whilst your driving it can you ? lol
Re: My V6 GLS ... From Chav to Class
Precisely. Its all about what I can see and do when driving. Saying that I managed to break the cruise contol today. Well in all fairness it still works, just the black plastic bit that goes over the throttle stub snapped. Will be hunting the garage to find something to replce it with. Hopefully that won't take too long and then I can wire in the variable wiper stalk.
Went for a drive yesterday, and found a Calibra in a scrappy with a V6 with a blown head gasket. Might see what he wants for some of the stuff on it. I have a plan to get all the intake bits and get them bored out to get a better airflow.
Went for a drive yesterday, and found a Calibra in a scrappy with a V6 with a blown head gasket. Might see what he wants for some of the stuff on it. I have a plan to get all the intake bits and get them bored out to get a better airflow.
Re: My V6 GLS ... From Chav to Class
Ok so a small update:
1) Found and replaced the outside air temp sensor. Had to rewire it as the previous owner had bodged it and the entire sensor and plug fell off.
2) Installed Omega intermittant wiper stalk and wired it all in. Even routed the three wires through to the passenger kick panel for the future installation of the trip DID.
3) Fixed the Cruise control cable with some wire and a bodge.
Re: My V6 GLS ... From Chav to Class
Ok after snapping the black plastic bit on the cruise cable and trying to glue it with araldite, I found that it kept on snapping. Tried for the life of me to get another from a scrappy, but no go. That was until I spotted a nice Vectra V6 CDX facelift today under a broken Zafira (I think). Pulled off the cable and the mount and parted with a fiver.
I wasn't happy with the old mount as it was a real bodge to get it in the right position, and I found that there is extra length to the vectra cable the throttle end compared to the Omega one. Luckily I had that Vectra mount. Now all I did was grind it back and bolted it on with one of the existing holes. Not too bothered at it moving as it also notches into the edges of the intake manifold. Ended up with this:

Much neater and hopefully won't snap like the last one. Had to adjust the throttle cable a little but it all seems ok.
Just a couple of pics of the stalks as well for proof
Cruise control and indicators:

Wipers (with intermittant adjustment), with trip computer controls:

A few more pics just for good measure
Heated seats and Traction Control switches (ignore the traction switch burn. Dunno how it got there but will be replaced when i can):

And for the rare sight on any Cavalier, a working accurate outside temperature guage :

Enjoy
I wasn't happy with the old mount as it was a real bodge to get it in the right position, and I found that there is extra length to the vectra cable the throttle end compared to the Omega one. Luckily I had that Vectra mount. Now all I did was grind it back and bolted it on with one of the existing holes. Not too bothered at it moving as it also notches into the edges of the intake manifold. Ended up with this:
Much neater and hopefully won't snap like the last one. Had to adjust the throttle cable a little but it all seems ok.
Just a couple of pics of the stalks as well for proof
Cruise control and indicators:
Wipers (with intermittant adjustment), with trip computer controls:
A few more pics just for good measure
Heated seats and Traction Control switches (ignore the traction switch burn. Dunno how it got there but will be replaced when i can):
And for the rare sight on any Cavalier, a working accurate outside temperature guage :
Enjoy
-
Cavalier342
- Registered user
- Posts: 9811
- Joined: Tue Jul 22, 2008 10:46 pm
- Location: Dorset
Re: My V6 GLS ... From Chav to Class
Awesome Looks like your motorway trips in an executive car are sorted I really want a trip computer in my Cav, but i reckon it'll be too complicated to install. At least for me anyway.
But ye, good job there, looks good mate
But ye, good job there, looks good mate
Previous:
China Blue 1989 Vauxhall Cavalier L 18SV
Kings Blue 1992 Vauxhall Cavalier LSi Auto C18NZ
Smoke Grey 1994 Vauxhall Cavalier V6 C25XE
Am I a light sleeper or a heavy sleeper? Well that depends on how much I've had to drink...
China Blue 1989 Vauxhall Cavalier L 18SV
Kings Blue 1992 Vauxhall Cavalier LSi Auto C18NZ
Smoke Grey 1994 Vauxhall Cavalier V6 C25XE
Am I a light sleeper or a heavy sleeper? Well that depends on how much I've had to drink...
Re: My V6 GLS ... From Chav to Class
Cheers buddy.Cavalier342 wrote:Awesome
But ye, good job there, looks good mate
I have been loking at the various posts about trip computers and stuff. From what I gather if you have all the wiring there already its a matter of plug and play. If not its a pain in the arris.
-
Cavalier342
- Registered user
- Posts: 9811
- Joined: Tue Jul 22, 2008 10:46 pm
- Location: Dorset
Re: My V6 GLS ... From Chav to Class
Ah right ok buddy. I doubt mine would have it, its only a facelift LS 
Previous:
China Blue 1989 Vauxhall Cavalier L 18SV
Kings Blue 1992 Vauxhall Cavalier LSi Auto C18NZ
Smoke Grey 1994 Vauxhall Cavalier V6 C25XE
Am I a light sleeper or a heavy sleeper? Well that depends on how much I've had to drink...
China Blue 1989 Vauxhall Cavalier L 18SV
Kings Blue 1992 Vauxhall Cavalier LSi Auto C18NZ
Smoke Grey 1994 Vauxhall Cavalier V6 C25XE
Am I a light sleeper or a heavy sleeper? Well that depends on how much I've had to drink...
Re: My V6 GLS ... From Chav to Class
You will be surprised. The easiest thing is to lift the dished plastic bit under the handbrake lever handle. You should see a big connector block. The trip computer switch plugs into a socket on the far drivers side. You should see some wires going into it from the gear lever side if the wiring is there already.
-
Cavalier342
- Registered user
- Posts: 9811
- Joined: Tue Jul 22, 2008 10:46 pm
- Location: Dorset
Re: My V6 GLS ... From Chav to Class
so there is its like a white/creamy coloured plastic box with a silver handle type thing on top and a wiring loom heading into the gear lever area. Now... where to acquire a trip computer and where to install it...
Previous:
China Blue 1989 Vauxhall Cavalier L 18SV
Kings Blue 1992 Vauxhall Cavalier LSi Auto C18NZ
Smoke Grey 1994 Vauxhall Cavalier V6 C25XE
Am I a light sleeper or a heavy sleeper? Well that depends on how much I've had to drink...
China Blue 1989 Vauxhall Cavalier L 18SV
Kings Blue 1992 Vauxhall Cavalier LSi Auto C18NZ
Smoke Grey 1994 Vauxhall Cavalier V6 C25XE
Am I a light sleeper or a heavy sleeper? Well that depends on how much I've had to drink...
Re: My V6 GLS ... From Chav to Class
Yep. Will get some photo's of what you are looking for when I go out next to the car.
-
Cavalier342
- Registered user
- Posts: 9811
- Joined: Tue Jul 22, 2008 10:46 pm
- Location: Dorset
Re: My V6 GLS ... From Chav to Class
ok thanks buddy
Previous:
China Blue 1989 Vauxhall Cavalier L 18SV
Kings Blue 1992 Vauxhall Cavalier LSi Auto C18NZ
Smoke Grey 1994 Vauxhall Cavalier V6 C25XE
Am I a light sleeper or a heavy sleeper? Well that depends on how much I've had to drink...
China Blue 1989 Vauxhall Cavalier L 18SV
Kings Blue 1992 Vauxhall Cavalier LSi Auto C18NZ
Smoke Grey 1994 Vauxhall Cavalier V6 C25XE
Am I a light sleeper or a heavy sleeper? Well that depends on how much I've had to drink...
Re: My V6 GLS ... From Chav to Class
Ok sorry for the delay in getting back cavalier342. But I have some photo's for you.
The first is the connector block. The Switch for the standard Fuel Computer plugs into position '3'. It connects on the rear most side (furthest from the gearstick). The wires (which I have missing) then go accross the passenger side infront of the chassis rail under the passenger seat, up the sill to a black connector block in the passenger footwell. I never bothered with this set of wires as I have an Omega wiper stalk which has the variable front intermittant speed controls, and handily has the Fuel Computer controls as well.

The second photo shows the plug that goes into the back of the actual display itself. As you can see it is much larger than the normal temp/clock display plug. You can usually find it cable tied to the wires that run just to the left of the hole where mine come out from in the pic. Its a bugger to find, and made a lot easier if you remove the glove compartment (which is only held in with 4 screws, you will have to remove the plastic surround of the parcel shelf to get to the top ones but that just pulls off). If you remove the parcel shelf don't forget to flip out the glove box light fist and disconnect it before removing the box.

The first is the connector block. The Switch for the standard Fuel Computer plugs into position '3'. It connects on the rear most side (furthest from the gearstick). The wires (which I have missing) then go accross the passenger side infront of the chassis rail under the passenger seat, up the sill to a black connector block in the passenger footwell. I never bothered with this set of wires as I have an Omega wiper stalk which has the variable front intermittant speed controls, and handily has the Fuel Computer controls as well.
The second photo shows the plug that goes into the back of the actual display itself. As you can see it is much larger than the normal temp/clock display plug. You can usually find it cable tied to the wires that run just to the left of the hole where mine come out from in the pic. Its a bugger to find, and made a lot easier if you remove the glove compartment (which is only held in with 4 screws, you will have to remove the plastic surround of the parcel shelf to get to the top ones but that just pulls off). If you remove the parcel shelf don't forget to flip out the glove box light fist and disconnect it before removing the box.
-
Cavalier342
- Registered user
- Posts: 9811
- Joined: Tue Jul 22, 2008 10:46 pm
- Location: Dorset
Re: My V6 GLS ... From Chav to Class
Wow, thanks dude. Thats a lot of detail Appreciate this dude, cheers 
Previous:
China Blue 1989 Vauxhall Cavalier L 18SV
Kings Blue 1992 Vauxhall Cavalier LSi Auto C18NZ
Smoke Grey 1994 Vauxhall Cavalier V6 C25XE
Am I a light sleeper or a heavy sleeper? Well that depends on how much I've had to drink...
China Blue 1989 Vauxhall Cavalier L 18SV
Kings Blue 1992 Vauxhall Cavalier LSi Auto C18NZ
Smoke Grey 1994 Vauxhall Cavalier V6 C25XE
Am I a light sleeper or a heavy sleeper? Well that depends on how much I've had to drink...
Re: My V6 GLS ... From Chav to Class
Well as some of you might be aware the Cav failed its MOT. A series of issues but noothing to hard to rectify. Headlamp aim was too low on each light so that was tweaked. I have to remove the bodged de-cat pipe and replace with a Cat as the emissions were way way too high. It was reading O2 levels of 0.67 when the pass mark was 0.3. After putting the new Cat on it came down to 0.02. The tester was really impressed with the results and couldn't believe I only spent £65 plus the dreaded for it.
De-cat pipe :

I also had to replace the wishbone. As you can see the old one was shot and the rear bush had fallen out completely:


The rest was simple as well. Got someone else to do the brake line that failed, but I took notes for further reference. I know its silly but I have never liked doing brake lines and therefore never touched them. After putting the Cav back in for the re-test it passed with only a few advisories, but three of them involved corroded brake lines.
I managed to get a DID off ebay that had already been programmed for a V6. arrived this morning and went about plugging it in. Fitted a treat as you can see.

I thought I would also take some pictures of the wiring in the passenger footwell of where the fuel computer switch wiring goes.
Black connector block behind kick panel:

Here are the three wires going into the bottom half. All I had was the three wires from the stalk. You can see them wrapped in insulation tape. I pulled the long yellow retainer out a little and that allowed me to push the terminals into the empty slots where the original switch wires should go. I never had the floor loom in the first place so I got some spare terminals from a scrappy and soldered them onto the stalk wires so I could get a more OEM feel about it. I have ringed the wires concerned.

Hope this helps clear up a few things for people when they do the same.
De-cat pipe :
I also had to replace the wishbone. As you can see the old one was shot and the rear bush had fallen out completely:
The rest was simple as well. Got someone else to do the brake line that failed, but I took notes for further reference. I know its silly but I have never liked doing brake lines and therefore never touched them. After putting the Cav back in for the re-test it passed with only a few advisories, but three of them involved corroded brake lines.
I managed to get a DID off ebay that had already been programmed for a V6. arrived this morning and went about plugging it in. Fitted a treat as you can see.
I thought I would also take some pictures of the wiring in the passenger footwell of where the fuel computer switch wiring goes.
Black connector block behind kick panel:
Here are the three wires going into the bottom half. All I had was the three wires from the stalk. You can see them wrapped in insulation tape. I pulled the long yellow retainer out a little and that allowed me to push the terminals into the empty slots where the original switch wires should go. I never had the floor loom in the first place so I got some spare terminals from a scrappy and soldered them onto the stalk wires so I could get a more OEM feel about it. I have ringed the wires concerned.
Hope this helps clear up a few things for people when they do the same.
Re: My V6 GLS ... From Chav to Class
Ok had some time on my hands so I went about tarting up the insides a little. Fisrt off was replacing the handbrake and gearstick gators. I got hold of some nice material from the local fabric shop and went about making my own. Took off the old ones and copied them. Ended up with this:


Much better. Its amazing how much a difference something so simple can make. Makes everything seem cleaner inside now. Also while I was in the mood I got hold of the loom and grab handles from a CDX in a scrappy and decided to install the illuminated versions. Was a bit of a pain, but worth it in the end. Best thing about pulling the stuff off a scrap car is you get to see where its meant to go. Fed the wires down the pillar to the boot and plugged it into the socket waiting there for it. Then ran the other ends to the drivers and passengers side. No cutting of the metalwork was needed and next thing I know is I have these:
Rear drivers side:

Rear passengers side:

Its slowly building up. Only thing left to do in the cabin now is the rear electric windows really. Just need to source the wiring loom. I have my eye on the mechanicals and switches.
Much better. Its amazing how much a difference something so simple can make. Makes everything seem cleaner inside now. Also while I was in the mood I got hold of the loom and grab handles from a CDX in a scrappy and decided to install the illuminated versions. Was a bit of a pain, but worth it in the end. Best thing about pulling the stuff off a scrap car is you get to see where its meant to go. Fed the wires down the pillar to the boot and plugged it into the socket waiting there for it. Then ran the other ends to the drivers and passengers side. No cutting of the metalwork was needed and next thing I know is I have these:
Rear drivers side:
Rear passengers side:
Its slowly building up. Only thing left to do in the cabin now is the rear electric windows really. Just need to source the wiring loom. I have my eye on the mechanicals and switches.