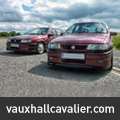

She's a 1994 CDX saloon with the mighty C25XE v6 engine and manual gearbox finished in very fetching Diamond Black metallic paint.
So I've known about this car for some time now. It was first up for sale about the time I bought my Dad's CD manual. Only then it was advertised for £2000 and the CD manual was a mere £325. So at the time the decision of which one to buy was a no brainer.
It was only about 4 miles away from me so I kept an eye on it just out of interest. It didn't sell, the price was lowered to £1500 and it was put up for sale again about a year later, once again there was no sale and all went quiet. Until last month when it was listed on eBay for the knock down price of £890. Too good to miss!
I bought it from a lovely chap called Robin Vater who has owned the car since 19th June 2003 (documented in the service history!). During that time it's had no expense spared and has been thoroughly pampered. Unfortunately, due to deteriorating health the car has not been driven much recently, only covering 1100 miles since August 2012.
Apparently, had I not bought it, it was going to get exported so someone overseas who had put in an offer. How true that was though I've no idea.
Anyway, enough history, let me show you around:
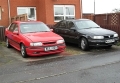
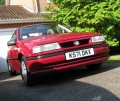
The exterior paint is in good condition. There are a few scratches and stone chips about the place but nothing major and better yet, rust free wheel arches!


Water beading up; paintwork must have been polished not too long ago:

The mighty V6, looking very clean:

The alloys are in fair condition but could do with a refurb. Does have a full set of kumho tyres with decent tread though. Here you can also see the V6's uprated front brakes:

All the electrics work. Even the Air-con switches on but doesn't blow cold, I'm hoping it just needs a re-gas.
The air-com was last given a service in 2008 according to the history.

As you can see It has the rare optional trip computer!
unfortunately there are a few dead pixels and it didn't come with a radio. So for now I've just put in a spare SC303 head unit I had.

Leather is in great shape, thought it's crying out for some leather balm:

I was especially impressed that all 3 rear seat belt buckles are intact with no broken clips:

The boot is also super clean:

Some of the car's best bits:
It came with a great service history, nothing older than 2001 unfortunately, but it's very comprehensive after that date. with every MOT certificate and a whole wad of receipts, a good chunk of which are from Vauxhall dealers. Also came with a few oddities like Mr Vater's new keepers supplement from an old V5 dated 19th June 2003:

It came with the two original keys and amazingly the torch still works!

Original unused spare wheel, with chalk still intact:


Original dealer plates, front and rear:

I really thought that it would have been made in Germany, but I was pleasantly surprised.
This is the first Cavalier I've seen with Air-con made at the Luton plant.
Up until now it has always been my understanding that all Air-con Cavs were made in Germany.

And the best extra, some genuine Vauxhall touch up paint!

So as you might expect I've been busy cleaning and fixing the last couple of days. Here are a few things I've done already.
New rubber aerial seal:

As you can see, the headlights were covered in green moss and the nearside unit had quite allot of condensation inside:


Found the original rubber seals:

Good as new after a quick clean up:

Fitted a new nearside indicator and headlight unit and cleaned up the offside:


I've also given it a good clean inside and out. There was a fair amount of 'green' built up around the rubber seals and around the windows but considering it's virtually been sitting still for the last few years it wasn't too bad.
There are a few other things I'd like to get done.
First of all, one of the rear door reflectors needs to be replaced.
The rear boot panel has cracked on the right hand side.
Needs a radio. Preferably the CD300 unit it would have come with originally.
Could really do with some genuine floor mats and new handbrake/gearstick gaiters.
My plans for her are basically just preserve as much as possible and keep her looking standard.
Subtle mods aren't out of the question. X30XE cams have been suggested and I would like a stainless exhaust as the standard one looks a bit too... sleeperish , shall we say.