Page 2 of 6
Re: Cavalier restoration
Posted: Sat Dec 09, 2017 1:37 pm
by Mazza
Robsey wrote:Digital dash display?
Do you mean the much coveted digital instruments?,
Dual info display, ?
Or Fuel Computer?
If it is the instruments, then I am sure that I have not yet seen anyone on the forum with a set actually fitted and working.
(Not even any of our mainland Europe friends where the digital instruments were available).
I have vectra A Europe digital display plus the clips/sensors & etc - if I remember it was an optional extra in U.K. .... but many of the new owners never went for the extra cost ...
Fuel computer displays x a few
It's strange what we find in boxes marked 'uni stuff '
... even found some parts from my old gsi 4x4. Where's my tissue box!!?!
I'll take a pics in due course... (not the tissue box!!!?)
Re: Cavalier restoration
Posted: Thu Dec 14, 2017 7:52 pm
by Mazza
Hi folks
It's a bit quiet... where's everyone gone...?
Does anyone know if the the omega b electric sunroof cover & motor will fit the mk3 facelift cavalier ?
Any modification needed to the cover, electrics or roof lining...?
Has anyone done it...?
Thanks in advance!
Re: Cavalier restoration
Posted: Thu Dec 14, 2017 10:04 pm
by Tobias_CDX
Do you want just total closure of the roof from central locking? If yes, then fitting the motor from Vectra B or Astra Mk3 is easier. I can upload pictures of the modifications if you want.
Re: Cavalier restoration
Posted: Thu Dec 14, 2017 10:12 pm
by Mazza
Thanks buddy. That'll be great if you can - no rush. Total closure - Ideally yes I'd like to get it all wired up.
I've seen one on my travels ... pretty good condition, both cover and motor. Only the light lens is missing, but I've got a few spare.
So just wanted to check before I paid for it...
Re: Cavalier restoration
Posted: Thu Dec 14, 2017 11:49 pm
by Tobias_CDX
I have to explain some things and start from the beginning:
Cavalier has a "dumb" roof motor. Just open/close and nothing else. Easily recognisable by the thick red and brown wire (directly mounted to motor), connection to switch also by thick wires. Switch is everywhere the same grey (and ugly) push button switch.
Late Astra Mk3 (I don't know since when), Astra Mk4 (until MY2001) and Vectra B got the cleverer roof motor. Open/close and closure by central locking. Recognisable by the 12-pin connector (i.e. used at central locking unit) at the side. All again with the old, grey (and ugly) switch. Wires to switch are thin because they only switch ground connection as signal and no power as at Cavalier.
As I first dealed with the roof motor conversion I also wanted a more better looking switch - preferabely with illumination - but not the Omega B version with selector switch. So far so good.
Let's start with the conversion of the roof motor (same procedure equal to switch type):
1. Close sun roof!
2. Remove interior lights and roof cover, disconnect roof switch.
3. Remove roof motor: 2 Phillips screws M5x25 and one M6 hex nut.
4. Disconnect power supply (single pin connector) and ground connection (small screw in roof sheet metal behind sun visor).
5. Remove the screw marked with yellow circle (I don't know the sense of it...).

If you now fit the motor to the roof you will notice that it is slanted.
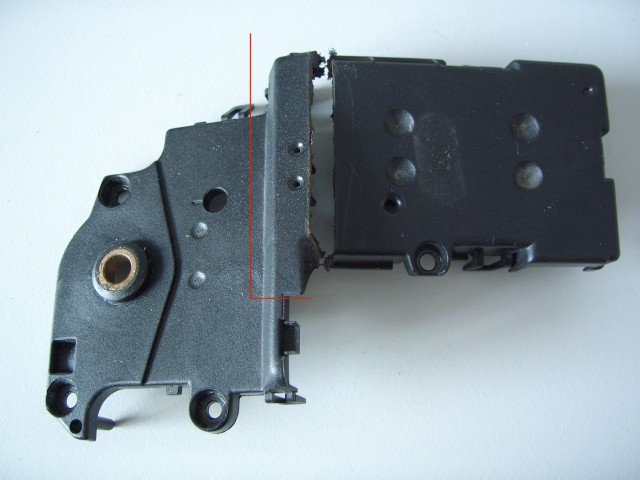
6. Dismantle cover of roof motor (4 Torx screws) and keep teeth gears where they are! Cut cover as shown in picture and at the red line in the picture. File edges and renew grease in motor (good opportunity now).
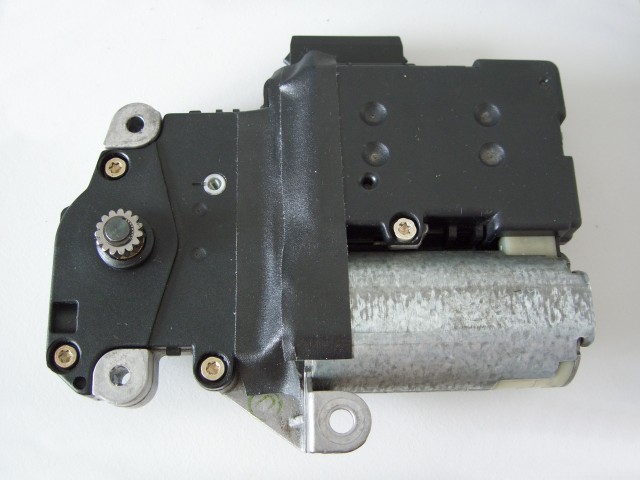
7. Install cover and insulate the uncovered parts with duct tape (as shown).
Now 2 ways are possible - with or without removing the metal bracket (I removed it).
8. Remove metal bracket or bend the part marked with green circle (see picture above) and remove the rubber buffer.
9. Install roof motor, use the 2 screws from item 3 and screw from item 5.
10. Rewire roof motor according to wiring diagram.
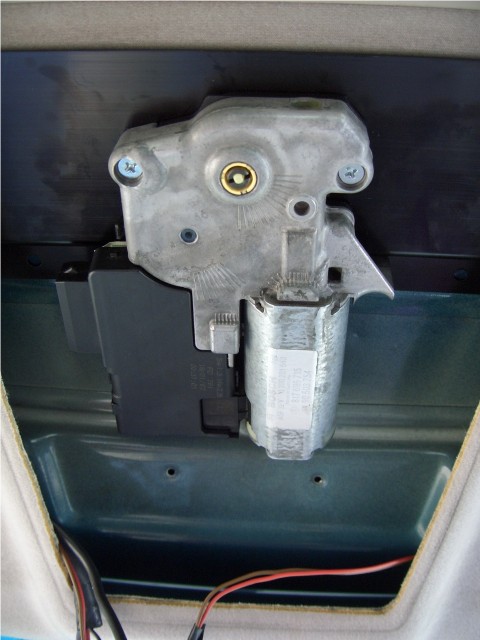
Picture of fitted motor:
Now it's time to decide!

Which switch shall it be?
The grey ugly one? Then use your old roof cover. Or the "premium version" with illumination?
If you want to have the better one this will cost some efforts and is a little bit tricky!
Two problems occur: illumination of switch is unforeseen in original and roof motor is controlled by switched ground.
1. Buy roof cover from Zafira A part number 9184576 (approx. 15 GBP) and a window lifter switch from passenger side of a Corsa C together with its 4-pin connector.
Ignore the two-button-switch.

2. Dismantle window lifter switch, resolder the illumination LED and solder it the other way round (best time to fit LED with different color!).
3. Connect as follows: switch pin 1 to ground, pin 2 to roof pin 2, pin 3 to roof pin 4 and pin 4 to ignition live wire (the same as for roof motor).
4. File the slotted holes for mounting until it fits to screw holes in roof. The back part is held by the weatherstrip.
Now you are done!
Re: Cavalier restoration
Posted: Fri Dec 15, 2017 12:47 am
by Robsey
Mazza wrote:Hi folks
It's a bit quiet... where's everyone gone...?
Does anyone know if the the omega b electric sunroof cover & motor will fit the mk3 facelift cavalier ?
Any modification needed to the cover, electrics or roof lining...?
Has anyone done it...?
Thanks in advance!
I have an Omega-B one-touch electric sunroof, wired to my alarm
(Meta A85m).
It fits physically after you have removed a few bits.
Electrically, you will need the following wires.
12 volts from ignition live fuse F10.
12 volts from a permanent live.
A ground wire.
Full closure wire (short to earth to trigger).
As you have a facelift Cavalier, you can connect the full closure roof wire to the central locking module full closure wire.
If you are doing this via a remote fob, you will need a timed switch to hold thr wire shorted to earth for 10 to 15 seconds.
If doing it by the door lock, just hold the key in the 45° position (lock not dead-lock) until the roof stops.
The rotary switch illuminates. You also need to extend the mounting screw slots at the front to fit the cavalier fixture holes.
Re: Cavalier restoration
Posted: Fri Dec 15, 2017 7:32 am
by Mazza
Thank you guys - much appreciated.
Now I'll have to look deep into my wallet,...
Btw - on my gsi 4x4 J plate - it had total closure with the factory alarm and when deadlock was engaged.
Re: Cavalier restoration
Posted: Fri Dec 15, 2017 9:12 am
by Robsey
Indeed, Vauxhall had several building-block type add ons for their alarms.
Here is a brief overview of some parts.
viewtopic.php?f=15&t=15815
Damn! - Just realised that I have another topic to repair. Hmm another job this weekend. I shall dig out the images over the weekend.
Update - Images now added courtesy of postimages.
Re: Cavalier restoration
Posted: Sat Dec 16, 2017 4:11 pm
by Mazza
Finally picked up my spare gsi body kit ... looks a bit different since I last seen it - power wash will fix it!!
Re: Cavalier restoration
Posted: Mon Dec 18, 2017 5:43 pm
by Mazza
Quick question - what's acceptable price for an omega b electric interior sunroof cover, switch & motor? Never bought one before..
Any guide prices..?
Re: Cavalier restoration
Posted: Mon Dec 18, 2017 6:21 pm
by Robsey
There is one on ebay for 35 quid delivered.
That is something like what I paid 10 years ago.
I would not go above £50 unless it is in very good nick and complete with the connector and a small length of loom.
Re: Cavalier restoration
Posted: Tue Dec 19, 2017 4:59 pm
by Mazza
Thanks Robsey - I've snapped them up.
I also got the reading lights - so complete.
Re: Cavalier restoration
Posted: Tue Dec 19, 2017 9:17 pm
by Robsey
Excellent news.
Some nice toys for the jalopy.
Hopefully you will have everything sorted by the summer.

Re: Cavalier restoration
Posted: Tue Dec 19, 2017 9:27 pm
by Mazza
Mmm ... well that was the plan, but doubt it'll happen by then.
All the mechanical components, Engine, gearbox, transfer box, diff and gear box are being pulled out .... soon.
So I very much doubt it'll be any time soon... more to come.
Where's my tissue box!!!
Re: Cavalier restoration
Posted: Tue Dec 19, 2017 9:33 pm
by Robsey
All depends how much is being done.
Also depends what additional work is found during the restoration.
Hopefully just a matter of months, not years.
Looking forward to seeing the progress in the months ahead.
Re: Cavalier restoration
Posted: Tue Dec 19, 2017 10:29 pm
by Mazza
Time will tell ...
Next on the agenda - I need to find new set of headlights & front indicators.
I've seen angel eyes, but undecided...
But still need set of original highlights- which ones are the best for cav turbo ?
I'm pretty sure the existing ones are Carello brand. There's other brands such as Bosch, Lucas, hella.. etc. Had a look, prices differ a lot for the same lights
Anyone..?
Re: Cavalier restoration
Posted: Wed Dec 20, 2017 11:42 am
by Tobias_CDX
Front indicators are still available as original parts. Best head lights for the facelift versions are Carello or Hella. Original part for example:
http://www.opel-classicparts.de/scheinwerfer-51018.html
My opinion: don't use headlights with angel eyes. Total crap - so much light on the street as you have putted candles into the lights. And to be honest: angel eyes never look good at these "classic" cars.
Re: Cavalier restoration
Posted: Wed Dec 20, 2017 5:46 pm
by Mazza
Thanks Tobias - I'm still in two minds....
Nevertheless I still need a full standard light set.
Are these electric adjustable ... or same across the cavalier range ?
Re: Cavalier restoration
Posted: Wed Dec 20, 2017 11:31 pm
by Cavalier342
Standard is as good as original. In my mind, that's perfect for a restoration.
There should be a manual adjust knob on the basic headlamps, it depends on which model they are fitted on, anything above an LS (facelift) will have electrically adjustable level headlamps.
Re: Cavalier restoration
Posted: Wed Dec 20, 2017 11:45 pm
by Robsey
Specifications did change slightly between production years.
In 1994 the LSi also had electrically adjusted headlight beam
Re: Cavalier restoration
Posted: Wed Dec 20, 2017 11:49 pm
by Mazza
Thanks guys.
Someone suggested euro lights - my response @&@!?"@&!£!**^*&!!'b@"&!!!
Re: Cavalier restoration
Posted: Wed Dec 20, 2017 11:57 pm
by Robsey
I changed to Angel Eyes because I thought that standard lights gave poor illumination of the road.
Angel Eyes aren't really any better.
It is the bulbs that makes the difference.
Osram Night Breakers work well for me.
As for Angels Eyes - I like the look of them - the car looks less dated, but obviously they also detract from the 'original' look.
In a purist view point - stick with original headlights... Carellos are the best from what I have heard.
Depo Angel Eyes / Halo light build quality can be quite poor.
They break quite easily due to the use of cheap plastics.
Re: Cavalier restoration
Posted: Thu Dec 21, 2017 12:12 am
by Mazza
Thanks Robsey / cavalier342 appreciated.
Got a few crazy people at work...
I'll need to look up the part numbers for both electric headlights and front indicators.
Are the front side lights also made by carello?
Re: Cavalier restoration
Posted: Thu Dec 21, 2017 12:25 am
by Tobias_CDX
Mazza wrote:Are these electric adjustable ... or same across the cavalier range ?
These are manual but you can install the motor nevertheless.
Front indicators are made by ZKW. Left is 90487605, right is 90487606.
Re: Cavalier restoration
Posted: Thu Dec 21, 2017 12:50 am
by Robsey
Front side lights?
Side lights are integral with the headlamp.
Or do you mean the wing mounted indicators.?
Note that the wing indicators are common to many other Vauxhalls in the late eighties and early nineties. (UK vehicles only).