1990 G-plate 1.8L Hatchback

Show off your pride and joy! All Mk3 Cavaliers are welcome (please post only one thread per car)
User avatar
MrSteve
Posts: 39
Joined: Fri Aug 25, 2017 12:15 am
Location: Lancaster

1990 G-plate 1.8L Hatchback

Post by MrSteve »

Hi all

Thought I should introduce my Cavalier properly.

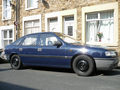
I bought this via ebay in May, having missed out on it when it first came up for sale on ebay last autumn , when it looked like this- completely standard and in pretty good condition apart from some minor scrapes and scratches. It had been off the road for quite a while, but was sold with a full MOT.

September 2017- sweet!
Image

It re-appeared in April with a dreadful ad with little information and a couple of bad pics (taken through the house window!). The seller sent me some better pics. It would be sold with the original wheels- fine by me!

April 2018- not so sweet!
Image

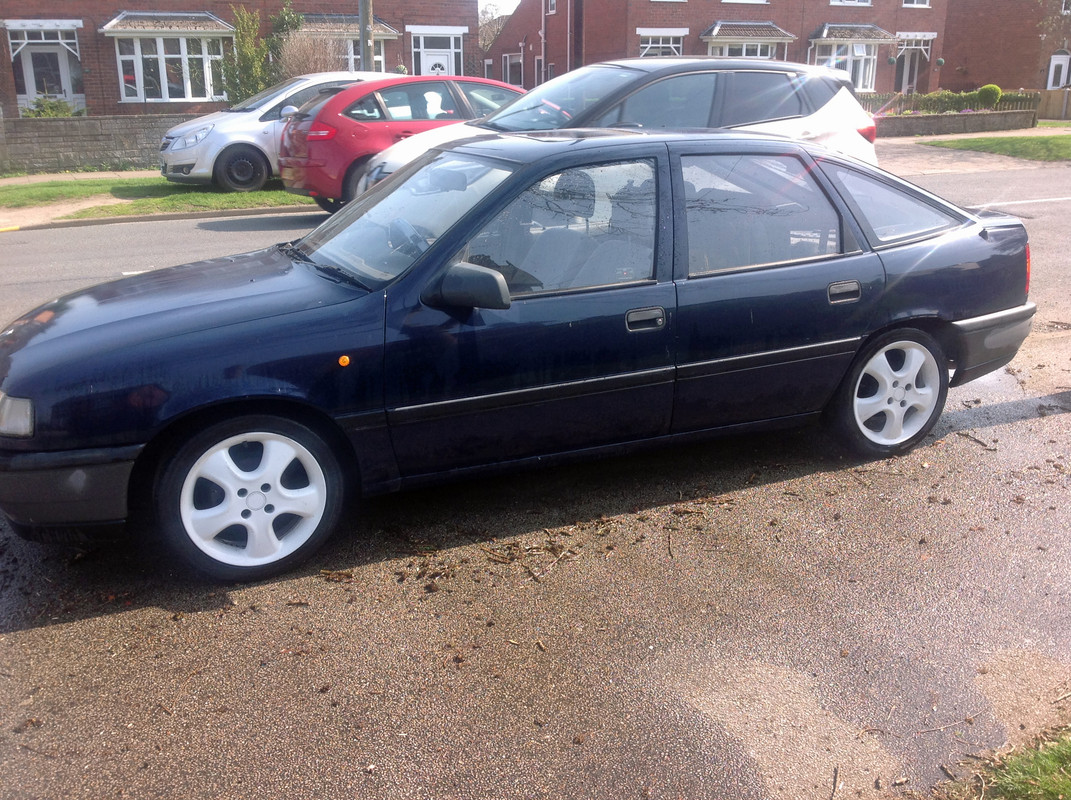
All the new owner had done was fit new leads, cap and rotor arm and then fitted lowered springs, shocks and those alloys. He hadn't kept the original springs, unfortunately. He'd also acquired all the seats and door cards from a later SRi, which filled the back of the car.

So at the start of May I travelled over to Lincoln on the train (well, 3 trains), handed over the cash, sorted out the tax online and drove the car back home.

That was interesting! The steering was horrible above 60- shaking steering wheel/vague feel- and it was really hard to get into/out of 3rd/4th gears. And the water temp gauge didn't work. Nor the interior blower (first 2 speed settings awol). And the heater was stuck on hot. And the brakes seemed to pull a bit to one side.

But I made it home!

The plan was now to use the remaining 3 months of MOT to get it ready for the next MOT.

The first job was to check the tyre pressures- they were way low and uneven across the axles- that probably explained part of the interesting steering. I also noticed that all the tyres bar one were shot. They were cracking very badly and the sidewalls were crazed. I decided they would do, as I wasn't going to go far in the car. I also took the wheel trims off at this point, as I knew the wheel would be on and off quite a bit (and I couldn't actually get them on again!).

Next job was to check the brakes all round. Rear brakes were like new, but the discs were really pitted from standing. I decided to buy new discs and pads, and clean up and copper grease the caliper sliding surfaces. Before fitting the new discs I checked with the garage next door and they thought the discs and pads were ok- just needed to be used. So I sent the discs and pads back- bit of money saved there!

Whilst the wheels were off I could see that one of the track rod end boots was split, and that the rubber bushes on the anti-roll bar drop links were utterly knackered. So I replaced these items and got the tracking done. Big improvement to the steering, but there was still a light knocking sound, which was either the suspension arms or the lowered springs rattling.

Next job was an oil and air filter change. Air filter was probably good for another year or 2, but the oil was very black, so new oil would do it some good.

A new water temp sender brought the temp gauge back to life.

I turned to the interior now- it was rather dirty and a bit whiffy, so I gave it good vacuum, cleaned the surfaces, then gave all the seats a shampoo- it now smelled better.

Image

Next job was to investigate the non-working heater control. It turned out that the brown plastic end of the cable at the slider arm was broken. I tried plastic glue but it wouldn't hold. Fortunately, genuinepartsearch could supply a new one for a tenner, and a few days later the new one was fitted and normal heater service was resumed.

Image

I now had to do a bit of welding on the RH front wheel arch- it had rotted a fair way around the rear edge. I now understood why the guy I bought the car off was surprised it had passed its last MOT...

I cut out the rusted steel, treated the surface rust behind and then welded in a new section. It took a few hours, but I was pleased with the result.

So now for the MOT I just had to get new tyres, wiper blades all round and unblock a windscreen washer jet.

I decided it was time to sort out the rusty wheels. I cleaned and lightly sanded the rims, masked off the tyres with playing cards then sprayed all the rims satin black. Another big visual improvement. Of course, I didn't want to scratch the paint so didn't bother putting the wheel trims back on. So the car now looked like this.

Image

After a week or so I got some Nexen N'Blue summer tyres for the front, as they seemed a decent tyre. They are quiet and grip fine, so I can recommend these. A month later I did the rear tyres- this time I got some cheap Tracmax Privilo tyres. They are quiet too and grip seems fine.

I had read about how changing the front wiper blades is a bit tricky, but I found that there is enough space on a wiper blade that you can change them without needing to take the arms off. That said, I will probably fit later arms as the spring on the drivers side arm twangs against the windscreen seal- harmless but annoying.

It was now time to sort out the brown coolant, which meant the thermostat had to come off to give it a good flush through. I Plus Gased the bolts and then began carefully undoing the bolts...

Snap!

One of the bolts sheared off and there was no access to drill it out, so the cam belt had to come off to be able to then remove the whole thermostat housing. Deep joy.

The water pump was stuck fast too- kind of crucial as this is the timing belt tensioner too. However, some thumping with a long piece of hardwood got it moving (eventually) and it popped out- it was in decent nick, so I got a new O-ring for when it was time to refit it.

The garage man snapped off an easy-out whilst drilling out the snapped bolt. So I had to find an engineering firm nearby that could drill it out. A few days, and £10 lighter, I got the housing back on, fitted the water pump with new O-ring and put a new timing belt back on.

Then I stripped one of the thermostat bolt threads when tightening up the 3 thermostat bolts, so the stat housing had to come off again. It wasn't me being ham-fisted as they only get tightened to 6 lb ft- but the thread had been damaged when extracting the snapped-off bolt. So I had a Time-Sert fitted by a different firm. Finally got it all back together and running again.

However, I had managed to squash the front to back plastic fuel pipe with a jack just enough to restrict the fuel supply and cause a failure to start and flattened the battery in the process. Cue new fuel pipe.

It seemed like a good time to fit a fuel filter into the fuel line before the fuel pump too. Finally, the car was in one piece and running again.

I still hadn't completed the coolant flush though...

This was when it decided to not start- a bit nerve-wracking as the MOT was going to expire and you need a running car for an MOT test! Original thread here

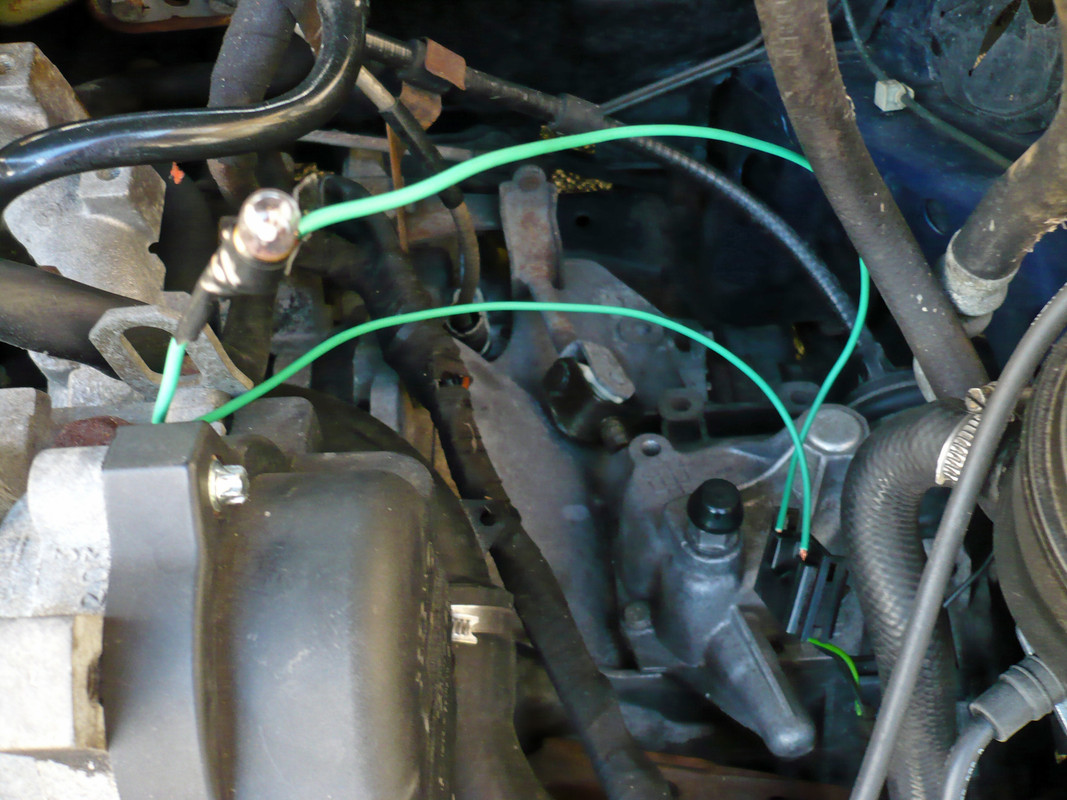
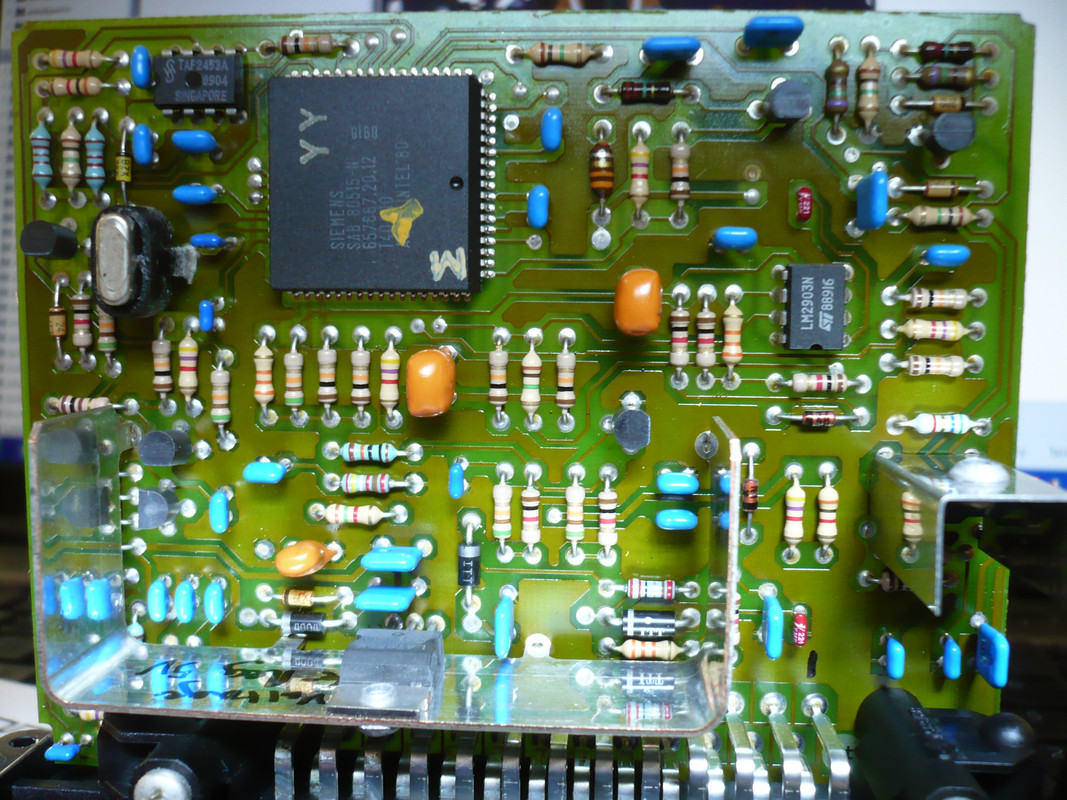
I had no choice but to cancel the MOT and try to get it running again. I tried a new coil, ignition amplifier and second-hand MSTS unit- none of them made a difference.

The car then decided it would start again, and I re-booked the MOT for 2 days' time. On the morning of the MOT it wouldn't start, then eventually ran, but idled roughly- some carb cleaner helped and so I went for a blast along the local bypass and then left it at the garage for its MOT.

I was nervous, as it was quite possible that it would not start for them. After a couple of hours, I checked online and the result was:
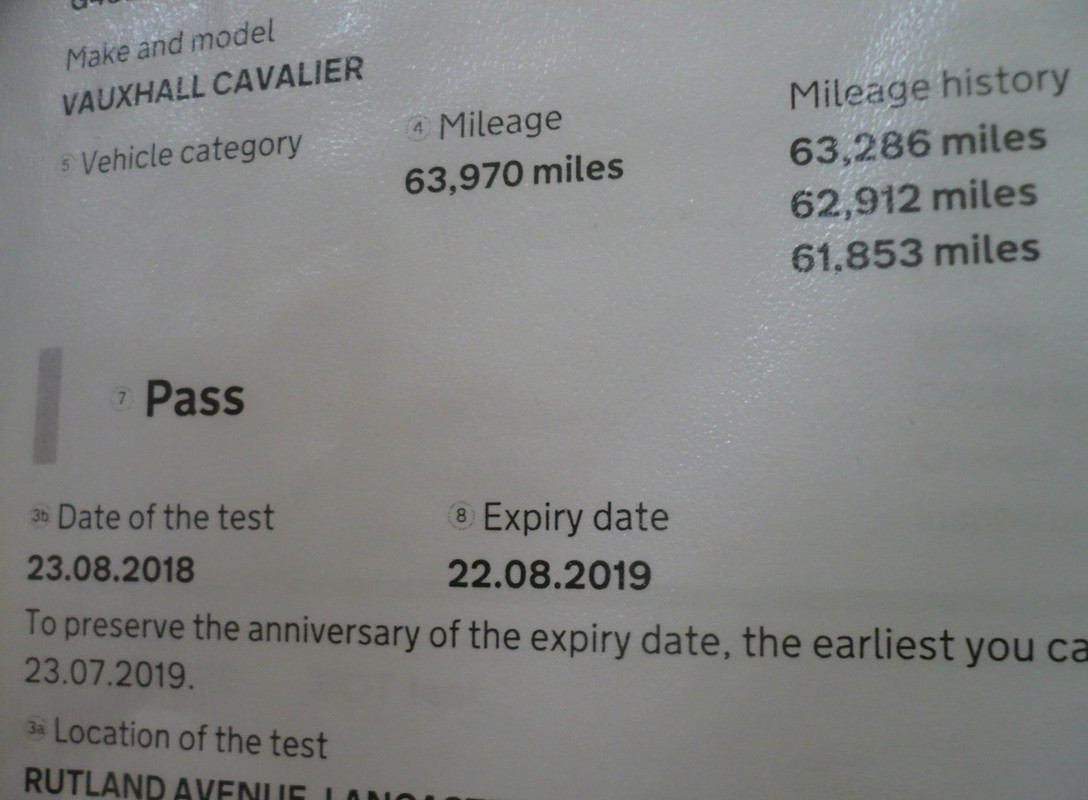
Image

And no advisories!

The garage couldn't find anything of concern with the suspension, so thought the knocking noise was just the lowered springs rubbing against each other. Indeed, now that I have the peace of mind that an MOT pass brings, you can indeed hear a kind of squeaky/twangy/knocking noise as the spring coils move. Lesson- don't fit lowered springs!

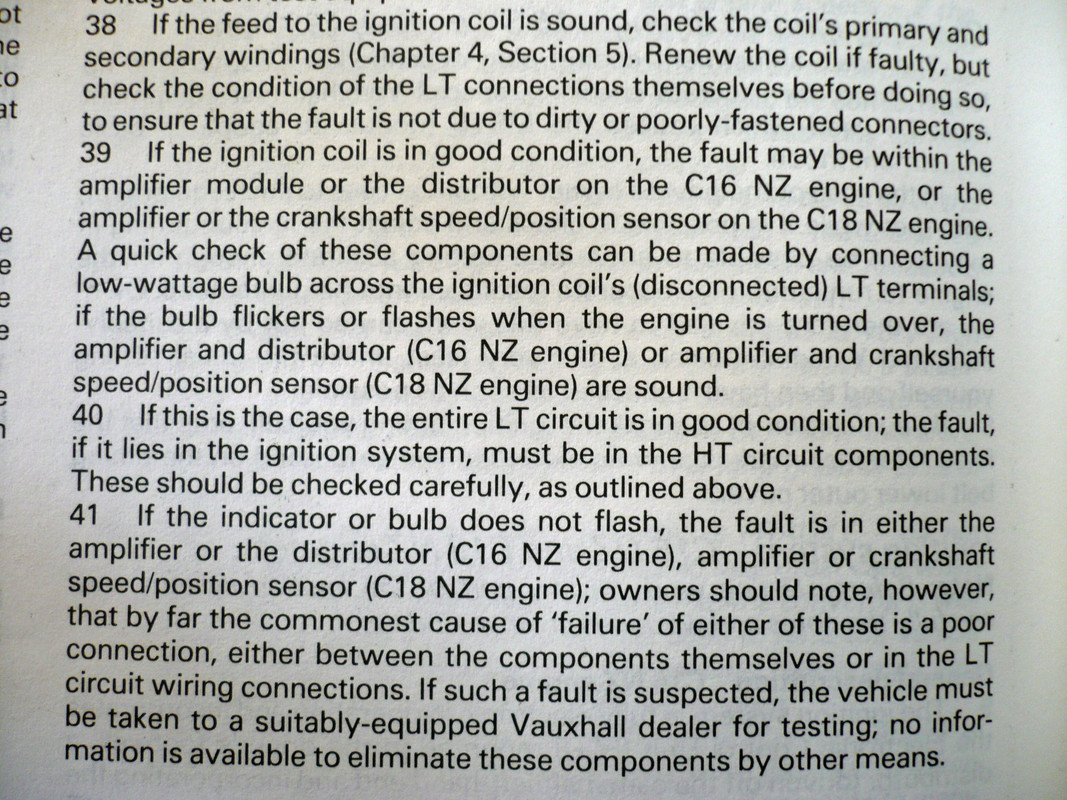
I went for a couple of drives in the car and also ordered up a replacement HT lead (the one from coil to distributor), as the one fitted was way too long- the correct one has a Bosch part number of 0 986 356 229 and is 30cm long so fits perfectly.

Unfortunately, I can't test if the new lead has made a difference, as the car has gone back to sulking and won't start at all- just turning over and not catching- like before.

So today, I decided to take the carb out and clean it properly inside. I was expecting lots of dirt or corrosion in the float bowl, but it was near spotless- even the little cone-shaped filter in the fuel inlet was clean too. I still used nearly a full can of carb cleaner going through every jet and orifice I could find!

The carb is back on now, so tomorrow I will have another go at starting the car to see if there has been any change.
User avatar
Envoy CDX
Club Admin
Posts: 9681
Joined: Sun Sep 23, 2007 3:51 pm
Location: Jarrow, Newcastle Upon Tyne

Re: 1990 G-plate 1.8L Hatchback

Post by Envoy CDX »

Looks like a nice base to start from, shame it got chavved before you got it, but I'm interested to see how this developes :)
Check the Rules!

Raw 8v Power! - Bad Cav, Naughty Cav... Cav want's to do 90!

The How2 Index
iangsi
Club Admin
Posts: 1709
Joined: Tue Jan 19, 2010 4:58 pm
Location: Bromley, Kent.

Re: 1990 G-plate 1.8L Hatchback

Post by iangsi »

Looks to be in good condition for a pre facelift car nice find :thumb
Mazza
Registered user
Posts: 258
Joined: Thu Nov 03, 2016 11:00 am

Re: 1990 G-plate 1.8L Hatchback

Post by Mazza »

Whoa,... now that’s a proper read.

Nice job so far. I guess it’s part of the ‘fun’ in owning a cavalier. Looking fwd to the updates.
User avatar
Robsey
Club Admin
Posts: 10619
Joined: Fri Dec 12, 2008 1:42 pm
Location: East Manchester

Re: 1990 G-plate 1.8L Hatchback

Post by Robsey »

Do you have an anti run-on solenoid on the carb?

My mk2 had a Pierburg 2e3 carb, but no anti-dieselling solenoid.
Vauxhall had a habit of fitting and removing stuff for the hell of it.
So they may have refitted it for the mk3s.

It has got to be a loose or dirty connection for it to be an intermittent fault.

Most other issues in my mk2 caused ignition failure when they got warm (faulty amplifier), or failed completely (coil or amplifier).

For an intermittent cold start issue.
Possibly poor choke / fuel enrichment function in cold weather conditions.
But weather has been warm for 4 months.

As James has said already, cold start issues are usually damp / condensation any where in the ignition system.
User avatar
MrSteve
Posts: 39
Joined: Fri Aug 25, 2017 12:15 am
Location: Lancaster

Re: 1990 G-plate 1.8L Hatchback

Post by MrSteve »

It is a 2e3. The anti-run-on solenoid clicks when the ignition is switched on , so it *appears* to be ok. By ok I mean that I've not had random rough running/stalling that a failing solenoid might display. And they are really expensive to replace so I'm hoping that's not the problem!

The carb did have petrol in it when I took it off, so fuel is getting into the float bowl and you get an extra squirt of petrol when you rotate the throttle arm. The choke seems to open up fine as the engine warms up.

I did think this was an ignition problem as there was no spark when doing the spark plug to block test- but a new ignition amp and coil made no difference, and the plugs, leads, rotor arm and cap were recent.

But then it did eventually start and run fine before the MOT test (day of the test excepted) and then ran fine for a few days after.

I have a niggly doubt about the battery- it is an 063 batttery and I've read that it should have a slightly larger 075 battery. Yet, it turns the starter over fast enough and has started the car fine on the occasions when it has started normally...!

I think it sulks every time I do something to it!
User avatar
MrSteve
Posts: 39
Joined: Fri Aug 25, 2017 12:15 am
Location: Lancaster

Re: 1990 G-plate 1.8L Hatchback

Post by MrSteve »

Had another go at getting the Cav started today.

As I would need to turn the engine over for a while to fill up the carb float bowl, I thought I would have another go at the light bulb test referred to in the Haynes manual here:

Image

So I disconnected the LT connector at the coil and inserted my little bulb and connecting wires like this:

Image

It's a little bulb, I promise- it's just very close! :lol:

On turning the engine over the bulb flashed regularly every 2-3 seconds during the first 10 or so seconds of cranking, but it stopped flashing completely after that. So pretty much the same as before.

Though I'm not sure how often the bulb should flash during this test- anyone know?
cavalier1990
Registered user
Posts: 1463
Joined: Wed Jun 29, 2011 9:15 pm
Location: Paisley, Scotland

Re: 1990 G-plate 1.8L Hatchback

Post by cavalier1990 »

That's a nifty test that I'll keep in mind if I ever get any issues with mine. I'd imagine the bulb should keep flashing as the engine is continually turning over and the ignition LT circuit is being pulsed by the rotation. Have you also tried a volt meter across the terminals while you do this to see what happens to the voltage when the light stops flashing? If it goes to low volts would imagine there is something wrong with the amplifer or dizzy.

Is that a newish selector mechanism in there, the top of it is gleaming?
User avatar
Robsey
Club Admin
Posts: 10619
Joined: Fri Dec 12, 2008 1:42 pm
Location: East Manchester

Re: 1990 G-plate 1.8L Hatchback

Post by Robsey »

My money is on the amplifier.

I have seen these fail when they start to warm up.
cavalier1990
Registered user
Posts: 1463
Joined: Wed Jun 29, 2011 9:15 pm
Location: Paisley, Scotland

Re: 1990 G-plate 1.8L Hatchback

Post by cavalier1990 »

Robsey wrote:My money is on the amplifier.

I have seen these fail when they start to warm up.
Makes sense that is the culprit. I'm guessing that amplify the crank sensor signal to 12v for LT circuit. If so my reverse lights will pulse when engine is running woops.
User avatar
MrSteve
Posts: 39
Joined: Fri Aug 25, 2017 12:15 am
Location: Lancaster

Re: 1990 G-plate 1.8L Hatchback

Post by MrSteve »

cavalier1990 wrote:That's a nifty test that I'll keep in mind if I ever get any issues with mine. I'd imagine the bulb should keep flashing as the engine is continually turning over and the ignition LT circuit is being pulsed by the rotation. Have you also tried a volt meter across the terminals while you do this to see what happens to the voltage when the light stops flashing? If it goes to low volts would imagine there is something wrong with the amplifer or dizzy.

Is that a newish selector mechanism in there, the top of it is gleaming?
I was thinking it should keep on flashing. I'm guessing that each flash occurs around the point where the missing teeth on the crankshaft trigger wheel pass the sensor?

I'll have to tape the multimeter probes into the terminals, which could be fun* - will give that a go later if I have the time.

The gear selector is just very clean- it was black with oily gunk, but cleaned up a treat with a brush and some petrol. I put some fresh grease on that long selector pin too.
cavalier1990
Registered user
Posts: 1463
Joined: Wed Jun 29, 2011 9:15 pm
Location: Paisley, Scotland

Re: 1990 G-plate 1.8L Hatchback

Post by cavalier1990 »

MrSteve wrote:
cavalier1990 wrote:That's a nifty test that I'll keep in mind if I ever get any issues with mine. I'd imagine the bulb should keep flashing as the engine is continually turning over and the ignition LT circuit is being pulsed by the rotation. Have you also tried a volt meter across the terminals while you do this to see what happens to the voltage when the light stops flashing? If it goes to low volts would imagine there is something wrong with the amplifer or dizzy.

Is that a newish selector mechanism in there, the top of it is gleaming?
I was thinking it should keep on flashing. I'm guessing that each flash occurs around the point where the missing teeth on the crankshaft trigger wheel pass the sensor?

I'll have to tape the multimeter probes into the terminals, which could be fun* - will give that a go later if I have the time.

The gear selector is just very clean- it was black with oily gunk, but cleaned up a treat with a brush and some petrol. I put some fresh grease on that long selector pin too.
i Think that is the way it works, quite a simple set up when you think on it. I think the ring is magnetic and induces a voltage in the sensor, through a small coil winding, but when the gap comes round the voltage collapses, which likely switches the amp on and this feeds the ignition coil for that brief second to distribute the spark.

Good that you got the car before it got completely chaved, what's your plans for the springs, you going to bring them back up. In all honesty it'd dont look to bad with the black wheels and lowered a bit.
User avatar
MrSteve
Posts: 39
Joined: Fri Aug 25, 2017 12:15 am
Location: Lancaster

Re: 1990 G-plate 1.8L Hatchback

Post by MrSteve »

cavalier1990 wrote: i Think that is the way it works, quite a simple set up when you think on it. I think the ring is magnetic and induces a voltage in the sensor, through a small coil winding, but when the gap comes round the voltage collapses, which likely switches the amp on and this feeds the ignition coil for that brief second to distribute the spark.

Good that you got the car before it got completely chaved, what's your plans for the springs, you going to bring them back up. In all honesty it'd dont look to bad with the black wheels and lowered a bit.
If I had the money I would put standard springs back on, but I don't so it will have to stay as it is!

I've got a new (hopefully working) ignition amplifier on the way- a Motaquip one this time. The one on the car is a Lucas unit- just remembered that it can't have been the original one as it had scratches on the metal base so no doubt came from scrappie.

I really hope this cures it because I want to drive the thing!
User avatar
Robsey
Club Admin
Posts: 10619
Joined: Fri Dec 12, 2008 1:42 pm
Location: East Manchester

Re: 1990 G-plate 1.8L Hatchback

Post by Robsey »

The shortened springs can make the ride feel much firmer. (I recently fitted Spax 30 / 40 lowered springs and Bilstein B4 dampers)

I also find going from 175- 70 R14 tyres to 195-60 R15 tyres recently, made the ride even more firm.

Quite a shock after wallowing around on standard springs for 20 years.

If your local roads are okay, then lower springs and lower tyre profiles can be acceptable,
but if your local roads are all pot holes and speed bumps, then I would definitely revert to standard springs as soon as finances allow.
User avatar
MrSteve
Posts: 39
Joined: Fri Aug 25, 2017 12:15 am
Location: Lancaster

Re: 1990 G-plate 1.8L Hatchback

Post by MrSteve »

No joy with the replacement ignition amp today.

All I succeeded in doing was flatten the battery- started at 13.05V and went flat at 12.4V.

There is fuel in the carb, so at least that bit is ok.

I did the light bulb test again and it didn't flash at all this time round, which means either the new amp is a dud (this'll be the 3rd one I've tried), crank sensor, or the MSTS unit is no longer working properly.

The spare MSTS unit I got a month back makes no difference either- maybe I now have 2 dud MSTS units?

The only way to check any of these is on another 18SV and there aren't many of those around near me!

And if the MSTS units are dead, then that would mean a massive spend on this sort of thing:

Image

£500-ish including wiring plus a dyno session to get it running right...£750 total perhaps? :shock:
cavalier1990
Registered user
Posts: 1463
Joined: Wed Jun 29, 2011 9:15 pm
Location: Paisley, Scotland

Re: 1990 G-plate 1.8L Hatchback

Post by cavalier1990 »

MrSteve wrote:No joy with the replacement ignition amp today.

All I succeeded in doing was flatten the battery- started at 13.05V and went flat at 12.4V.

There is fuel in the carb, so at least that bit is ok.

I did the light bulb test again and it didn't flash at all this time round, which means either the new amp is a dud (this'll be the 3rd one I've tried), crank sensor, or the MSTS unit is no longer working properly.

The spare MSTS unit I got a month back makes no difference either- maybe I now have 2 dud MSTS units?

The only way to check any of these is on another 18SV and there aren't many of those around near me!

And if the MSTS units are dead, then that would mean a massive spend on this sort of thing:

[ Image ]

£500-ish including wiring plus a dyno session to get it running right...£750 total perhaps? :shock:
Sounds like you've eliminated it to the crank sensor if that is the only thing you haven't tried, and another msts unit made no difference.
User avatar
MrSteve
Posts: 39
Joined: Fri Aug 25, 2017 12:15 am
Location: Lancaster

Re: 1990 G-plate 1.8L Hatchback

Post by MrSteve »

It's getting a bit Groundhog Day to be honest. If I get another crank sensor that will be the 4th one I've tried!

Sensor 1- the original Bosch sensor- working fine right up until I replaced it with:
Sensor 2- Meyle brand- new- currently on the car.
Sensor 3- Siemens brand- new- made no difference to the lack of starting, so reconnected the Meyle one.

For ignition amplifiers I have got:

Amp 1- the existing one that came on the car- worked fine- no running issues.
Amp 2- Valeo unit- new, but didn't cure starting problem.
Amp 3- Motaquip unit- new again, but also hasn't cured starting problem.

I must be the unluckiest person on the planet if I have got 3 dead ignition amplifiers, 3 dead crank sensors and 2 dead MSTS units!
cavalier1990
Registered user
Posts: 1463
Joined: Wed Jun 29, 2011 9:15 pm
Location: Paisley, Scotland

Re: 1990 G-plate 1.8L Hatchback

Post by cavalier1990 »

MrSteve wrote:It's getting a bit Groundhog Day to be honest. If I get another crank sensor that will be the 4th one I've tried!

Sensor 1- the original Bosch sensor- working fine right up until I replaced it with:
Sensor 2- Meyle brand- new- currently on the car.
Sensor 3- Siemens brand- new- made no difference to the lack of starting, so reconnected the Meyle one.

For ignition amplifiers I have got:

Amp 1- the existing one that came on the car- worked fine- no running issues.
Amp 2- Valeo unit- new, but didn't cure starting problem.
Amp 3- Motaquip unit- new again, but also hasn't cured starting problem.

I must be the unluckiest person on the planet if I have got 3 dead ignition amplifiers, 3 dead crank sensors and 2 dead MSTS units!
Sorry I missed you'd actually replaced them before. I'd probably have a bit of a step back and rethink about the problem as it's obviously not any of these components at fault if you've replaced them with the correct parts.

I've had these kind of things before where you are going round in circles and you kind of convince yourself it must be this but in actual fact when you stand back, think about it and do more testing you find the real issue.

It definitely does sound related to the feed for the ignition, you don't have an old alarm or something hanging around in there or some sort of immobilizer somewhere. Maybe worth checking ignition switch, look for bodged wiring or "interference" of wiring circuit anywhere in the ignition feed, including behind fusebox in case something has came adrift. I'm not 100% on the specifics of the way the ignition is energised from switch to > Feed i.e. the bits in between, but that is definitely where you need to be step by step tracing through voltage readings. I know the later cavs have a key sensor around the ignition barrel, I don't think the earlier ones had it but worth a check.
User avatar
MrSteve
Posts: 39
Joined: Fri Aug 25, 2017 12:15 am
Location: Lancaster

Re: 1990 G-plate 1.8L Hatchback

Post by MrSteve »

cavalier1990 wrote: Sorry I missed you'd actually replaced them before. I'd probably have a bit of a step back and rethink about the problem as it's obviously not any of these components at fault if you've replaced them with the correct parts.

I've had these kind of things before where you are going round in circles and you kind of convince yourself it must be this but in actual fact when you stand back, think about it and do more testing you find the real issue.

It definitely does sound related to the feed for the ignition, you don't have an old alarm or something hanging around in there or some sort of immobilizer somewhere. Maybe worth checking ignition switch, look for bodged wiring or "interference" of wiring circuit anywhere in the ignition feed, including behind fusebox in case something has came adrift. I'm not 100% on the specifics of the way the ignition is energised from switch to > Feed i.e. the bits in between, but that is definitely where you need to be step by step tracing through voltage readings. I know the later cavs have a key sensor around the ignition barrel, I don't think the earlier ones had it but worth a check.
There was an old Scorpion alarm fitted, but I removed that to eliminate it is a source of potential headaches- only had to repair one cut wire- the one that feeds the starter solenoid.

Had a quick multimeter session earlier. Unplugged the MSTS and checked voltages at its loom connector with ignition off, then ignition on.

Ignition off- 12V battery voltage to pin 12. 0.02V at pin 20.

Ignition on- battery voltage to pins 9 and 12, 0.2V less than battery voltage to pin 16 (EML).

MSTS connected, ignition on:

5V to MAP sensor

Crank sensor has 2.76V at pin 1 and 2.51V at pin 2.

Igntion amp- battery voltage at pins 1 and 3.
0.01V at pin 2
0.1V at pin 4

Coil- has battery voltage to black and green wires. I am guessing that it is the green one that gets switched off to make the HT side of the coil spark?

Image

Weird thing of note- the dash lighting for the heater slider control area comes on when the ignition is switched on.
User avatar
Robsey
Club Admin
Posts: 10619
Joined: Fri Dec 12, 2008 1:42 pm
Location: East Manchester

Re: 1990 G-plate 1.8L Hatchback

Post by Robsey »

The heater panel illumination is one bulb, which is turned on with an ignition live supply.
So that sounds perfectly normal to me.
User avatar
MrSteve
Posts: 39
Joined: Fri Aug 25, 2017 12:15 am
Location: Lancaster

Re: 1990 G-plate 1.8L Hatchback

Post by MrSteve »

Robsey wrote:The heater panel illumination is one bulb, which is turned on with an ignition live supply.
So that sounds perfectly normal to me.
Phew- thanks for confirming that Robsey- nice to have one thing fewer to worry about! :D
cavalier1990
Registered user
Posts: 1463
Joined: Wed Jun 29, 2011 9:15 pm
Location: Paisley, Scotland

Re: 1990 G-plate 1.8L Hatchback

Post by cavalier1990 »

MrSteve wrote:
cavalier1990 wrote: Sorry I missed you'd actually replaced them before. I'd probably have a bit of a step back and rethink about the problem as it's obviously not any of these components at fault if you've replaced them with the correct parts.

I've had these kind of things before where you are going round in circles and you kind of convince yourself it must be this but in actual fact when you stand back, think about it and do more testing you find the real issue.

It definitely does sound related to the feed for the ignition, you don't have an old alarm or something hanging around in there or some sort of immobilizer somewhere. Maybe worth checking ignition switch, look for bodged wiring or "interference" of wiring circuit anywhere in the ignition feed, including behind fusebox in case something has came adrift. I'm not 100% on the specifics of the way the ignition is energised from switch to > Feed i.e. the bits in between, but that is definitely where you need to be step by step tracing through voltage readings. I know the later cavs have a key sensor around the ignition barrel, I don't think the earlier ones had it but worth a check.
There was an old Scorpion alarm fitted, but I removed that to eliminate it is a source of potential headaches- only had to repair one cut wire- the one that feeds the starter solenoid.

Had a quick multimeter session earlier. Unplugged the MSTS and checked voltages at its loom connector with ignition off, then ignition on.

Ignition off- 12V battery voltage to pin 12. 0.02V at pin 20.

Ignition on- battery voltage to pins 9 and 12, 0.2V less than battery voltage to pin 16 (EML).

MSTS connected, ignition on:

5V to MAP sensor

Crank sensor has 2.76V at pin 1 and 2.51V at pin 2.

Igntion amp- battery voltage at pins 1 and 3.
0.01V at pin 2
0.1V at pin 4

Coil- has battery voltage to black and green wires. I am guessing that it is the green one that gets switched off to make the HT side of the coil spark?

[ Image ]

Weird thing of note- the dash lighting for the heater slider control area comes on when the ignition is switched on.
The low side of the coil should be 12v supply, the black wire, the green would be the switching, which would effectively collapse Voltage in coil by grounding through amp every pulse, then a hefty voltage is induced in the HT side of coil by the collapsing voltage in low side, which then earths through the distributor > spark to ground.
User avatar
MrSteve
Posts: 39
Joined: Fri Aug 25, 2017 12:15 am
Location: Lancaster

Re: 1990 G-plate 1.8L Hatchback

Post by MrSteve »

cavalier1990 wrote: The low side of the coil should be 12v supply, the black wire, the green would be the switching, which would effectively collapse Voltage in coil by grounding through amp every pulse, then a hefty voltage is induced in the HT side of coil by the collapsing voltage in low side, which then earths through the distributor > spark to ground.
Many thanks!

I now realise that the ignition amplifier is just an NPN transistor in a black plastic case...hence the NPN transistor symbol on the wiring diagram!

I found this annotated picture of the type of amp fitted:

Image

Pin 1- green wire to coil
Pin 2- to earth
Pin 3- positive supply
Pin 4- input from MSTS

So when doing the LT light bulb test, that's why the bulb comes on- just like an alternator light then- most of the time there is 12V at either side, so no lit bulb. Then the transistor gets an input signal from the MSTS telling it to switch off, making a path to earth for electricity to flow, lighting the bulb/causing the magnetic field collapse that makes the HT side energise.

At least I am getting a better understanding of how things are/aren't working- i.e. either the amp isn't switching, the crank sensor isn't sending a voltage signal or the MSTS is no longer processing the crank signal and telling the amp to switch off when it should.
User avatar
Robsey
Club Admin
Posts: 10619
Joined: Fri Dec 12, 2008 1:42 pm
Location: East Manchester

Re: 1990 G-plate 1.8L Hatchback

Post by Robsey »

Going back to basics again.
I am sure I have said it once somewhere, so apologies if I sound like a cracked record.

Are the connector pins, and wiring loom between the msts, coil, +12v feed and ground all clean, dry, secure and in good overall condition.?

It is highly unlikely that replacing with new parts as many as four times could be down to faulty parts.
To me it would indicate that something is stopping electricity from flowing properly between those 4 components.
User avatar
MrSteve
Posts: 39
Joined: Fri Aug 25, 2017 12:15 am
Location: Lancaster

Re: 1990 G-plate 1.8L Hatchback

Post by MrSteve »

Robsey wrote:Going back to basics again.
I am sure I have said it once somewhere, so apologies if I sound like a cracked record.

Are the connector pins, and wiring loom between the msts, coil, +12v feed and ground all clean, dry, secure and in good overall condition.?

It is highly unlikely that replacing with new parts as many as four times could be down to faulty parts.
To me it would indicate that something is stopping electricity from flowing properly between those 4 components.
There's no bent pins and I gave the contacts I could access a rub with fine wet and dry to get them shiny again, like the LT male/female connectors at the coil.

Cables seem intact with no signs of chafing- looks as per factory.

You've given me an idea there- when I next have some time and dry weather, I'll take the top off the MSTS again and check for continuity between the connector pin to circuit board links, along the bottom of this photo below, and the wiring end points.

Image

It still amuses me that the main chip says Intel '80 in a car made a decade later...!
Post Reply