
Sadly they are quite tatty some with bubbling paint, one with significant kerb damage.
Besides - after the amount of effort and time put in by Troy... it would be insulting to put a set of scabby alloys on the old girl.
1994 Cavalier LSi C20NE (was C18NZ) Work-horse
Re: 1994 Cavalier LSi C20NE (was C18NZ) Work-horse
Ah Troy....btcctroy wrote:Wheels? When you getting these done
I see you forgot our Whatsapp conversation.
I was going to leave it until after the car is completed, but decided "in for a penny, in for a pound" so getting these done in a few weeks.
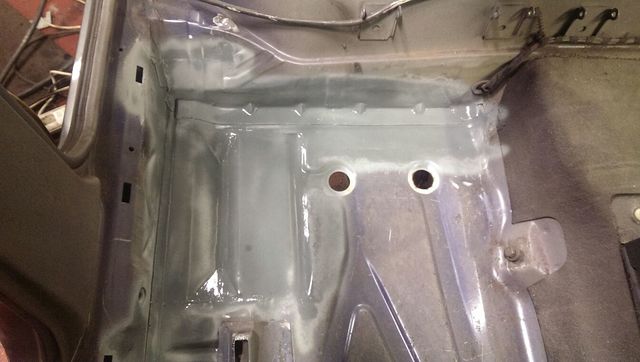
Anyway - Thinking of Troy - he has been hard at it again with his bodywork wizardry.
See if you can tell original metal from his genius repairs...
picture from earlier tonight.
Re: 1994 Cavalier LSi C20NE (was C18NZ) Work-horse
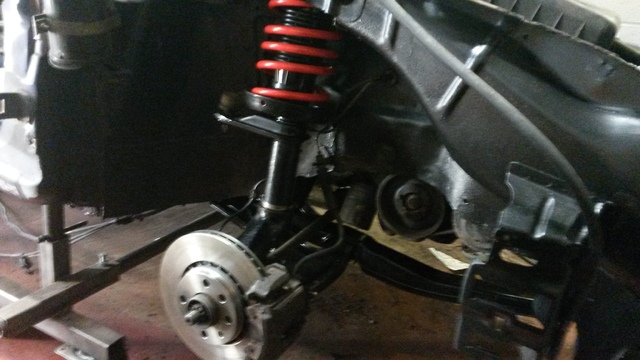
Got my right suspension leg back from the powder coaters (or steering knuckle to use the official name).ilovedmymantas wrote:The powder coating looks amazing! How long is that expected to last, out of interest ?
The powder coating is a very thick layer which looks very hard wearing.
As a guesstimate, I would think that the equivalent thickness in paint would be about 20 good coats. Very thick - nice.
The coated knuckle makes the new one look quite dull and shabby by comparison.
-
ilovedmymantas
- Registered user
- Posts: 1203
- Joined: Sat Jan 12, 2013 2:54 am
Re: 1994 Cavalier LSi C20NE (was C18NZ) Work-horse
That is just beautiful work, you're a god compared to other welders, keep it up !
" It's not rust. It's age-related patina " 
1980 vauxhall cavalier MK1 1.6L, 1982 opel manta berlinetta 1.8s, 1985 opel manta 2.0 gte, 1990 cavalier 2.0 gl ,1994 cavalier sri x20xev
-1995 cdx x20xev
---------------
Matt
1980 vauxhall cavalier MK1 1.6L, 1982 opel manta berlinetta 1.8s, 1985 opel manta 2.0 gte, 1990 cavalier 2.0 gl ,1994 cavalier sri x20xev
-1995 cdx x20xev
---------------
Matt
Re: 1994 Cavalier LSi C20NE (was C18NZ) Work-horse
Troy is very much a perfectionist..
We have laughed at the idea that he is a bit O.C.D. with everything he does.
But that works well for me.
This is why he has had the car for nearly 12 months. So much eye for detail can not be done in a three minute slap-dash hurry.
That and the fact that he works full time during the day, BEFORE he then goes on to his unit to slog out a few more hours on my very lucky Cav.
-
ilovedmymantas
- Registered user
- Posts: 1203
- Joined: Sat Jan 12, 2013 2:54 am
Re: 1994 Cavalier LSi C20NE (was C18NZ) Work-horse
Meant to be a credit to troy. Sorry about that, mindfartilovedmymantas wrote:That is just beautiful work, you're a god compared to other welders, keep it up !
" It's not rust. It's age-related patina "
1980 vauxhall cavalier MK1 1.6L, 1982 opel manta berlinetta 1.8s, 1985 opel manta 2.0 gte, 1990 cavalier 2.0 gl ,1994 cavalier sri x20xev
-1995 cdx x20xev
---------------
Matt
1980 vauxhall cavalier MK1 1.6L, 1982 opel manta berlinetta 1.8s, 1985 opel manta 2.0 gte, 1990 cavalier 2.0 gl ,1994 cavalier sri x20xev
-1995 cdx x20xev
---------------
Matt
Re: 1994 Cavalier LSi C20NE (was C18NZ) Work-horse
No worries - I knew it was aimed at Troy...
I have never thought of myself as anything but Mr Average... so no mind-fart observed - lol.
I have never thought of myself as anything but Mr Average... so no mind-fart observed - lol.
Re: 1994 Cavalier LSi C20NE (was C18NZ) Work-horse
Okay - so Troy tells me that the welding is more or less complete.
Woohoo !!
Floor pan finished...

So now the crappy tedious bit... clearing all the under-seal from underneath.
This is one bit Troy wished he hadn't agreed to...


So it's time to book some leave so that I can deliver and fit all the suspension gubbins.
Woohoo !!
Floor pan finished...
So now the crappy tedious bit... clearing all the under-seal from underneath.
This is one bit Troy wished he hadn't agreed to...
So it's time to book some leave so that I can deliver and fit all the suspension gubbins.
-
Lowrider Dave

- Club Admin
- Posts: 2993
- Joined: Wed Dec 22, 2010 10:00 am
- Location: Southampton
- Contact:
Re: 1994 Cavalier LSi C20NE (was C18NZ) Work-horse
Superb work by Troy there. No doubt you're itching to start the rebuild!
Re: 1994 Cavalier LSi C20NE (was C18NZ) Work-horse
Indeed, but I don't think it will be ready for Billing.
just waiting for some free time and decent weather...
just waiting for some free time and decent weather...
-
Lowrider Dave
- Club Admin
- Posts: 2993
- Joined: Wed Dec 22, 2010 10:00 am
- Location: Southampton
- Contact:
Re: 1994 Cavalier LSi C20NE (was C18NZ) Work-horse
So, wheels back on then respray? before refitting everything?
Re: 1994 Cavalier LSi C20NE (was C18NZ) Work-horse
Steelies can go back on for now..
Just while I juggle the cost of the alloy wheel refurbs.
Yup Troy is going to finish treating, sealing etc on the underside.
Then I will go and fit all the suspension, including rear beam, front sub-frame, anti roll bars - of course with all new bushes, drop links, wish-bones, shockers and dampers complete with new mounting components and bolts throughout.
Then Troy says the paintshop lads will come and drag the car away for painting.
All exciting stuff.
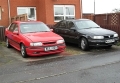
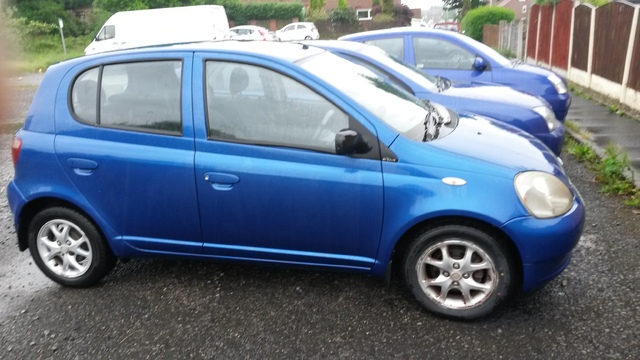
I have bought a battered old car to transport all my parts to Troy's unit as necessary. Rather than abusing the wife's Vectra any more than I have already.
I just hope the errand car is big enough.
Here it is in the family fleet blue colours.
Just while I juggle the cost of the alloy wheel refurbs.
Yup Troy is going to finish treating, sealing etc on the underside.
Then I will go and fit all the suspension, including rear beam, front sub-frame, anti roll bars - of course with all new bushes, drop links, wish-bones, shockers and dampers complete with new mounting components and bolts throughout.
Then Troy says the paintshop lads will come and drag the car away for painting.
All exciting stuff.
I have bought a battered old car to transport all my parts to Troy's unit as necessary. Rather than abusing the wife's Vectra any more than I have already.
I just hope the errand car is big enough.
Here it is in the family fleet blue colours.
Re: 1994 Cavalier LSi C20NE (was C18NZ) Work-horse
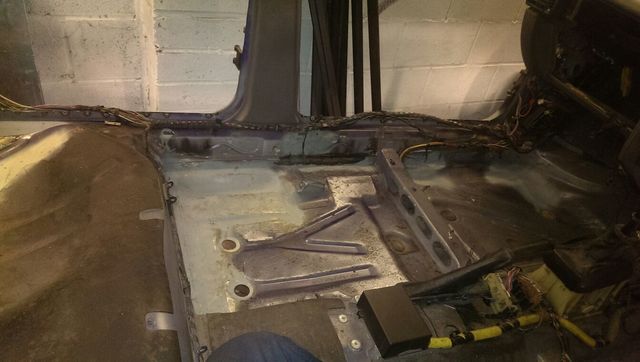
Okay - one of the last full on Troy jobs.
The floor pan has been treated to a liberal coating of truck bed liner paint.
It is scratch and chip resistant, with a rubberised feel to it.
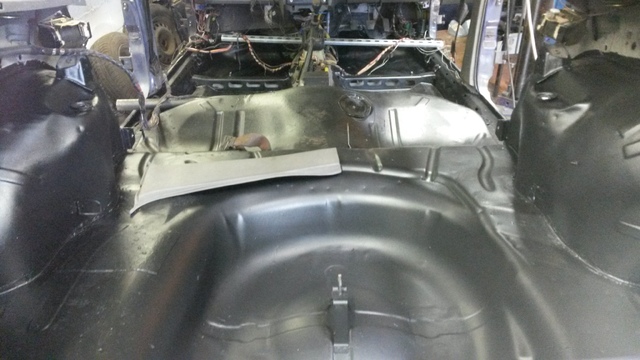
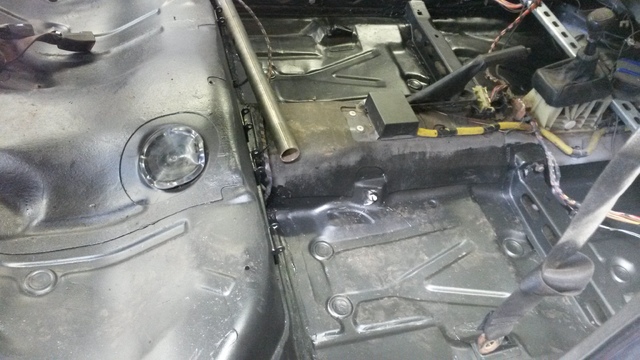
So it was time for me to do some work.
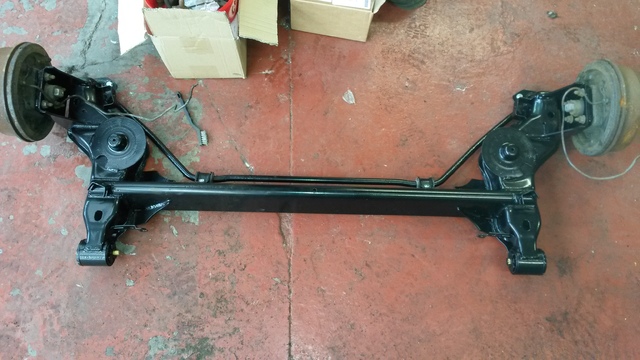
Reassembly of the rear beam and front subframe complete with new bushes and shiny plated bolts for the anti-roll bars.
And original GM bolts everywhere else.
Then I realised a few nights ago that I did not buy any rear beam pivot bolts
d'oh !!
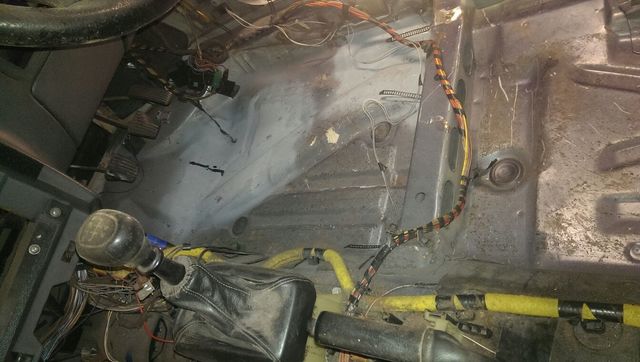
And then whilst Troy had his lunch, I spent a whole 30 seconds doing the Astra-G gear stick modification.
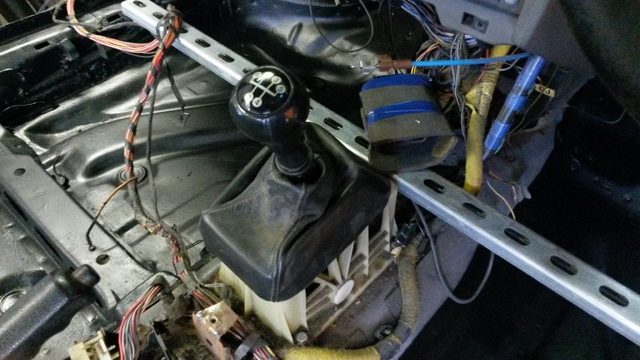
I wish all jobs were that easy.
By the way - As a weird quirk of Japanese design - the rear bench seat slides forward and then flip up against the back of the front seats - So yes, I was able to get the rear beam, front subframe, rear drums and hubs, all my tools and two boxes of parts into the back.
A deceptively large boot space for such a tiny jalopy.
The floor pan has been treated to a liberal coating of truck bed liner paint.
It is scratch and chip resistant, with a rubberised feel to it.
So it was time for me to do some work.
Reassembly of the rear beam and front subframe complete with new bushes and shiny plated bolts for the anti-roll bars.
And original GM bolts everywhere else.
Then I realised a few nights ago that I did not buy any rear beam pivot bolts
d'oh !!
And then whilst Troy had his lunch, I spent a whole 30 seconds doing the Astra-G gear stick modification.
I wish all jobs were that easy.
By the way - As a weird quirk of Japanese design - the rear bench seat slides forward and then flip up against the back of the front seats - So yes, I was able to get the rear beam, front subframe, rear drums and hubs, all my tools and two boxes of parts into the back.
A deceptively large boot space for such a tiny jalopy.
-
James McGrath
- Club Admin
- Posts: 2897
- Joined: Tue Aug 11, 2009 11:35 am
- Location: East Sussex
Re: 1994 Cavalier LSi C20NE (was C18NZ) Work-horse
Looking sweet Rob. 
Nearly there.
Nearly there.
Re: 1994 Cavalier LSi C20NE (was C18NZ) Work-horse
Yes - very close..
Troy tells me that the bumpers, front wings and other removable parts have all been sent to the painters.
I even supplied primed mirror casings, so for the first time in it's life it will have colour coded door mirrors.
I have some upper rear spring rubber bumpers on order @ £6.11 each.
Hopefully arrive by first class post tomorrow.
Then it is play time...
Looking at all the electrics projects.
-
Lowrider Dave
- Club Admin
- Posts: 2993
- Joined: Wed Dec 22, 2010 10:00 am
- Location: Southampton
- Contact:
Re: 1994 Cavalier LSi C20NE (was C18NZ) Work-horse
Excellent progress - all very exciting!
Re: 1994 Cavalier LSi C20NE (was C18NZ) Work-horse
Progress was very slow today - I was ready to give up by 11 am.
Today was assemble hubs and bearings day.
I had one hub that wanted relieving of its inner bearing race.
No amount of chiselling would budge it. Out came the the oxy-acetalene - still stuck solid.
Tough times call for tough measures. Out came the cutting disc. Cut virtually down to the hub shaft and then split the race with a chisel - ka-chiiing!! Hot smoking race goes into a low level fly-past across the workshop.
Okay - clean it up and move onto the legs - or knuckles to use the correct term.
The old powder coated leg had an outer race and cir-clips fitted.
More sweating and swearing to peel out one cir-clip. They are damned tight in the knuckle bore. Then the other. Finally push out the bearing with a bench press.
Well almost - got most of the way out but became bound up somewhere. So back in the vice and drift the bugger out with hand punches / chisels.
Eventually it yielded. "F'ing yes!!"
This had taken me two hours so far - very embarrassing for a professional engineer.
Okay now to rebuild the legs.
Again cir-clips were a stupidly tight fit in the bores.
Insert the ends into the groove.
Close the rings until the ends are touching - wtf? The cir-clip is still too big to go into the bore.
Anyway after a bit of head scratching, I gently tapped the ring down into the bore working from one end to the other around its length - until "click" it dropped into it's groove.
Then press the bearing in on the bench press - using the old outer race to push it fully home against the retaining / stop cir-clip.
Other clip fitted to hold the bearing from drifting back out - highly unlikely as I also used bearing grade loctite.
Then press in the hub. -Supporting the inner race if you don't want to push the inner race out of the other side of the leg.
Bugger!! - I forgot to fit the disc shield.
Ah well - I will have to get the tin snips out.
I'll faff with that in a bit.
Then it was the turn of the other leg.
Just as tricky despite being a new unused part.
This time I remembered to fit the disc shield before pressing in the hub..
Well nearly - another "bugger" moment.
The disc shields were too small !!
Aaaghh!!
The bore was about 1/2 diameter too small.
So I fitted the hub and threw the shields back in the box in disgust.
Then I fitted the dampers - having to grip the 60mm nut in a bench vice.
And that was as far as I got... I had left all the damper bushes and bump stops in Troy's unit.
That was three hours of swearing and grunting done with.
So it was a big thanks to my previous boss Brendan for letting me use his workshop and tools - and for supplying cups of coffee.
Then it was off to my current works to see if my rear beam upper spring rubbers had arrived - yayy!!
So 24 hours behind my planned schedule -
Tomorrow will be total refit of everything underneath the car. Suspension, track rod ends, front and rear brakes, fuel tank... oh eck - it is going to be a long day.
The paint shop lads are collecting the car on Friday evening - and they want it running - including stopping and starting.
Eeek!!
Re: 1994 Cavalier LSi C20NE (was C18NZ) Work-horse
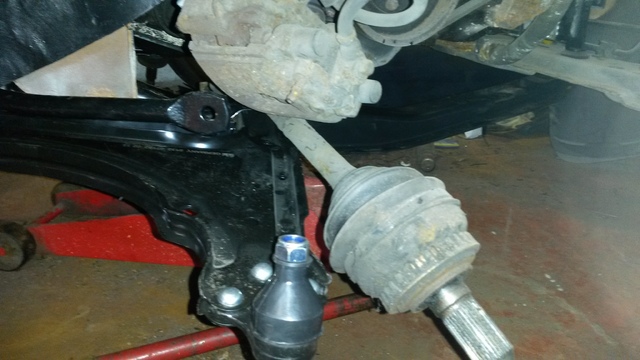
Another d'oh moment occurred last night when I opened the track rod end box in my shed - to be greeted by another pair of drop-links.
At least these Delphi items had all rubbers, washers and nuts with them.
My Febi drop links had no fixtures and no rubbers.. weird.
So this morning I had to go to my local factors for a pair of track rod ends.
One was a "Com-line" item and the other was a Quinten Hazell item.
Oh the shame of it - Not original GM / Febi / Delphi parts....
Re: 1994 Cavalier LSi C20NE (was C18NZ) Work-horse
Now have the correct shields on order from Germany.
100mm hub flange diameter.
They are of an open aspect, so do not need tin-snips to get them to fit.
Part numbers are
90375289 for the left
90375290 for the right.
----------------------------------
So if you have a 14NV, 16SV, E16NZ or C16NZ then feel free to pm me.
My now redundant disc shields will fit your car but not mine. 87mm hub flange diameter.
I spent more on them, but happy to accept £20 posted. They are zinc plated and epoxy powder coated black.
Here is a picture before powder coating.
Re: 1994 Cavalier LSi C20NE (was C18NZ) Work-horse
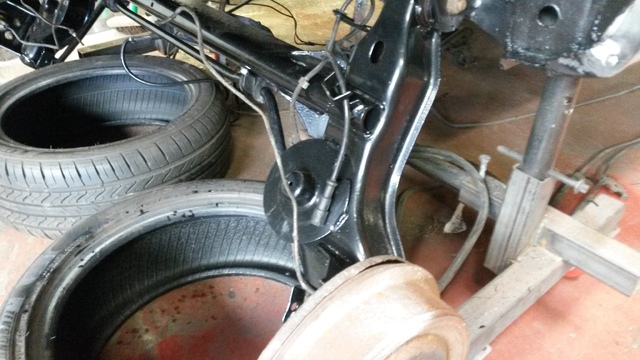
More slow progress today - but it was still progress.
Assembled the front legs complete - which is amazingly quick and easy when you have shortened springs fitted. No need for spring compressors. - yayy!!
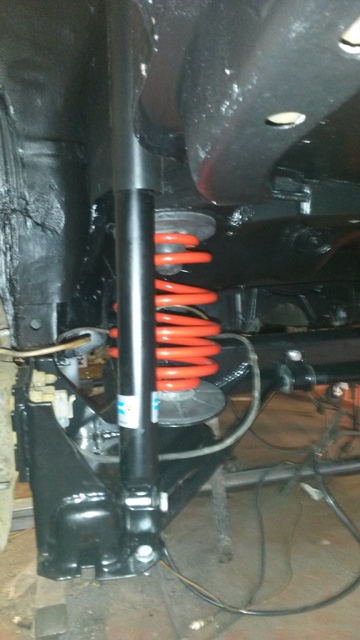
So fitted rear springs, dampers and bumper rubbers (top and bottom).
Hmm shiny red Spax springs all round and Bilstein B4's for dampers.
Then proceeded with fitting the front legs.
There were a few hang-ups as usual - the front disc pads were too big despite being for my C18NZ specification 20mm thick disc brakes.
So had to fit the old pads for the time being despite being worn stupidly low.
Less than a millimetre of material on three of the pads - ouch!!
The car is suspended on a frame above the ground, so access is great, but the wheels are clear of the ground so the bearings cannot be torqued up yet.
After that it was fit the ABS wiring, rear brake cables -


And then the fuel tank - what a cow of a job... you end up with most of the grit and crud off the tank and straps falling on your face and in your eyes.
Anyway - I discovered it goes in much easier if you fit it the right way up.
I did end up spilling petrol down my trousers which meant I smelt great for the whole afternoon.
I can still smell unleaded 7 hours later despite having a shower and changing my clothes. At least it smell like good unleaded - so it hasn't gone off yet - bonus!!.
Assembled the front legs complete - which is amazingly quick and easy when you have shortened springs fitted. No need for spring compressors. - yayy!!
So fitted rear springs, dampers and bumper rubbers (top and bottom).
Hmm shiny red Spax springs all round and Bilstein B4's for dampers.
Then proceeded with fitting the front legs.
There were a few hang-ups as usual - the front disc pads were too big despite being for my C18NZ specification 20mm thick disc brakes.
So had to fit the old pads for the time being despite being worn stupidly low.
Less than a millimetre of material on three of the pads - ouch!!
The car is suspended on a frame above the ground, so access is great, but the wheels are clear of the ground so the bearings cannot be torqued up yet.
After that it was fit the ABS wiring, rear brake cables -
And then the fuel tank - what a cow of a job... you end up with most of the grit and crud off the tank and straps falling on your face and in your eyes.
Anyway - I discovered it goes in much easier if you fit it the right way up.
I did end up spilling petrol down my trousers which meant I smelt great for the whole afternoon.
I can still smell unleaded 7 hours later despite having a shower and changing my clothes. At least it smell like good unleaded - so it hasn't gone off yet - bonus!!.

-
humbucker

- Club Admin
- Posts: 9298
- Joined: Tue Aug 19, 2008 10:42 pm
- Location: Cobra Kai Dojo
- Contact:
Re: 1994 Cavalier LSi C20NE (was C18NZ) Work-horse
Top job, Rob. Everything looking awesome.
-
Lowrider Dave
- Club Admin
- Posts: 2993
- Joined: Wed Dec 22, 2010 10:00 am
- Location: Southampton
- Contact:
Re: 1994 Cavalier LSi C20NE (was C18NZ) Work-horse
LOL!Robsey wrote:Anyway - I discovered it goes in much easier if you fit it the right way up.

Re: 1994 Cavalier LSi C20NE (was C18NZ) Work-horse
Looking good and getting there now.
As for tightening the bearings theres no need for the car to be on the ground, just get a large screwdriver and stick it in the vents in the disc and that stops the disc/hub turning so you can do the hub nut to the correct torque. Ive been doing it this way for years and works a treat and much quicker.
As for tightening the bearings theres no need for the car to be on the ground, just get a large screwdriver and stick it in the vents in the disc and that stops the disc/hub turning so you can do the hub nut to the correct torque. Ive been doing it this way for years and works a treat and much quicker.
Re: 1994 Cavalier LSi C20NE (was C18NZ) Work-horse
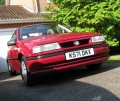
Well the bigger dust shields arrive - and they are still not right - or at least one isn't
Can you see the difference.
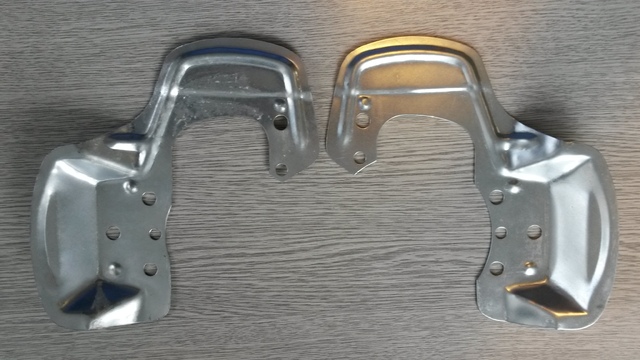
again one is the wrong hub diameter.
What a pain in the bum - thankfully it is easy enough the make the other one fit.
Two drill holes and trim the metal back to suit.
See the marker pen lines on the incorrect part.

Can you see the difference.
again one is the wrong hub diameter.
What a pain in the bum - thankfully it is easy enough the make the other one fit.
Two drill holes and trim the metal back to suit.
See the marker pen lines on the incorrect part.