My VERY RUSTY VW T25 Camper Van Project
Re: My VERY RUSTY VW T25 Camper Van Project
A bit late this week.
I had to do an urgent trip on Monday evening...
So I went to the unit on Wednesday evening instead.
As usual Troy was very helpful and supportive, as I cut even more off the van.
I am amazed at how much sealant they plastered on the seems when the car was made.
It was like scraping off thick wodges of plasticine.
And another two big chunks cut off tonight.
The left lower front corner...
Troy painted some black paint on the flange on the A pillar around which the outer skin is folded and then spot welded in place.
I then painted the whole front corner of the van with acid, to convert rust to a harmless black surface.
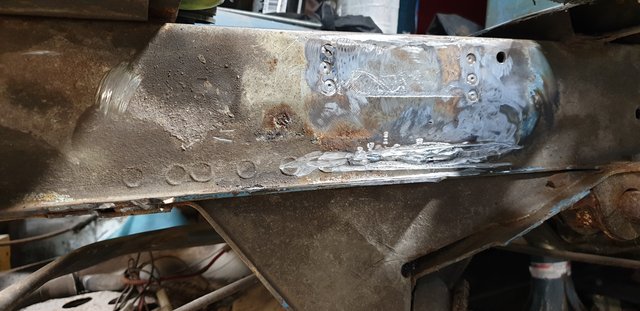
And the left cab floor diagonal support box section
It is smazing how fast 4 1/2 hours passes.
I finally swept up and packed up at 12:40 Thursday morning.
The overall plan is to work from front to back along the left side.
Then repeat along the right side.
You can see my replacement Klokkerholm bottom corner panels on top of the wheel arch in the first photo.
I had to do an urgent trip on Monday evening...
So I went to the unit on Wednesday evening instead.
As usual Troy was very helpful and supportive, as I cut even more off the van.
I am amazed at how much sealant they plastered on the seems when the car was made.
It was like scraping off thick wodges of plasticine.
And another two big chunks cut off tonight.
The left lower front corner...
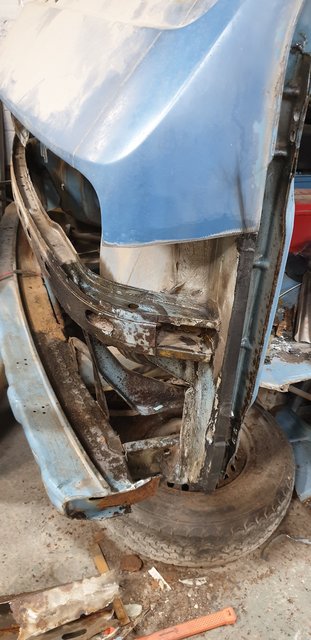
Troy painted some black paint on the flange on the A pillar around which the outer skin is folded and then spot welded in place.
I then painted the whole front corner of the van with acid, to convert rust to a harmless black surface.
And the left cab floor diagonal support box section
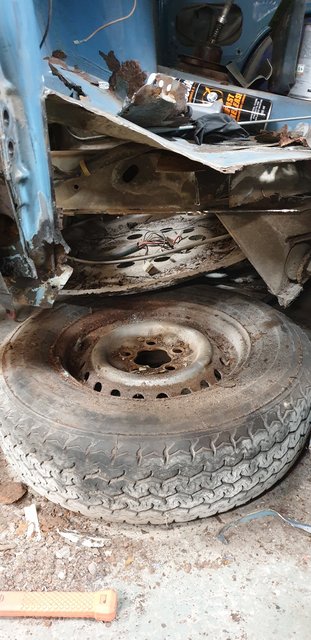
It is smazing how fast 4 1/2 hours passes.
I finally swept up and packed up at 12:40 Thursday morning.
The overall plan is to work from front to back along the left side.
Then repeat along the right side.
You can see my replacement Klokkerholm bottom corner panels on top of the wheel arch in the first photo.
Re: My VERY RUSTY VW T25 Camper Van Project
It actually looks supprisingly solid under the skin. You're making me feel quite envious.
Re: My VERY RUSTY VW T25 Camper Van Project
All the load bearing stuff is very heavy duty and so quite solid, but all the usual rot spots are well and truly rotted.
The worst parts are the front jacking points and the sills.
The solid (load bearing) bits are between 3 and 5mm thick steel.
In a collision, these vans would suffer minimal damage. They are built like the old electric milk floats.
It clearly pre-dates crumple zone manufacturing methods etc.
Even the collapsible steering collumn would not bend in a collision.
Unless hit in a vertical plane.
The column is almost vertical.
Re: My VERY RUSTY VW T25 Camper Van Project
The lastest episode of scrap heap challenge involved me cutting out a section of footwell to drill out the spot welds left over from cutting out the front diagonal outrigger.
Then I cleaned up the main chassis rail.
What a tedious task it is, getting all the spot welded remnants off.
Part way through the evening, I had a VERY lucky escape.
I was using a wire brush tool in my angle grinder.
The bristles must have got snagged, ripping the angle grinder out of my hands.
Within milli-seconds it shot off,
Under the front of the van,
down the leg of my trousers
and across the floor to a mass of electrical cables.
I managed to grab the grinder before it hit the cables, but it had ripped a large 'V' out of the leg of my trousers.
Amazingly no contact at all with the skin on my leg.
Troy agreed, that the wire brush was only safe for the bin.
I was calm throughout, but I know a warning sign when I see one.
Re: My VERY RUSTY VW T25 Camper Van Project
so attention moved to gaining better access.
The plan will be to drop out the front near-side suspension leg and hub assembly.
There is a lot of rust down there, but amazingly the main top wishbone pivot bolt undid and moved quite freely.
Time was trapping on, so I sprayed all the nuts and bolts with plus-gas.
Ready to soak in, before attacking the nuts and bolts next week.
On the van, everything is huge, and I bet the suspension leg must weigh in excess of 50 kg.
So it will need stripping before I can take it away for shot blasting and powder coating.
Another 4 1/2 hours of some hard work, but quite rewarding.
I am not looking forward to the drop link replacement.
Just like the earlier Cavaliers, they are "push on" bushes
Re: My VERY RUSTY VW T25 Camper Van Project
The Knotted brush incident
How many times did i warn you of its dangers lol, i had a bad injury from one of those in my younger days. Never again!
I'm glad its going in the bin with no loss of blood, i recommend others to do the same and use a cup knotted brush as an alternative
Troy
How many times did i warn you of its dangers lol, i had a bad injury from one of those in my younger days. Never again!
I'm glad its going in the bin with no loss of blood, i recommend others to do the same and use a cup knotted brush as an alternative
Troy
Re: My VERY RUSTY VW T25 Camper Van Project
I have used it without incident before,btcctroy wrote:The Knotted brush incident.
How many times did i warn you of its dangers lol,
Troy
but I have read of many people on here who had horror stories to tell.
It just so happens that I now have my own to tell.
But - if nothing else, I do learn from my mistakes.
Hence why the bin beckons for the knotted brush to go and join it.
Re: My VERY RUSTY VW T25 Camper Van Project
superb tool for removing any substrate including skin and limbs
Re: My VERY RUSTY VW T25 Camper Van Project
I've lost count of how many times I've had an accident with one. My one finger has a permanent indentation where it removed skin and flesh when the grinder kicked back.
Re: My VERY RUSTY VW T25 Camper Van Project
One finger!!! ???3cav3 wrote: My one finger...................
Sheesh, that is some serious grinder rash !!
Re: My VERY RUSTY VW T25 Camper Van Project
mmmm do you struggle with learning3cav3 wrote:I've lost count of how many times I've had an accident with one. My one finger has a permanent indentation where it removed skin and flesh when the grinder kicked back.
im pretty thick, but soon realised there are better options
- ilovedmymantas
- Registered user
- Posts: 1240
- Joined: Sat Jan 12, 2013 2:54 am
Re: My VERY RUSTY VW T25 Camper Van Project
Too close for comfort.
I hope you've bought a lottery ticket!
Good progress with the van.
I couldn't see beyond the rust at the beginning. Now that you're cutting it away I see the better bits and the potential
I hope you've bought a lottery ticket!
Good progress with the van.
I couldn't see beyond the rust at the beginning. Now that you're cutting it away I see the better bits and the potential
" It's not rust. It's age-related patina "
1980 vauxhall cavalier MK1 1.6L, 1982 opel manta berlinetta 1.8s, 1985 opel manta 2.0 gte, 1990 cavalier 2.0 gl ,1994 cavalier sri x20xev
-1995 cdx x20xev
---------------
Matt
1980 vauxhall cavalier MK1 1.6L, 1982 opel manta berlinetta 1.8s, 1985 opel manta 2.0 gte, 1990 cavalier 2.0 gl ,1994 cavalier sri x20xev
-1995 cdx x20xev
---------------
Matt
Re: My VERY RUSTY VW T25 Camper Van Project
I did get a ticket, but alas I am still flat broke.
I can see a lot of very difficult parts to get to.
And there are several areas with three skins, layers.
This corner could be considered as an easy bit.
The B pillars are quite complex, and so are the rear jacking points.
At this stage I lack Troys confidence and experience.
But hopefully I will get there.
Re: My VERY RUSTY VW T25 Camper Van Project
ComplexRobsey wrote:I did get a ticket, but alas I am still flat broke.
I can see a lot of very difficult parts to get to.
And there are several areas with three skins, layers.
This corner could be considered as an easy bit.
The B pillars are quite complex, and so are the rear jacking points.
At this stage I lack Troys confidence and experience.
But hopefully I will get there.
the most basic design ever, there isn't a single thing that i couldn't make for this van.
The capri A piller i'm currently rebuilding is somewhat complex and awkward, Exactly like my misses
Re: My VERY RUSTY VW T25 Camper Van Project
There speaks the modest voice of a VERY experienced motor body repairer.
To mr average, and virtual bafoons like me, the way that the panels are overlaid and put together can be quite involved.
Picking these apart in the correct manner and order so as not to cause even more work down the line is where the complexity comes into it.
Anyone can take a cutting disk to a van.
Doing it correctly is another thing.
So yes, the shape is simple - a heavy duty box on wheels.
The correct dis-assembly is not quite so simple.
-
- Registered user
- Posts: 1512
- Joined: Wed Jun 29, 2011 9:15 pm
- Location: Paisley, Scotland
Re: My VERY RUSTY VW T25 Camper Van Project
Lol I had my grinder with a cupped knotted brush catch and wind itself into my jumper into a nice knot, luckily the jumper material stopped it going any further!
Had plenty of scrapes with those twisted knot brushes on grinder, they are very violent, you have to be holding the grinder with 2 hands very tightly. I find using a knotted brush on a drill much less scary.
Re: My VERY RUSTY VW T25 Camper Van Project
it amazes me why they have a latching switch on a grinder.
Surely a dead man's handle type approach would be safer.
-
- Registered user
- Posts: 1512
- Joined: Wed Jun 29, 2011 9:15 pm
- Location: Paisley, Scotland
Re: My VERY RUSTY VW T25 Camper Van Project
I've found when you're drilling out spot welds do it with less speed and more pressure, and keep the drill lubed with spray, actually find the better result is when you just nibble it away by flicking the drill on and off and apply plenty of pressure. Means you won't polish the drill bit away, and also you won't drill right through the panel on the back side. Are you using a good drill bit for spot welds i.e. dormer spot weld drills?Robsey wrote:The lastest episode of scrap heap challenge involved me cutting out a section of footwell to drill out the spot welds left over from cutting out the front diagonal outrigger.
Re: My VERY RUSTY VW T25 Camper Van Project
Yes, I use Dormer bits.
I used to use a lot of Dormer tools when I was a bench fitter and machine operator in the late 80s and 90s; so I knew that they were decent kit.
If nothing else, I may be a novice at the body work stuff, but on the whole I use reasonable tools.
DeWalt, Riobi, Dormer etc..
And yes, I whole heartedly agree with the slow pulse drilling to get started, and then I gently build up the speed as the drill breaks the surface of the steel.
But never flat out, as you are guaranteed to burn out the tip of the drill bit.
Re: My VERY RUSTY VW T25 Camper Van Project
eBay item number 402317298424
The ultimate wire brush, fits on the end of a petrol strimmer. Just think how much flesh you could remove with this. Lol.
Re: My VERY RUSTY VW T25 Camper Van Project
3cav3 wrote:eBay item number 402317298424
The ultimate wire brush, fits on the end of a petrol strimmer. Just think how much flesh you could remove with this. Lol.
Re: My VERY RUSTY VW T25 Camper Van Project
Tonight, I had a break from grinders and cutting disks.
Well almost.
Tonights plan was to drop out the front left suspension leg.
I say that was the plan...
Reality was less straight forward.
Even with an air impact wrench, a lot of parts refused to budge.
Some did budge, but only after a lot of swearing and cursing.
And despite being a German vehicle, there were all sorts of sizes of bolt heads.
These ranged from 11mm, to 24mm and 27mm.
Amazingly the biggest bolts were the easiest to undo.
And just for extra awkwardness, there were two 8mm hex-socket cap head bolts on the upper wishbone.
The cap head bolts refused to undo, and so I ended up using a cutting disk to cut the bolt heads off and separate the leg from the upper wishbone.
At the end of the night, I ended up with five piles..
1 - A pile of debris, and dust etc.
2 - A pile of old rusty bolts, nuts, perished bushes and corroded mounting fixtures.
3 - The wheel hub
4 - The brake calliper
5 - The upper wishbone.
After stripping all that from the van,
I was joined by Troy in a bid to strip down the brake calliper.
The pad retaining pins and the pistons were seized in solid.
Suffice to say, that the pistons were toast, but the callipers were salvagable.
It is amazing how quick four hours can go.
Unfortunately, very little to show for all that effort.
Oh and because it is me, I had a bit of Robsey drama.
Whilst jacking up and lowering down the van, I managed to get the front passenger door trapped under the front nose panel of the van.
This has put a kink in both the upper door frame and the nose panel.
Obviously I called myself a few very descriptive names.
Re: My VERY RUSTY VW T25 Camper Van Project
We've all done stupid things like that, lol. At least you've got someone with Troy's skill levels to sort it out.
Re: My VERY RUSTY VW T25 Camper Van Project
I did the same thing about a month ago, but managed not to damage anything.3cav3 wrote:We've all done stupid things like that, lol. At least you've got someone with Troy's skill levels to sort it out.
Troy told me that I was a silly billy,
then set about reshaping the door frame with his favourite dolly.
The nose panel isn't a biggy, as it is mostly out of sight
I am sure that I must frustrate him with my bumbling.
Troy doesn't suffer fools, so I try not to look totally incompetent.
Re: My VERY RUSTY VW T25 Camper Van Project
Thats beacuase Troy is the fool.Robsey wrote:I did the same thing about a month ago, but managed not to damage anything.3cav3 wrote:We've all done stupid things like that, lol. At least you've got someone with Troy's skill levels to sort it out.
Troy told me that I was a silly billy,
then set about reshaping the door frame with his favourite dolly.
The nose panel isn't a biggy, as it is mostly out of sight
I am sure that I must frustrate him with my bumbling.
Troy doesn't suffer fools, so I try not to look totally incompetent.
i think your at cross roads now, the missing bits need to be put back before you spend hours deciding how it all does back together