New metal going on must be encouraging, keep it up!
My VERY RUSTY VW T25 Camper Van Project
-
ilovedmymantas
- Registered user
- Posts: 1214
- Joined: Sat Jan 12, 2013 2:54 am
Re: My VERY RUSTY VW T25 Camper Van Project
this is really starting to come along now 
New metal going on must be encouraging, keep it up!
New metal going on must be encouraging, keep it up!
" It's not rust. It's age-related patina " 
1980 vauxhall cavalier MK1 1.6L, 1982 opel manta berlinetta 1.8s, 1985 opel manta 2.0 gte, 1990 cavalier 2.0 gl ,1994 cavalier sri x20xev
-1995 cdx x20xev
---------------
Matt
1980 vauxhall cavalier MK1 1.6L, 1982 opel manta berlinetta 1.8s, 1985 opel manta 2.0 gte, 1990 cavalier 2.0 gl ,1994 cavalier sri x20xev
-1995 cdx x20xev
---------------
Matt

Re: My VERY RUSTY VW T25 Camper Van Project
New parts Klaxon!!
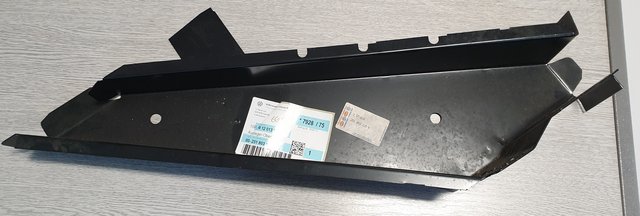
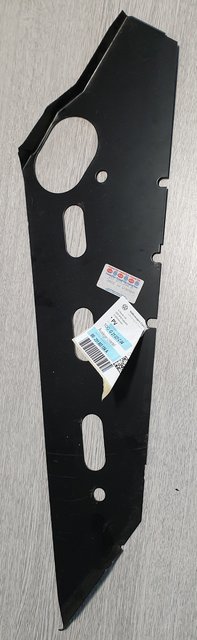
Original VW parts - no longer available.
Making their way onto my van this autumn.
I will be cleaning any remnants of the old left front outrigger from the van next week.
Original VW parts - no longer available.
Making their way onto my van this autumn.
I will be cleaning any remnants of the old left front outrigger from the van next week.

Re: My VERY RUSTY VW T25 Camper Van Project
bet they werent cheap!
-
cavalier1990
- Registered user
- Posts: 1466
- Joined: Wed Jun 29, 2011 9:15 pm
- Location: Paisley, Scotland
Re: My VERY RUSTY VW T25 Camper Van Project
Sometimes I can get a really neat weld, but many times welding good metal to not the best metal on the car creates less than desirable results. Mind you welds I thought were crap, then down the line when I had to remove said old repair proved they had penetrated and held well, as it took a mother of an effort to get them to relase their grip! This was the days before I used zinc metal, it used to be the old metal round the new plate rotted away a few years after.btcctroy wrote:ewww those welds are not as neat as id like. Anyway could blame a whole host of things lol
Re: My VERY RUSTY VW T25 Camper Van Project
Expensive?
Yes and no...
Being genuine VW Audi parts, then not too bad.
Had they been pattern parts, then possibly a touch on the steep side.
But alternative / pattern parts are not available.
Hopefully it will help us to progress a little better.
I know Troy wants to weld metal in, but the underside stuff needs fitting before we can fit the door step and wheel arch.
Re: My VERY RUSTY VW T25 Camper Van Project
You can't beat new genuine panels, always look and fit better than pattern, which I'm suprised with the way in which computers can accurately scan things these days that nobody produces better pattern stuff.
Also there is something really nice about removing a manufacturers original label before welding the panel into place.
Also there is something really nice about removing a manufacturers original label before welding the panel into place.
Re: My VERY RUSTY VW T25 Camper Van Project
we have discussed this before,
I have had Klokkerholm parts for the Cavalier, that have varied in quality from really good to needing a lot of fettling.
I believe the worst panels were "UniPart" inner rear arches.
Some of the van parts are made "down the road" at a highly regarded supplier 5 miles from me.
I came to a realisation this morning, that we need to rebuild the bottom of the 'B' post, before the arch can go in.
And then there are the "three" panels to make up the left inner and outer sills plus the bottom door runner panel.

Hmmm - I really need to check whether the "B" post can be done before or after the sills.
I have had Klokkerholm parts for the Cavalier, that have varied in quality from really good to needing a lot of fettling.
I believe the worst panels were "UniPart" inner rear arches.
Some of the van parts are made "down the road" at a highly regarded supplier 5 miles from me.
I came to a realisation this morning, that we need to rebuild the bottom of the 'B' post, before the arch can go in.
And then there are the "three" panels to make up the left inner and outer sills plus the bottom door runner panel.
Hmmm - I really need to check whether the "B" post can be done before or after the sills.
Re: My VERY RUSTY VW T25 Camper Van Project
No reply from the VW forum yet about the best running order...
Week eleven was quite a random affair.
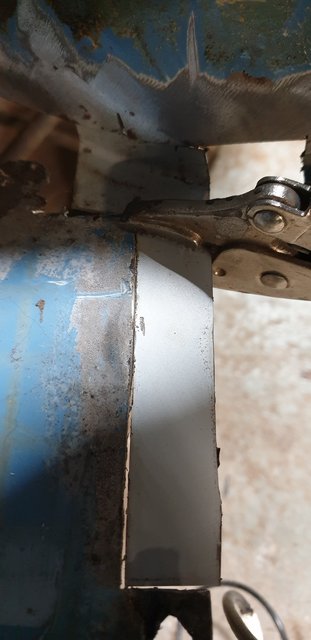
First thing was to compare Troys left lower outrigger panel to a VW original right lower outrigger panel.
He was very pleased with his masking-tape pattern panel.

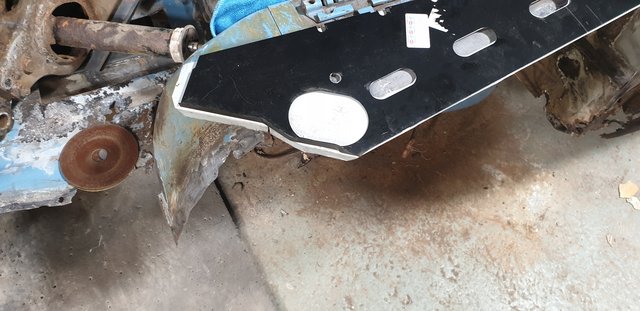
Very close indeed. We still never sussed out the reason for the huge hole on the wide end.
As per my proposal last week, I cleaned the remnants of the old outrigger away.
It took a long time because of limited access preventing the use of the spot drill.
And a hidden bolt (15 hex head bolt) in the A pillar holding the box section in place.
I also had to cut another section of floor out to remove an old support strip.

So lots of grinding and chiselling ensued.
Until I was able to offer up the first big panel - the new upper outrigger panel.
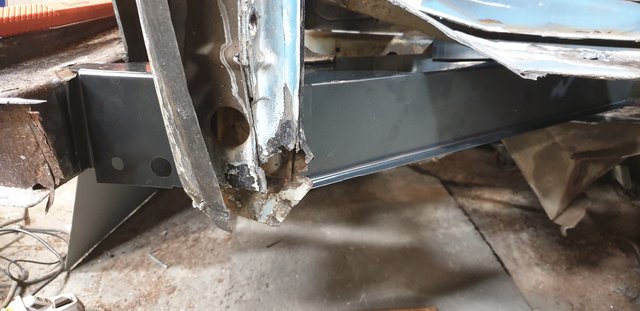
The bolt holes did not quite line up, but a little fettling should get a good fit.
It was agreed that he would not be welding anything in today, so work stopped on the van, so that I could sort-of assist Troy with his Nova steering geometry / suspension upgrade. All part of his fancy pants gearbox installation.
Starting to take shape
Week eleven was quite a random affair.
First thing was to compare Troys left lower outrigger panel to a VW original right lower outrigger panel.
He was very pleased with his masking-tape pattern panel.
Very close indeed. We still never sussed out the reason for the huge hole on the wide end.
As per my proposal last week, I cleaned the remnants of the old outrigger away.
It took a long time because of limited access preventing the use of the spot drill.
And a hidden bolt (15 hex head bolt) in the A pillar holding the box section in place.
I also had to cut another section of floor out to remove an old support strip.
So lots of grinding and chiselling ensued.
Until I was able to offer up the first big panel - the new upper outrigger panel.
The bolt holes did not quite line up, but a little fettling should get a good fit.
It was agreed that he would not be welding anything in today, so work stopped on the van, so that I could sort-of assist Troy with his Nova steering geometry / suspension upgrade. All part of his fancy pants gearbox installation.
Starting to take shape
-
cavalier1990
- Registered user
- Posts: 1466
- Joined: Wed Jun 29, 2011 9:15 pm
- Location: Paisley, Scotland
Re: My VERY RUSTY VW T25 Camper Van Project
Nice, new metal being offered up, it makes it all worthwhile when you've been slogging away cutting panel after panel off and then get to start rebuilding it, starts to give you hope that your efforts are not in vain after all!
Re: My VERY RUSTY VW T25 Camper Van Project
Indeed... it did bring a smile to my face when I slotted it into place.
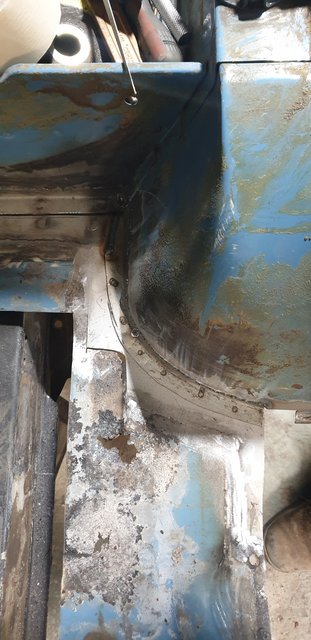
Still need three strips making for the bottom of the wheel arch.
And the front part of the B post.
I am not sure if he was joking, but Troy mentioned about sorting the sill panels on that side.
Just two complex panels amounting to just shy of £200. Ouch!!
I will see real progress when we can finally fit the front door step and arch panels.
But all in good time.
-
cavalier1990
- Registered user
- Posts: 1466
- Joined: Wed Jun 29, 2011 9:15 pm
- Location: Paisley, Scotland
Re: My VERY RUSTY VW T25 Camper Van Project
you're on a roll now Robsey, just remember plenty of the dinitrol behind those panels. I guess with the van there is a more sort of box sections underneath than you would find on the typical car, i'm guessing though it's not a seperate chassis on the van?Robsey wrote:Indeed... it did bring a smile to my face when I slotted it into place.
Still need three strips making for the bottom of the wheel arch.
And the front part of the B post.
I am not sure if he was joking, but Troy mentioned about sorting the sill panels on that side.
Just two complex panels amounting to just shy of £200. Ouch!!
I will see real progress when we can finally fit the front door step and arch panels.
But all in good time.
Re: My VERY RUSTY VW T25 Camper Van Project
There are two main "I" beams or RSJs that run the entire length of the van.
These are the main spine onto which the body is welded.
With outriggers providing lateral ribs to the sides.
Unlike the really old cars, the body shell is not bolted onto the chassis.
The only body parts not welded in place are plastic panels, doors and tailgate.
Apologies, but I am not visiting the unit until later this weak. So no update just yet.
Re: My VERY RUSTY VW T25 Camper Van Project
Just for interest, I came across this factory production video.
Heavily computerised manufacturing in the 80s.
Wow! - British manufacturing never stood a chance - lol
https://m.youtube.com/watch?v=rceTqDtGgz8
Heavily computerised manufacturing in the 80s.
Wow! - British manufacturing never stood a chance - lol
https://m.youtube.com/watch?v=rceTqDtGgz8
-
ilovedmymantas
- Registered user
- Posts: 1214
- Joined: Sat Jan 12, 2013 2:54 am
Re: My VERY RUSTY VW T25 Camper Van Project
Fascinating and scary at the same time. I wonder how they could afford itRobsey wrote:Just for interest, I came across this factory production video.
Heavily computerised manufacturing in the 80s.
Wow! - British manufacturing never stood a chance - lol
https://m.youtube.com/watch?v=rceTqDtGgz8
" It's not rust. It's age-related patina "
1980 vauxhall cavalier MK1 1.6L, 1982 opel manta berlinetta 1.8s, 1985 opel manta 2.0 gte, 1990 cavalier 2.0 gl ,1994 cavalier sri x20xev
-1995 cdx x20xev
---------------
Matt
1980 vauxhall cavalier MK1 1.6L, 1982 opel manta berlinetta 1.8s, 1985 opel manta 2.0 gte, 1990 cavalier 2.0 gl ,1994 cavalier sri x20xev
-1995 cdx x20xev
---------------
Matt
Re: My VERY RUSTY VW T25 Camper Van Project
High demand and efficiency probably paid back for the cost of investment in modern production methods quite quickly.
To refer to another thread -
It is highly unlikely that you will find a robot that spends half of it's night shift asleep.
Also VW was riding high on the popularity of the previous two versions of the Transporter,
and also the VW Beetle had just ended a very long production run.
VW would also have sold patterns and tooling to plants in-
South Africa, who made the Transporter T25 until 2002.
and
Mexico, where they made the Beetle and latterly the Transporter T2 (Bay Window) until 2014.
-
cavalier1990
- Registered user
- Posts: 1466
- Joined: Wed Jun 29, 2011 9:15 pm
- Location: Paisley, Scotland
Re: My VERY RUSTY VW T25 Camper Van Project
In the video the narrator said "no chance of Monday cars here" Well didn't they know that in the UK we were able to make monday, tuesday, Wednesday, Thursday AND Friday cars 
Re: My VERY RUSTY VW T25 Camper Van Project
It refers to "Monday Morning" and "Friday Afternoon" shifts,
Which relates to employees working inefficiently due to recovering from a weekend on the ale, or their mind looking forward to the weekend rather than the job at hand.
Periods of the week when most mistakes are made.
Which relates to employees working inefficiently due to recovering from a weekend on the ale, or their mind looking forward to the weekend rather than the job at hand.
Periods of the week when most mistakes are made.
-
cavalier1990
- Registered user
- Posts: 1466
- Joined: Wed Jun 29, 2011 9:15 pm
- Location: Paisley, Scotland
Re: My VERY RUSTY VW T25 Camper Van Project
Aye Robsey I know all about the monday morning cars, i suppose my point was we made those cars every dayRobsey wrote:It refers to "Monday Morning" and "Friday Afternoon" shifts,
Which relates to employees working inefficiently due to recovering from a weekend on the ale, or their mind looking forward to the weekend rather than the job at hand.
Periods of the week when most mistakes are made.
Re: My VERY RUSTY VW T25 Camper Van Project
Week twelve was two days late.
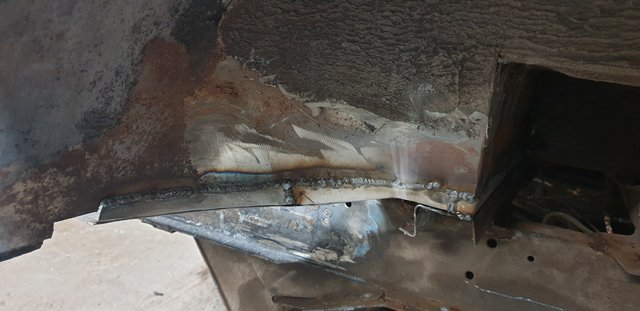
So Wednesday evening saw me make a few little strips to repair the join between the wheel arch tub, and the footwell.
However part way through the evening Troy had a change of tactic, so one piece was modified and one was discarded.
Therefore Troy made a new piece, and then welded them both in.
This trying not to distract Troy is seriously not working. - lol
Once this was done, I chose to remove the blower motor and the complete heater housing from the dash.
Six Philips No3 screws with M6 threads are used to locate the housing to the dash.
All four of the upper screws sheared off.
Thankfully the bottom two lived to see another day.
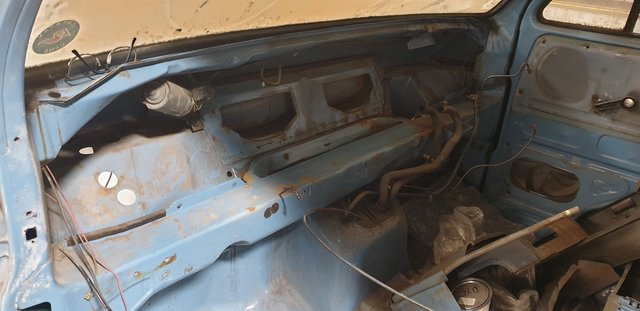
And the dash area cleaned a bit.
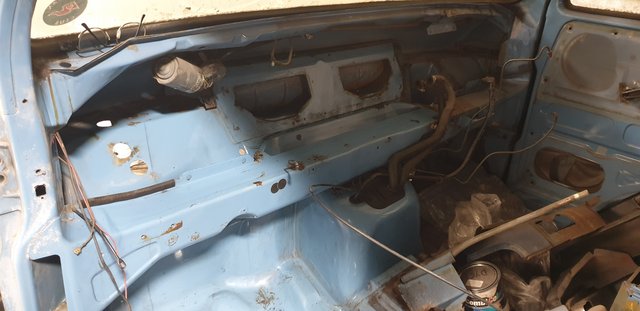
Whilst it was out, I stripped the heater housing to examine the internals.
Immediately 2 "ram air" flaps fell out.
I have no idea where they came from.

The blower motor was removed and found to be seized solid... more bin fodder.
The heater matrix looked good, however foam buffers simply crumbled into powder.
Finally the resistor pack was also crumbling.
Not a huge concern really, as I was looking at putting a "pulse width modulator" controller in instead.
Rather than wasting electricity generating heat within the resistor pack, the PWM controller provides pulses of 12 volts to the motor.
The more pulses, the faster the motor spins.
Obviously when the speed is low, the voltage is off more off than it is on, so saving precious battery power.
Thankfully new blower motors are much cheaper on this model, than on a Cavalier.
So Wednesday evening saw me make a few little strips to repair the join between the wheel arch tub, and the footwell.
However part way through the evening Troy had a change of tactic, so one piece was modified and one was discarded.
Therefore Troy made a new piece, and then welded them both in.
This trying not to distract Troy is seriously not working. - lol
Once this was done, I chose to remove the blower motor and the complete heater housing from the dash.
Six Philips No3 screws with M6 threads are used to locate the housing to the dash.
All four of the upper screws sheared off.
Thankfully the bottom two lived to see another day.
And the dash area cleaned a bit.
Whilst it was out, I stripped the heater housing to examine the internals.
Immediately 2 "ram air" flaps fell out.
I have no idea where they came from.
The blower motor was removed and found to be seized solid... more bin fodder.
The heater matrix looked good, however foam buffers simply crumbled into powder.
Finally the resistor pack was also crumbling.
Not a huge concern really, as I was looking at putting a "pulse width modulator" controller in instead.
Rather than wasting electricity generating heat within the resistor pack, the PWM controller provides pulses of 12 volts to the motor.
The more pulses, the faster the motor spins.
Obviously when the speed is low, the voltage is off more off than it is on, so saving precious battery power.
Thankfully new blower motors are much cheaper on this model, than on a Cavalier.
Re: My VERY RUSTY VW T25 Camper Van Project
the only thing left from the dash to remove is the wiper motor and linkage.
But the screws are rusted solid, and immediately below the windscreen.
So I shall wait until the screen is removed before tackling the last two screws.
It may seem that I am goung too far stripping stuff out, but I am glad that I am, before putting all the dash back again.
Just more expense to the list...
-
cavalier1990
- Registered user
- Posts: 1466
- Joined: Wed Jun 29, 2011 9:15 pm
- Location: Paisley, Scotland
Re: My VERY RUSTY VW T25 Camper Van Project
Robsey wrote:
Finally the resistor pack was also crumbling.
Not a huge concern really, as I was looking at putting a "pulse width modulator" controller in instead.
Rather than wasting electricity generating heat within the resistor pack, the PWM controller provides pulses of 12 volts to the motor.
The more pulses, the faster the motor spins.
Obviously when the speed is low, the voltage is off more off than it is on, so saving precious battery power.
Thankfully new blower motors are much cheaper on this model, than on a Cavalier.
I quite like the thought of that wee mod, although I am an originality freak, it would be an interesting thing to fit to the cavy as well, rather than as you said wasting heat to control the speed of the motor. I done a wee project in my electronics course using a modulated signal to drive a motor, suppose it's the same principal.
Re: My VERY RUSTY VW T25 Camper Van Project
and you can pick up a PWM module to handle upto 60 amps for less than £15.
Many also come with a digital display to show the percentage of maximum supply that is being fed to the device - in this instance a motor, but it could be used for lighting etc. (that is how LED dimmers work - but on a smaller scale).
Many also come with a digital display to show the percentage of maximum supply that is being fed to the device - in this instance a motor, but it could be used for lighting etc. (that is how LED dimmers work - but on a smaller scale).
Re: My VERY RUSTY VW T25 Camper Van Project
I have been looking into the refurb of my heater panel.
I even watched the same Youtube repair / refurb video four times, trying to suss out the repair neoprene / foam vibration dampers and seals used.
It turns out, that one of my local specialists sells a kit.
Apart from them, the kit does not appear to exist other than in the Youtube video.
So blower motor and heater box foam kit are on order.
A nice job for "on the kitchen table" during the winter months.
Re: My VERY RUSTY VW T25 Camper Van Project
as for originality...
I have always been plagued with indecision on this aspect.
The resistor pack, complete with fresh new wiring would be great. - and very simple to fit without faffing.
But I am also torn to fit gadgets.
A recent bit of research has found that most pwm modules are of Chinese origin with very poor build quality. And the thought of a potential electrical fire does not appeal.
Hmmmmmm - originality may win the day.
Re: My VERY RUSTY VW T25 Camper Van Project
Week thirteen.
I brought the heater unit home for stripping.
The new motor and flap seals are on their way.
The resistor pack is currently out of stock.
So Monday seemed to be an odd night.
I repaired the four mounting holes for the heater box. (Drilled out the old snapped studs).
I then rust treated the main interior crashbar and the whole area that is normally hidden by the heater unit.
As per my previous suggestions, it was necessary to make up a front facet for the B post, so that the arch can then be fitted.
As usual this meant more cutting out.
This time the front of the sills where the jacking point is located.
Troy then made up and trial fitted the B post panel. (Using self drilling / tapping panel screws.)

And then for shits n giggles, we trial fitted the front arch.

It would appear that things are indeed moving forward.
Just waiting for the bulk order of TechniQ Etch Primer to arrive.
Then we can look at spot welding the panels in place.
About 5 panels to my reckoning.
The question of removing the screen was discussed...
Maybe next week to access the wiper motor mounts and the rusty screen frame in the bottom left corner.
I brought the heater unit home for stripping.
The new motor and flap seals are on their way.
The resistor pack is currently out of stock.
So Monday seemed to be an odd night.
I repaired the four mounting holes for the heater box. (Drilled out the old snapped studs).
I then rust treated the main interior crashbar and the whole area that is normally hidden by the heater unit.
As per my previous suggestions, it was necessary to make up a front facet for the B post, so that the arch can then be fitted.
As usual this meant more cutting out.
This time the front of the sills where the jacking point is located.
Troy then made up and trial fitted the B post panel. (Using self drilling / tapping panel screws.)
And then for shits n giggles, we trial fitted the front arch.
It would appear that things are indeed moving forward.
Just waiting for the bulk order of TechniQ Etch Primer to arrive.
Then we can look at spot welding the panels in place.
About 5 panels to my reckoning.
The question of removing the screen was discussed...
Maybe next week to access the wiper motor mounts and the rusty screen frame in the bottom left corner.