My VERY RUSTY VW T3 Camper Van Project

An area of the forum dedicated to the other marques and models sat on your driveway (please post only one thread per car)
User avatar
Robsey
Club Admin
Posts: 11031
Joined: Fri Dec 12, 2008 1:42 pm
Location: East Manchester

Re: My VERY RUSTY VW T3 Camper Van Project

Post by Robsey »

Envoy CDX wrote: Sun Dec 15, 2024 12:21 am That sounds impressive, but yes early injection was very wasteful fuel wise. One of the things I always wanted to do on the 18SE was retrofit a later injection setup in terms of ECU and such even just to get over-run working.
To be honest... it is just another multipoint injection thing.
I am sure with just a bit of faff, I could fit a basic 20NE ECU and loom.
There is a top dead centre sensor already fitted, so potential to fit a crank sensor.
There is a crude 3-position throttle switch array on the underside of the throttle body that could be replaced by a proper throttle position sensor.
And a different model of air flow sensor.
The throttle body, idle control valve and fuel pressure regulator are already there.
I have at least one of everything in my shed, and maybe just enough information to make up a half decent loom.. :ugeek: :ugeek:

And for the ignition timing???
Hmmm - I wonder. - lol. :scratch
_____________________

Oh dear - maybe I need to get the van built first. :no

I could always check out a basic megasquirt system later... Much Later!!

The slightly later digifant did timing and oxy-sensor, stuff 'from the box' but has much less bhp than the digijet.

Rob! Stop!! :lol: :lol:
User avatar
Robsey
Club Admin
Posts: 11031
Joined: Fri Dec 12, 2008 1:42 pm
Location: East Manchester

Re: My VERY RUSTY VW T3 Camper Van Project

Post by Robsey »

Envoy CDX wrote: Sun Dec 15, 2024 12:21 am One of the things I always wanted to do on the 18SE was retrofit a later injection setup in terms of ECU and such even just to get over-run working.
Sorry for the double quote but -

The wastefuless of the batch-firing injection is what gives it more bhp / balls / raw power.

You could have fitted the SEH or NE injection stuff, for better emissions, but you would lose grunt and grin factor.

One for the head over heart camp I think.

If I was going to fit anything, it would be for better understanding of what is going on in the ECU.
There is no MIL / EML on early systems to say why the engine is running badly.

I like to know what is going on - it feeds my paranoia. :lol:
____________________

There is a Marco Mansi kit, but at $3000, it would be cheaper to stick with what I have.

I can live with 22 to 28mpg on a brick-shaped 1.3 ton van, more than I can stomach $3000 of unnecessary tech.
User avatar
Envoy CDX
Club Admin
Posts: 9980
Joined: Sun Sep 23, 2007 3:51 pm
Location: Jarrow, Newcastle Upon Tyne

Re: My VERY RUSTY VW T3 Camper Van Project

Post by Envoy CDX »

thats a hell of a chunk of cash for maybe what 5mpg if that, and more worries.

But yeah, if I were to do it all over again, there would be some significant considerations.
Check the Rules!

Raw 8v Power! - Bad Cav, Naughty Cav... Cav want's to do 90!

The How2 Index
User avatar
Robsey
Club Admin
Posts: 11031
Joined: Fri Dec 12, 2008 1:42 pm
Location: East Manchester

Re: My VERY RUSTY VW T3 Camper Van Project

Post by Robsey »

I have chosen not to visit the unit until after the New Year.
It is silly season out there on the roads.
I have had two colleagues shoved off the road in two days by drunk or reckless drivers.

So I am not risking any un-necessary night-time journeys.

---------
On the up-side, my bearing puller slide-hammer has arrived.

Image

I cannot wait to get the spigot bearing out, ready to fit everything required to get the gearbox and starter on.
User avatar
Envoy CDX
Club Admin
Posts: 9980
Joined: Sun Sep 23, 2007 3:51 pm
Location: Jarrow, Newcastle Upon Tyne

Re: My VERY RUSTY VW T3 Camper Van Project

Post by Envoy CDX »

Makes sense to me. Especially if the risk is so great. Sad times that people cause that kind of issue :(
Check the Rules!

Raw 8v Power! - Bad Cav, Naughty Cav... Cav want's to do 90!

The How2 Index
User avatar
Robsey
Club Admin
Posts: 11031
Joined: Fri Dec 12, 2008 1:42 pm
Location: East Manchester

Re: My VERY RUSTY VW T3 Camper Van Project

Post by Robsey »

Sad times indeed that people still persist to 'do their version' of driving whilst full of drink or drugs,

Or they are so selfish and in a rush that they drive like complete idiots, putting the rest of us at risk.
Cutting people up and swapping lanes on the motorway as if they are playing Gran Tourismo or Ridge Racer.
(As you can tell, it is 20+ years since I last looked at a pc or console game) .

There is no fun in driving any more.
I drive purely out of need - work, shopping and medical appointments.
It is many-years since I last went for a drive for the fun of it.
__________________

Hey ho - jollification will resume soon, when it is safe to venture out and play on the van and/or it's engine again.
3cav3
Registered user
Posts: 1609
Joined: Sun May 22, 2016 6:07 pm

Re: My VERY RUSTY VW T3 Camper Van Project

Post by 3cav3 »

Thats why I'm pleased i drive mainly in the countryside these days, generally a lot safer and less stressful than driving in towns and cities,( but both me and my wife have had total no fault write offs on B roads). The biggest downside is selfish farmers who refuse to pull over even when a big que forms behind them.

I find particularly BMW and Audi drivers plus the under 25's tend to be the most dangerous on the roads - sorry if any of our members fall into the above categories, just what I've observed as a general rule round by us.

Christmas is definitely a time to be safe if you can, look forward to the progress in the new year .
User avatar
Envoy CDX
Club Admin
Posts: 9980
Joined: Sun Sep 23, 2007 3:51 pm
Location: Jarrow, Newcastle Upon Tyne

Re: My VERY RUSTY VW T3 Camper Van Project

Post by Envoy CDX »

There are two many idiots on the road, and it doesn't seem to matter what they drive (or ride so I am inclusive of bikers, people on mobility scooters etc)

Driving is still fun for me thankfully, I miss it - alot!.

Its like anything I guess, if you have to drive for work alot I can see it taking the fun out of stuff over time.
Check the Rules!

Raw 8v Power! - Bad Cav, Naughty Cav... Cav want's to do 90!

The How2 Index
User avatar
Robsey
Club Admin
Posts: 11031
Joined: Fri Dec 12, 2008 1:42 pm
Location: East Manchester

Re: My VERY RUSTY VW T3 Camper Van Project

Post by Robsey »

Eleven hours a week to commute the thirteen miles each way between home and work is soul destroying.

Actual business miles, I only average about 150 miles per month.

This week has been blissful - with commute times less than a third of the usual commute time.

It reminds me of the hazy days of almost empty motorways in the months between March and September 2020.
A horendous period for many people due to the effects of Covid... death or going stir-crazy.

But for me, clear motorways, and working outdoors on mobility equipment in the baking sunshine.
User avatar
Envoy CDX
Club Admin
Posts: 9980
Joined: Sun Sep 23, 2007 3:51 pm
Location: Jarrow, Newcastle Upon Tyne

Re: My VERY RUSTY VW T3 Camper Van Project

Post by Envoy CDX »

Yeah, I couldn't be doing that.... even at its worst in the north east, 16 miles each way, maybe 40-50 minutes. Not much better but multiple routes in and not exactly soul destroying battling with that god awful ring road.

I remember the days of 2020 and epic open roads..
Check the Rules!

Raw 8v Power! - Bad Cav, Naughty Cav... Cav want's to do 90!

The How2 Index
User avatar
Robsey
Club Admin
Posts: 11031
Joined: Fri Dec 12, 2008 1:42 pm
Location: East Manchester

Re: My VERY RUSTY VW T3 Camper Van Project

Post by Robsey »

After waiting for drunken season to end, I finally made my way to the unit in Oldham, this evening.

Within an hour, I wished that I hadn't bothered. :wall
First job on the agenda was to use my trusty new blind-bearing remover slide hammer to extract the spigot bearing.

Took three or four attempts to get the flanges of the remover to grip the bearing.
A few really good yanks on the hammer and....
The roller cage came out in two distinct halves.
This left behind the mangled remains of the outer shell.

Another hour trying to pry, lever and eventually chisel out the shell left me with no progress at all.
The shell now even more mangled, along with the bore of the crank shaft rear flange. :cry:

Totally flummoxed as to what to do next, without completely scrapping the crankshaft. :scratch
_________________

On the DH / GW engine (early digijet) the front left water passage flange is blanked off.
So I made up a blanking plate, using an old flange with a small-bore water pipe spigot.
After cutting off the spigot, I made up an ad-hoc plug.
An M8 nut and bolt, copper washers, sealed with none-hardening sealant produced a water-tight blaning plate.
_________________

Next - fit the dipstick tube.
This is simply slotted into a hole in the block, with a copper washer and rubber o' ring to act as a seal.
In a really half-arsed way, VW chose to simply use a pipe clip to retain the dipstick holder onto a bracket on a nearby water pipe.
___________________

I was going to assemble my injectors into the manifolds, but then spent half-an-hour finding the plastic manifold gaskets, only to realise that I do not have any 50mm jubillee clips for the rubber manifold tube joiners.
Bugger, bugger, bugger!! :evil:

So yet another job going nowhere tonight.
2025 is not proving very kind yet :(
_____________________

Final job that I could be fussed with was fitting of the plastic mesh over the blower motor intake port on the van's bulkhead.
I managed to slot it in place, but then found that my black self-tappers were at home. :roll:

Okay, fed up by now, so decided enough was enough.
Rattle firmly launched out of the pram into orbit.
3cav3
Registered user
Posts: 1609
Joined: Sun May 22, 2016 6:07 pm

Re: My VERY RUSTY VW T3 Camper Van Project

Post by 3cav3 »

If you can get access try a run of weld inside the outer cradle, the welding normally draws it inwards and should fall out.
User avatar
Robsey
Club Admin
Posts: 11031
Joined: Fri Dec 12, 2008 1:42 pm
Location: East Manchester

Re: My VERY RUSTY VW T3 Camper Van Project

Post by Robsey »

The outer shell is very thin...
I would probably end up welding it to the crank shaft - lol.
User avatar
Envoy CDX
Club Admin
Posts: 9980
Joined: Sun Sep 23, 2007 3:51 pm
Location: Jarrow, Newcastle Upon Tyne

Re: My VERY RUSTY VW T3 Camper Van Project

Post by Envoy CDX »

Ick, it'll sort - just think, it'll be better next time :)
Check the Rules!

Raw 8v Power! - Bad Cav, Naughty Cav... Cav want's to do 90!

The How2 Index
User avatar
Robsey
Club Admin
Posts: 11031
Joined: Fri Dec 12, 2008 1:42 pm
Location: East Manchester

Re: My VERY RUSTY VW T3 Camper Van Project

Post by Robsey »

I think I just need a narrow wedge-like chisel
- a bit like a carpentry chisel, to get under one edge of the casing, and then lever it in on itself so that it collapses away from the bore of the crankshaft flange.

Then, tickle up the crankshaft flange to remove as much of my damage as I can.
User avatar
Envoy CDX
Club Admin
Posts: 9980
Joined: Sun Sep 23, 2007 3:51 pm
Location: Jarrow, Newcastle Upon Tyne

Re: My VERY RUSTY VW T3 Camper Van Project

Post by Envoy CDX »

£4.99 B&M chisels are the kind of thing I'd sacrifice for that :D
Check the Rules!

Raw 8v Power! - Bad Cav, Naughty Cav... Cav want's to do 90!

The How2 Index
User avatar
Robsey
Club Admin
Posts: 11031
Joined: Fri Dec 12, 2008 1:42 pm
Location: East Manchester

Re: My VERY RUSTY VW T3 Camper Van Project

Post by Robsey »

Ah yes...
I thought of making one up myself, drawing on my 1980s training for heat treating steel.

There is a bench grinder at the unit to create the shape that I think would work,
My trusty mapp gas torch to get the steel silly hot.

Then cold water for hardness quenching,
Then repeat the heat process for oil annealing and blacking as required.

I was going to make my own clutch alignment tool too on the lathe.

Hmmm - Ideas for Tuesday night.

I am sure, that much like the weather, my plans will have changed again by then.
User avatar
Envoy CDX
Club Admin
Posts: 9980
Joined: Sun Sep 23, 2007 3:51 pm
Location: Jarrow, Newcastle Upon Tyne

Re: My VERY RUSTY VW T3 Camper Van Project

Post by Envoy CDX »

Hey, if you can make the tools, that is even better in my opinion.
Check the Rules!

Raw 8v Power! - Bad Cav, Naughty Cav... Cav want's to do 90!

The How2 Index
User avatar
Robsey
Club Admin
Posts: 11031
Joined: Fri Dec 12, 2008 1:42 pm
Location: East Manchester

Re: My VERY RUSTY VW T3 Camper Van Project

Post by Robsey »

I have spoken to Troy,

He has suggested using his air-saw to cut the outer race out.
I will get it done - one way or another.

Had a bit of a tidy today. I have loads of project bits in the kitchen. Like you do when you use it as a workshop in the winter. :lol:
Anyway, found some more van parts so less to buy now.

I have ordered eight black mikelor 32-50mm jubillee clips for the intake pipes. 8-)
Should be here later in the week.
Hopefully get the fuel and induction system buttoned down on the engine in the next few weeks. :)


I had ordered some rubber bushes to mount the electric fuel pump on the chassis rail.
I didn't realise the bushes were coming from China until I saw the four-week delivery date. :roll:
Ah well - not in a rush.
I won't be mounting the pump under the van for several months yet.
User avatar
Envoy CDX
Club Admin
Posts: 9980
Joined: Sun Sep 23, 2007 3:51 pm
Location: Jarrow, Newcastle Upon Tyne

Re: My VERY RUSTY VW T3 Camper Van Project

Post by Envoy CDX »

All ways and means. I know the feeling re: lots of project bits..

Nice ticking off points though, all progress.
Check the Rules!

Raw 8v Power! - Bad Cav, Naughty Cav... Cav want's to do 90!

The How2 Index
User avatar
Robsey
Club Admin
Posts: 11031
Joined: Fri Dec 12, 2008 1:42 pm
Location: East Manchester

Re: My VERY RUSTY VW T3 Camper Van Project

Post by Robsey »

I did try the air-saw, but the blade seemed quite worn smooth.
A bit more chiselling also proved fruitless.

I found an old 3/4" diameter reamer, which seamed to work a treat - to some extent
Okay - I have got most of it out,

The replacement bearing is a strange size. 20.8mm diameter.
So it looks like an expandable reamer is required for the final bit.
A 19 to 21mm reamer should do it.
More expense, but at least the crank won't be scrap.

The end collar of the reamers are usually quite deep, but I am hoping that the blades will reach deep enough into the bore.
User avatar
Robsey
Club Admin
Posts: 11031
Joined: Fri Dec 12, 2008 1:42 pm
Location: East Manchester

Re: My VERY RUSTY VW T3 Camper Van Project

Post by Robsey »

Plans changed again tonight.

The expanding reamer had not arrived yet, so nothing done on the crankshaft flange tonight.

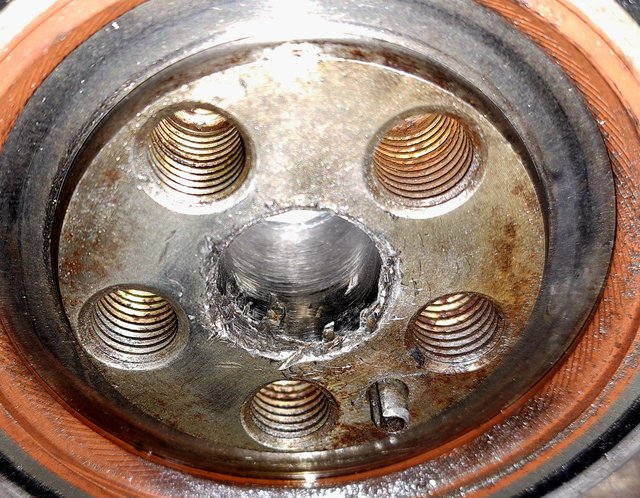
This picture looks worse than it is.
There is some chisel-marking on the flange, but about 95% of the visible damage is on the remnants of the outer shell. :?

Image
___________________

So instead, I looked at the induction system.

First - fitting of the black Mikalor jubillee clips - 32-50mm.
From memory, the tubes are 40mm diameter.

You will see in the images, that I have also fitted the Bosch injectors with new retaining rings and seals.
And the fuel feed rails.
Bizarrely, the injection manifolds use 1/8" thick plastic gaskets (?) between the manifolds and the heads.
No paper, card or gasket sheet.

I used non-hardening seal paste between all the layers to avoid any leaks - maybe I am being over-zealous, but I don't want to start faffing with induction leaks a few months into the future.

So -
Left manifold assembled...

Image

And right manifold assembled...

Image

Final actual job, was to put a new gasket on the front left manifold blanking plate.

Image

I would like to start fitting the exhaust, but I need to save up for a pair of push-rod shields first.

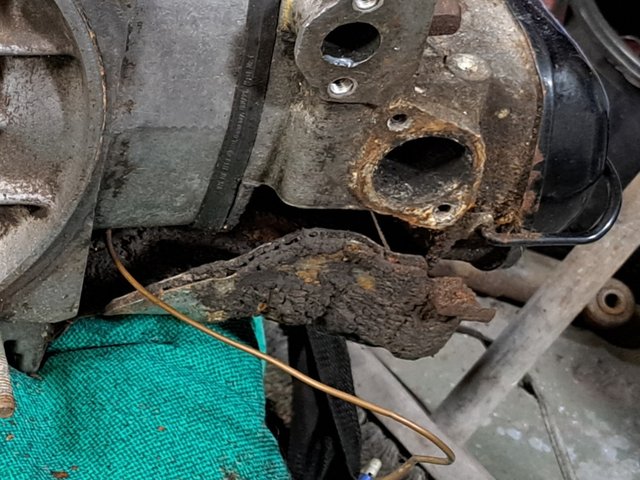
Both originals are rotted. The right one fell off on the way to the unit a few months ago.

Right push-rod tubes visible because the shield fell off.
Image

The left one is hanging on for grim-death. :shock:
The left cover rotted and swollen before it's journey to the unit.
Image
________________________

I looked at the injector and sensor loom wiring.
It appears that I need to fit a wire for the blue charge exciter wire on the alternator.

And I will need to check the DJ loom.
I have spotted an extra 2 pin connector for the Maestro digi-dash temperature gauge sensor.
Correct wire colours, and fits perfectly. :cheers
_____________________________

In good old Robsey fashion, I could not be fussed bringing home the loom for rectification / updating. :roll:

Further checks through the loom bag, and a box with the original DF loom, reaveals that I appear to have two ignition amplifiers and two digital idle controllers.
I do like to have spares. :D

And for my own info... a green label coil.
There are two versions - green label and grey label.
Something to do with internal resistances of the ignition system. :scratch

More fun next Tuesday evening
User avatar
Envoy CDX
Club Admin
Posts: 9980
Joined: Sun Sep 23, 2007 3:51 pm
Location: Jarrow, Newcastle Upon Tyne

Re: My VERY RUSTY VW T3 Camper Van Project

Post by Envoy CDX »

Sounds like progress, I'm sure things will clean up around the flange. But steps in the right direction :)
Check the Rules!

Raw 8v Power! - Bad Cav, Naughty Cav... Cav want's to do 90!

The How2 Index
User avatar
Robsey
Club Admin
Posts: 11031
Joined: Fri Dec 12, 2008 1:42 pm
Location: East Manchester

Re: My VERY RUSTY VW T3 Camper Van Project

Post by Robsey »

The expanding reamer arrived yesterday (Monday), so I was looking forward to finally reaming-out the bearing outer race remnants.

I was surprised to find that the race was so tough, that it snapped three of the six reamer blades.
Resulting in bin fodder.

Image

I re-ground a tapered chisel. Fifth time lucky.
This time the chisel tore through the shell, and I was able to peel it away from the bore.

The remnants of the race and part of one broken blade.
Image

A clean up with emery cloth and a half-round file soon cleaned up any roughness in the bore and the fly-wheel mating face.

Once satisfied a new bearing was tapped into place.
This time, the correct way round.

Flat printed side facing towards the flywheel.
Image

The bearing seal and shims were all cleaned and oiled, ready for the flywheel to be mounted.

Image

Each time I bolted the flywheel on, the crank became locked.
So off it came, check the shims, flywheel back on...
Nope locked again
Four more removals and refits before we had success.

Flywheel can be rotated by hand.
Now torqued up to 81 ft lbs with loctite for good measure

Image

Then the clutch was fitted.
Centralised using a big socket, and tightened in place with new bolts. 18 ft lbs.

Finally - attention moved to the fuel pipes.
The fuel pressure regulator pipes were easy enough, but the fuel feed pipes just did not want to fit.

Image

As they say - if things refuse to fit.
Put it down and come back to it another day.
User avatar
Envoy CDX
Club Admin
Posts: 9980
Joined: Sun Sep 23, 2007 3:51 pm
Location: Jarrow, Newcastle Upon Tyne

Re: My VERY RUSTY VW T3 Camper Van Project

Post by Envoy CDX »

Happy days, its certainly progress Rob, happy with the progress?
Check the Rules!

Raw 8v Power! - Bad Cav, Naughty Cav... Cav want's to do 90!

The How2 Index
Post Reply