Vauxhall Senator

An area of the forum dedicated to the other marques and models sat on your driveway (please post only one thread per car)
cavalier1990
Registered user
Posts: 1463
Joined: Wed Jun 29, 2011 9:15 pm
Location: Paisley, Scotland

Re: Vauxhall Senator

Post by cavalier1990 »

As promised here are some pics of the aforementioned work:

The rust in the floor where seatbelt mounts into. The little plate for the seatbelt goes onto the back of the inner sill and was still there albeit a little surface rust but nothing of concern.

Image


Template made up to patch this area. Had to drill a hole in where seat belt bolt goes and welded the back of the plate on to the seatbelt mount as well as in the other usual places.
Image

After welding the plate up:
Image

The chassis leg rust, double skinned here so cut off the outer and then inner rust and repair in reverse
Image

The repair after being welded up:
Image

Still got to seal up all the welds, that comes at the end. I do this so I don't have to keep opening and closing the bonding sealant as once you open it, it starts hardening up.
User avatar
Robsey
Club Admin
Posts: 10619
Joined: Fri Dec 12, 2008 1:42 pm
Location: East Manchester

Re: Vauxhall Senator

Post by Robsey »

Just one long complicated game of chess.
Planning four or five steps in front, so that you don't trip yourself up along the way.

Should be good and strong now.

A bit of fettling here and there, and it will be spot on.
cavalier1990
Registered user
Posts: 1463
Joined: Wed Jun 29, 2011 9:15 pm
Location: Paisley, Scotland

Re: Vauxhall Senator

Post by cavalier1990 »

Robsey wrote:Just one long complicated game of chess.
Planning four or five steps in front, so that you don't trip yourself up along the way.

Should be good and strong now.

A bit of fettling here and there, and it will be spot on.

I honestly had a real heart sink when I looked at the state of the underneath, mainly at the back, & especially the rear subframe mount, I had that "this will never get done" mentality for a bit, almost a bit depressed about it, but I'm so chuffed I've managed to pull it round and actually fix most of the bodywork. It's just a case of taking it repair by repair and not letting the whole project consume you, because you end up avoiding it and then nothing gets done.

Just like I'm doing now lol! Kidding, just redone the exhaust on the cavy LS as mot coming this saturday!
cavalier1990
Registered user
Posts: 1463
Joined: Wed Jun 29, 2011 9:15 pm
Location: Paisley, Scotland

Re: Vauxhall Senator

Post by cavalier1990 »

Today I decided it was time to strip the plastic sheeting I had over last year's repairs to make sure rust wasn't taking a hold anywhere, thankfully I'd made sure no water was getting in anywhere near the joins or anything and was just running off. I'd also properly sealed the join at the back windows with panel sealer and primer.

Note this is because I've not sealed any of the panel up yet, except the bit I mentinoed above. I had to put rear light in as well so any water running down the back channel was not running into boot.

Decided to rub down the rear panel as storage scratches and edges had light rusting starting, then gave it a paint with 2 pack primer, which is pretty good at holding any rusting at bay. So this is only temp coat to protect it just now.

Just the other day I spotted a brand new whole boot floor for just over 200 Euros, would of saved me the hassle of cutting out all the wee bits on the floor and edges where back panel is, and the edge of the spare wheel well needs repaired as well. The repair panel for the spare wheel is only the lower section, where wheels sits, up to it meets the inner wing, pretty much most of it except the bit that goes vertically to the boot floor.

The boot floor panel comes with everything including the whole spare wheel well.

So that's that done. Next steps are to start patching the boot floor and surrounding areas, including the bit between rear panel. which is replaced, and back of boot floor, thereis a gap where the rear panel join rotted away.

Dying to get it back on the road, and also to start using my spot welder to do the sill up. That entails getting a 16A fused switch installed, the local sparky is going to do that at my Mum's place so I can get to use the welder.

It's all going the right way now :)
3cav3
Registered user
Posts: 1422
Joined: Sun May 22, 2016 6:07 pm

Re: Vauxhall Senator

Post by 3cav3 »

Can't beat buying full panels. I've found my spot welder runs fine off a 13amp plug, and even a long extension lead.
cavalier1990
Registered user
Posts: 1463
Joined: Wed Jun 29, 2011 9:15 pm
Location: Paisley, Scotland

Re: Vauxhall Senator

Post by cavalier1990 »

3cav3 wrote:Can't beat buying full panels. I've found my spot welder runs fine off a 13amp plug, and even a long extension lead.
I know, i'm a new panel addict. I'm thinking I might get that boot floor after all! I was looking at the floor today and there is all the little square bits I cut out where the paint drain plug holes had rotted out, plus the big piece missing along the edge where it meets the back panel. Now I know how to drill out the panels I've kinda went on a role with this so might just go for it.

Nah I was living in hope this welder would run off 13a but it doesn't, find that quite intruging that it runs off 13A, usually these things are really heavy on the old current.
User avatar
Robsey
Club Admin
Posts: 10619
Joined: Fri Dec 12, 2008 1:42 pm
Location: East Manchester

Re: Vauxhall Senator

Post by Robsey »

cavalier1990 wrote: Nah I was living in hope this welder would run off 13a but it doesn't, find that quite intruging that it runs off 13A, usually these things are really heavy on the old current.
I would have thought that 16 amps would only be necessary for full-on "balls-out" welding of thick heavy panels.

Most of the panels should be 18 swg or 20 swg thickness, and so should need a lot less heat and currant.

But then I have a cheap n cheerful 150 amp hobby gasless welder, which will run off a standard 13 amp socket allday long.
3cav3
Registered user
Posts: 1422
Joined: Sun May 22, 2016 6:07 pm

Re: Vauxhall Senator

Post by 3cav3 »

My mig is supposed to run off a 13 amp plug and most of the time it does but if I'm doing a lot of welding and with the extension lead it can sometimes trip out, so I now run it off a 16 amp socket in the workshop.
cavalier1990
Registered user
Posts: 1463
Joined: Wed Jun 29, 2011 9:15 pm
Location: Paisley, Scotland

Re: Vauxhall Senator

Post by cavalier1990 »

My MIG is ok on 13 amp normal socket. I did think I could fit a 13 AMP to this spot welder but it specifically says do not fit or operate wiht a 13 AMP plug, shame, mind you I can'tt wait to see it go!
cavalier1990
Registered user
Posts: 1463
Joined: Wed Jun 29, 2011 9:15 pm
Location: Paisley, Scotland

Re: Vauxhall Senator

Post by cavalier1990 »

Got myself back into doing some more cutting and destroying on the senator last couple of days. Decided to start cutting off the remaining front sills, and yes they were in a bit of a mess, I tried to preserve the joining lip as much as I could but the front section had been grinded and welded, and then rusted some more, so it was a delicate but smoother operation to drill out the spot welds that hold the floor section to the back of the inner sill, so not only will I need to lower a new lip section from floor front but also the inner sill iteslf. The floors themselves are fine.

Some lovely pictures have been taken and an almost full 3/4 pic of aforementioned motor has been taken. I've also near enough decide I want to replace the boot floor, yes I must be mad, but there is one available and I reckon why get this far and patch up a flaky boot floor round the whole new wheel well, back panel and rear wing, I probably could fashion repair panels quicker than I could drill out the old floor, but it makes much more sense to replace it with new metal and no sill bits of panel plastered over the various sections that had rotted in the boot.

Sorry never got pics of the boot, it was mainly the edge along the back panel, and various rubber bung sections and O/S behind wheel well that had been taken out by the dreaded tin worm.

Here it is in all it's mossy glory!
Image

The front of the inner sill lip was especially a bit of a mess, time to start replacing.
Image

This is where the inner sill strengthener ends about under the back of the front door, as you can see the edges are frillly, so I will continue my repair from back towards this section, this then welds onto the outer sill along it's downward facing section.
Image

You can sort of see where the back inner sill section has been cut away and I have repair panel fashined for that, which you will see in subequent pictures.
Image

Another shot of N/S/F of inner sill, O/S much the same.
Image

This is me crudly modelling the rear inner sill repair patch, complete with strengthening holes ground out them, it was rusty half way up them, so they look a bit squint here cause I'm not holding it straight!
Image

2nd pic of repair panel.
Image

And finally a pic of the rear wing lower quarter new panel crudly painted in 2 pack primer that resists water absorption.
Image


Still plenty to do but plenty being done, I'm going to be doing some stuff on this week, so hopefully more progress pics posted soon.
User avatar
Robsey
Club Admin
Posts: 10619
Joined: Fri Dec 12, 2008 1:42 pm
Location: East Manchester

Re: Vauxhall Senator

Post by Robsey »

Woohoo!!
I have been waiting to see more progress on this car.
Strange, but my two favourite cars on this forum are your Senator and 3cav3's Astra van.

That rear quarter is looking excellent.

Although it is more work, a new boot floor would mean that you don't have to re-do the flakey one in two year's time.
3cav3
Registered user
Posts: 1422
Joined: Sun May 22, 2016 6:07 pm

Re: Vauxhall Senator

Post by 3cav3 »

I'm totally with you on the replacement floor. If it's available and more than a couple of localised patches are needed I would always from choice fit a full replacement panel. It may be more work in the short term, but you'll know it's right.
cavalier1990
Registered user
Posts: 1463
Joined: Wed Jun 29, 2011 9:15 pm
Location: Paisley, Scotland

Re: Vauxhall Senator

Post by cavalier1990 »

Thanks Guys for your support! I'm glad you are enjoying the senator and astra van update, it's kinda similar amount of work in a way isn't it. I do like the astra van progress, and it keeps me going a bit knowing I'm not the only one.

So that's me got a majority vote for the boot floor, only thing I was thinking about was that the majority of it I willl have to spot weld with my MIG, not my fancy new spot welder, as the spots are too far away from the edges most of them.

I also get the spare wheel well on the new floor, so will have to cut it off, neatly, as I have already replaced that. If you seen the floor, you'd likely agree it's worth replacing, about 2" from back panel to floor is missing, plus many of the drain plugs were rotten, and if you look at the floor underneath the whole thing is scabby with surface crud. Also I'll be able to get inside the chassis legs to clean them out and treat any rust inside them.

I've also ordered 6 dormer spot weld drills so no going back now!

Cheers

Andrew
cavalier1990
Registered user
Posts: 1463
Joined: Wed Jun 29, 2011 9:15 pm
Location: Paisley, Scotland

Re: Vauxhall Senator

Post by cavalier1990 »

The boot floor is actually for a carlton but I'm hoping it will be ok, I'm asking a few bods in autobahnstormers if they know either way.

Senator boot floor:

http://www.catcar.info/opel/?lang=en&l= ... ZXk9PTM%3D

Carlton boot floor:

http://www.catcar.info/opel/?lang=en&l= ... 09NA%3D%3D

THe part numbers are almost identical and everything looks the same so here's hoping.
cavalier1990
Registered user
Posts: 1463
Joined: Wed Jun 29, 2011 9:15 pm
Location: Paisley, Scotland

Re: Vauxhall Senator

Post by cavalier1990 »

So today I finished off cutting off the crusty bits of the N/S sill and worked my way towards the front of the sill in behind the wing. Obviously I was thinking here we go again more rust is going to be exposed, and from what I could see there had been some plating done in that area. The jackpoint strengthener was also holed and crusty so I didn't hold out too much hope for the rest of it, and as expected I was greeted with a completely rotten door frame! Most of the crust I poked holes in is around the plates that someone had already welded on.

Mins you not to worry the door isn't falling off - yet, - but it will be soon. Luckily I think I found a repair panel GM genuine so I can whip said door off, drill out the spot welds and replace the panel. The good thing is the panel goes right to the bottom of the sill lip so that will overlap nicely with new sill, it also has the door hinges already welded on on new panel so phew to that!

Here's some crust I also found on the bumper mount and in behind the inner wheel well, strange thing is I've went full circle and met up with the repairs I done on the front subframe, so progress is now paying off!

like putting a knife through butter
Image
Extra fresh air vents
Image
So that's where the damp has been coming from!
Image

I removed the canister after this and poked and prodded there is some crust but nothing too major.
Image

Might replace this as I still see them online and easy enough to replace.
Image
3cav3
Registered user
Posts: 1422
Joined: Sun May 22, 2016 6:07 pm

Re: Vauxhall Senator

Post by 3cav3 »

I know the feeling of finding more rot every time you remove something. Although I long for the day when I've gone full circle and reached back at the start of my repairs.
User avatar
Robsey
Club Admin
Posts: 10619
Joined: Fri Dec 12, 2008 1:42 pm
Location: East Manchester

Re: Vauxhall Senator

Post by Robsey »

I tried your part number search on EPC.
Vauxhalls Electronic Parts Catalogue.

You can search via part number, which would identify which Carlton parts fit the Senator and vice versa.

Like you, I did not get a cross-match on either part number.
But they do look identical.

As for that front end rot.
It looks like major stuff from here, but it appears that you have it all under control.

As for the door shuts... I wouldn't be surprised if the water getting in was via the scuttle panel drain tubes.
A common problem on Vauxhalls.
cavalier1990
Registered user
Posts: 1463
Joined: Wed Jun 29, 2011 9:15 pm
Location: Paisley, Scotland

Re: Vauxhall Senator

Post by cavalier1990 »

Thanks Robsey, I am taking a big gamble as I don't know if there are critical differennces, but judging by every other panel inside of the outer bodywork on a carlton being the exact same as the senator, I'm hopeful.

That and the door pillar panel are not winging their way to me, got a wee weekend of non-car stuff and be working at home at the missues house I'm taking a well earned break from it all.

Last night I stripped out the servo to get in at a small bit of crust on the bulkhead join, what a buggar that was to get out, I had to pull it past the strut tower and inlet manifold, marking each in the process.

Then a bit of work about the drivers floor and sill to start the process of taking the outrigger bit out and the usual section of floor that is always rotten, I've got the outrigger as a new panel for O/S, but need the other side, seem quite hard to get the other one.

Cheers
Andrew
cavalier1990
Registered user
Posts: 1463
Joined: Wed Jun 29, 2011 9:15 pm
Location: Paisley, Scotland

Re: Vauxhall Senator

Post by cavalier1990 »

So I ordered the parts, the boot floor, and bumper hangers for the front, but they have a weird ordering system namely you have to transfer money using IBAN and such stuff. I had actually received the reply of the parts being pulled into one shipment and totally forgot to transfer the money. Thinking I'd done it a few days ago I then realised I hadn't and had to fish through all the emails and invoices to work out the exact payment - in Euros - and then figure out how to transfer it via bank online.

The guy was being a bit churlish and I did try and just remain light spirited as I dove through multiple emails and invoices to get the IBAN and other numbers, then get their address and stuff to fill in the online form to transfer.

Kind of annoying when someone is like this, he'd mentioned the IBAN number and an orderID reference so I couldn't find the SWIFT transfer No the bank wanted. which is a totally different name to the BIC code they had on their invoice.

Why o why are these things so effin complicated. I felt like saying can you not use paypal next time :)

Then he said we are on holiday from Monday, when the transfer will clear, and won't be able to process order til after holidays, end of July. It's lucky I'm not in a big rush for these or I might have went off on one!

Anyway I have the door frame panel and can work on that and get sill ready for replacement.
User avatar
Robsey
Club Admin
Posts: 10619
Joined: Fri Dec 12, 2008 1:42 pm
Location: East Manchester

Re: Vauxhall Senator

Post by Robsey »

Paypal is great for buyers,
but not so good for businesses who sell goods, due to additional fees etc.

With your fleet, I am sure you have plenty to keep you out of trouble.
cavalier1990
Registered user
Posts: 1463
Joined: Wed Jun 29, 2011 9:15 pm
Location: Paisley, Scotland

Re: Vauxhall Senator

Post by cavalier1990 »

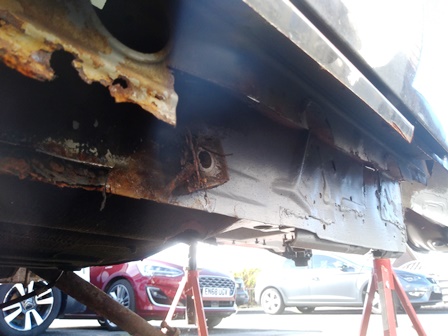
Latest update, this is when things get more interesting, I decided to tackle the N/S door frame, as it looked particularly crusty.

Started off drilling out the spot welds for the longitudinal strengthener, which is particularly thick metal, so it took a bit of blood, sweat and tears to get this off, it was also welded to the door post just above the top hinge, which was also paper thin and quite easy to poke a hole in. For those of you who like a visual represenatation, the strengthener plate is no. 6 in this diagram:

https://opel.7zap.com/en/car/v88/a/3/3-0/

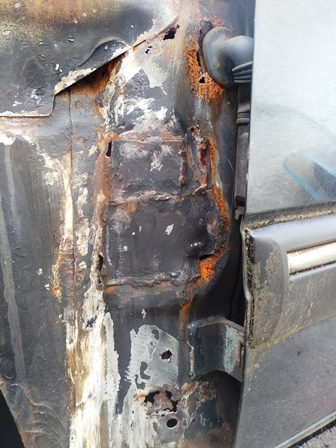
So part of this sits over the door post and once that was off I started drilling out the spot welds for the door post itself, and eventually it succumbed to me and my drill and fell off. I did have to do a bit of edge of your seat cutting on the windscreen post and very near the screen, where the cut was purposefully below the line on the windscreen post where the wing sits over, there is a sort of longitudinal indent in the pillar for where the edge of wing sits.

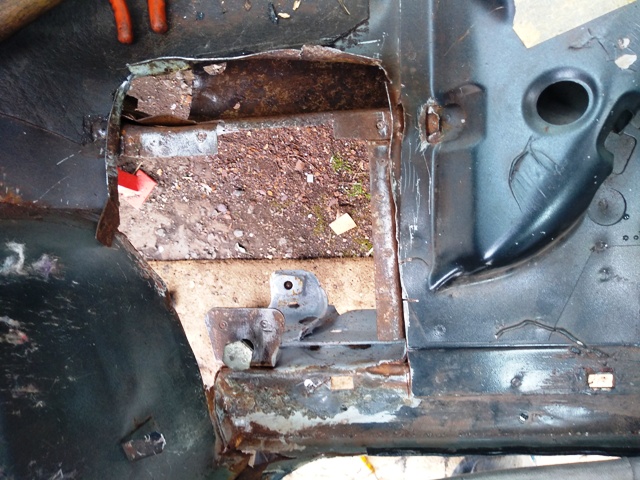
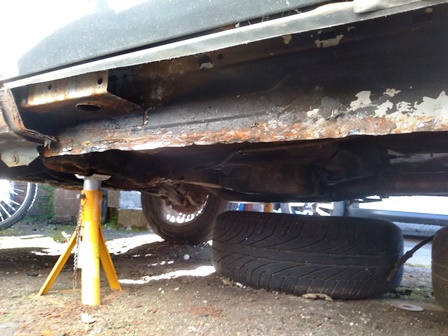
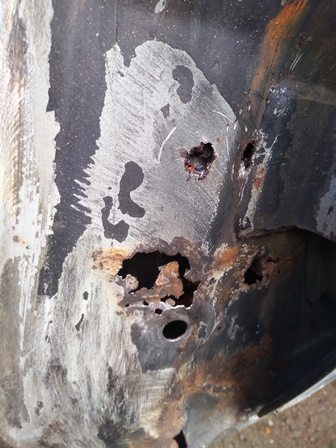
Here is the resultant removed door pillar in all it's glory, as you can see there is just a smidgen of tin worm!

Image

Image

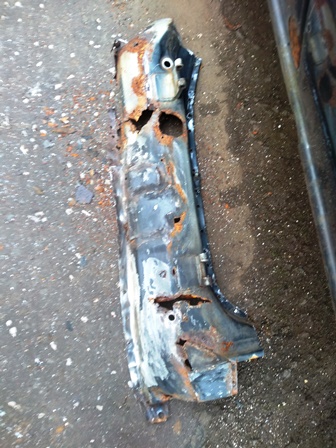
Despit all this there was no visible sag on the door, nor did it seem significantly weakened, well at least by pulling down the top of the door i Couldn't see it flexing. Maybe if I stood on it though ....!

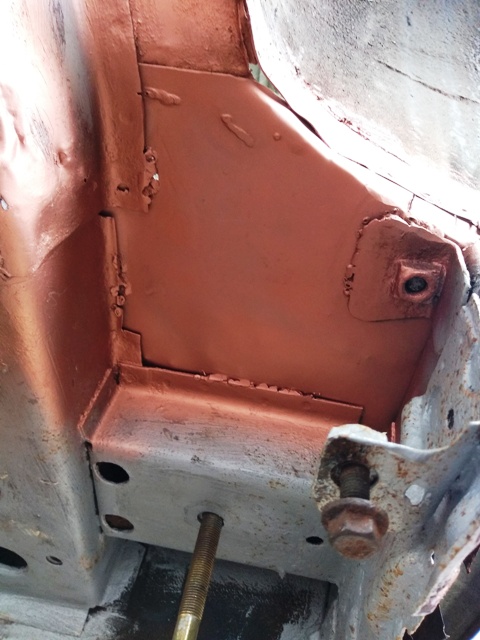
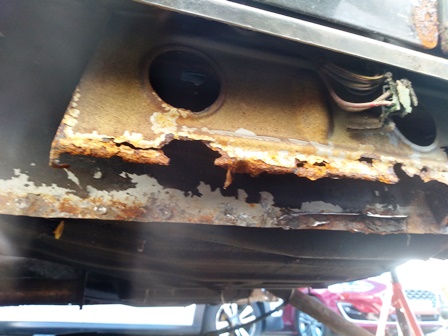
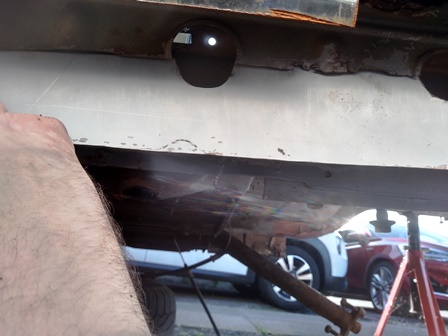
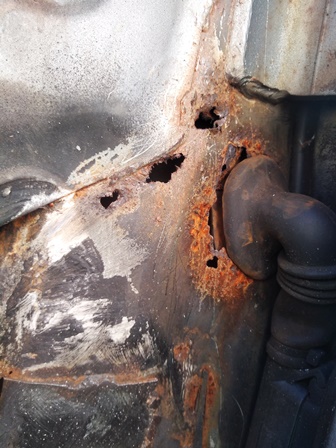
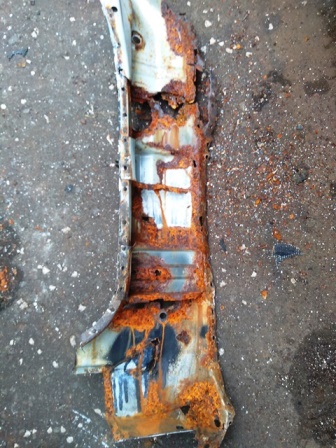
And also the view in behind, which I thought I had pics of, is not that much better.

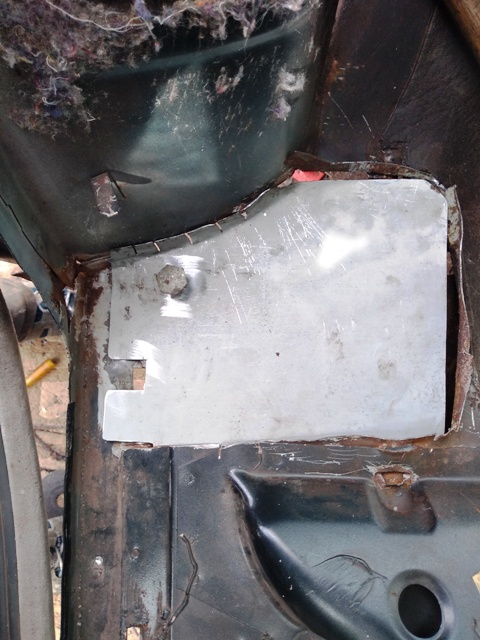
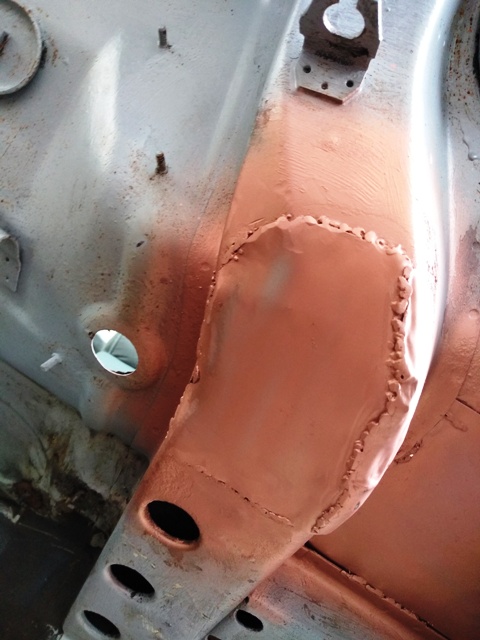
It's all repairable though just need to order myself some more zinc plated metal, maybe 4 ton or so :)

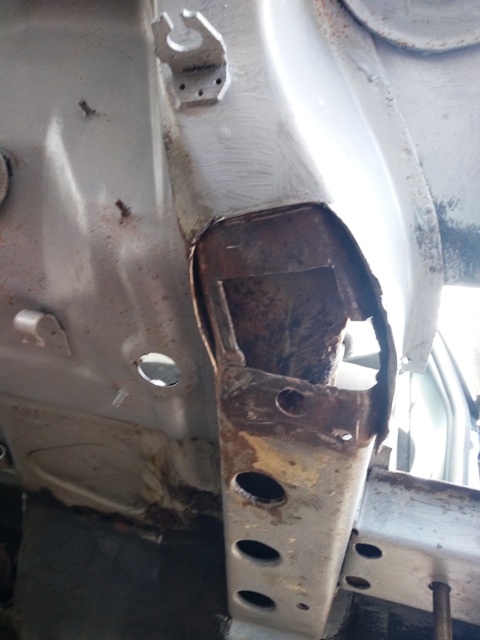
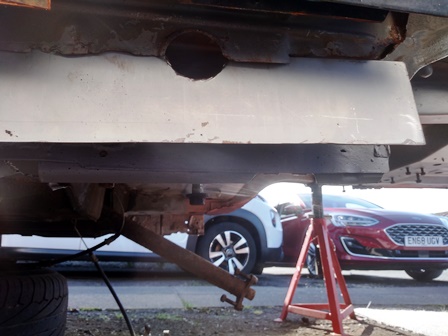
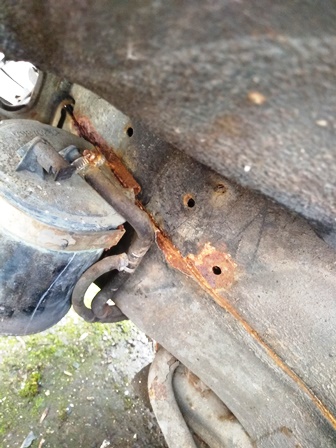
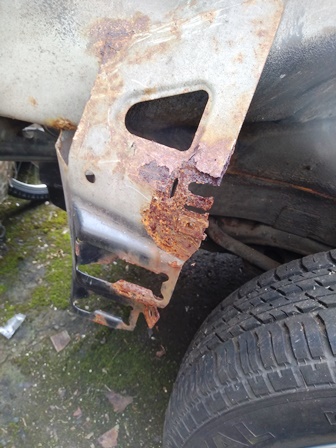
After seeing that I was kind of dreading pulling off the drivers wing, but a cursory glance it looked "a bit" better. But you know how it goes right?

Anyway I took wing off, and yes there was some crust along where the rubber grommet is for door wiring, but it wasn't as bad as the other side, there was a a few chunks of crust aroundabout the area but the actual post looked ok. I did have to remove the spot welds from the bottom of the strengthener from that side and lift the edge of it out a bit as the metal going up the kickplate side to the top was crusty in behind, but I do not want to have to take off the strengthener again. In all honesty it should be replaced as I know it is a bit crusty inside as well, but I'm going to give myself the benefit of the doubt and just make sure it is sound as possible for as long as possible with some neat cleaning and rustr proofing and small repairs

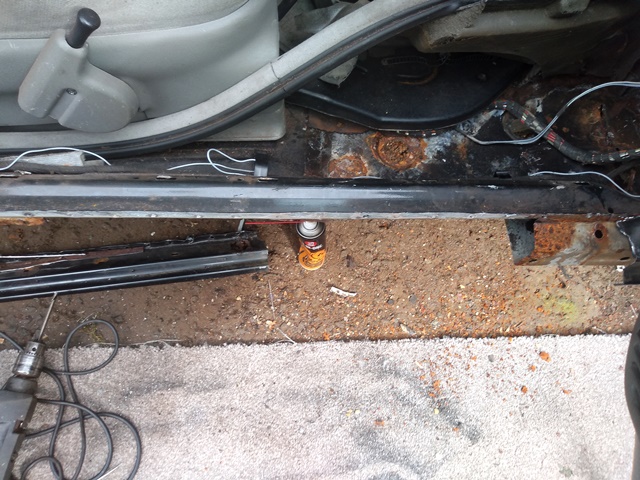
I also cut off the N/S sill and the remnants of the O/S sill at drivers bit. All spot welds out and now looking like the start of a template to getting new sills back on, before I fix the inner sill panel of course.

Image

Time for my break away, I'm going on hols for a very well earned break!
3cav3
Registered user
Posts: 1422
Joined: Sun May 22, 2016 6:07 pm

Re: Vauxhall Senator

Post by 3cav3 »

At least it's not only me then that keeps uncovering horror stories, lol. Makes you wonder what caused it to rot out there? Maybe long ago accident repair? Or is that Vauxhall did something stupid like route the sunroof drains into the door frame?
User avatar
Robsey
Club Admin
Posts: 10619
Joined: Fri Dec 12, 2008 1:42 pm
Location: East Manchester

Re: Vauxhall Senator

Post by Robsey »

They are in the a-pillar / door frame on the cavalier.

As a new inductee into the rust removing squad, it makes me wonder what I have let myself in for.

Ah well - back to the old mantra - "it is all progress".
And any progress is better than none. :)
cavalier1990
Registered user
Posts: 1463
Joined: Wed Jun 29, 2011 9:15 pm
Location: Paisley, Scotland

Re: Vauxhall Senator

Post by cavalier1990 »

3cav3 wrote:At least it's not only me then that keeps uncovering horror stories, lol. Makes you wonder what caused it to rot out there? Maybe long ago accident repair? Or is that Vauxhall did something stupid like route the sunroof drains into the door frame?
Standard fair for the sunroof drains to go down the door pillar, guess whatever moisture collected in the bottom of sill some of it would have evaporated up the door frame, much like a chimney affect. Also just age and given there is strengthening strips in there which are nice little ledges for water to collect, and not very much in the way of ventilation, well until now!
User avatar
Mk3alan
Registered user
Posts: 633
Joined: Sun Mar 09, 2014 8:40 pm

Re: Vauxhall Senator

Post by Mk3alan »

Never did sound like a good idea to pour water into a box section!
My MK4 Astra sunroof has leaked water pipes down the screen pillar then exits between inner and outer wing which is where the bulkhead water goes.

Alan
Post Reply