
Progress is slow, but it is still progress.
I am hoping to start ordering parts at the end of June, so that I can get the front leg, hub, disc, and bearings assembled. Hopefully the gearbox and linkage too.
Shopping list includes -
Suspension-
upper and lower ball joints, (£15 + £43)
Anti roll bar bushes, (£44)
Anti roll bar drop link bushes (£28)
Gear linkage- (£82).
Operating ball and cup with boots.
Rear and middle bushes.
Gearbox- (£43)
Complete gasket and seal kit.
Probably hit over £250 in that little lot, plus shipping.
Did I say parts are expensive?..
Once the box is in, I can hook-up the engine, and reassemble the exhaust, cooling, fuel injection and wiring.
--------------------------------------
I am still waiting for the big array of parts to be sent away for bead blasting and powder coating...
And get them back again, before I can rebuild the front near-side suspension.
And I still need to decide which cooling system and exhaust I will use.
I have an early van, and late engine... so a whole array of options.
I should go late for both exhaust and cooling, but I do fancy the original early versions in keeping with how the van looked and sounded in it's day.
I know that sounds rediculous when I am bogging about modernising the rest of the van.
My VERY RUSTY VW T25 Camper Van Project
-
Envoy CDX

- Club Admin
- Posts: 9681
- Joined: Sun Sep 23, 2007 3:51 pm
- Location: Jarrow, Newcastle Upon Tyne
Re: My VERY RUSTY VW T25 Camper Van Project
All mounts up, as for the mix of late and early parts. I'd say go for whatever gives the best feeling for you and assuming it isn't going to be silly expensive.
Re: My VERY RUSTY VW T25 Camper Van Project
Well this is it.
Early van -
I still have all the early coolant pipework, bar one £50 pipe only available in stainless steel.
For the exhaust, I mistakenly binned all the early exhaust except the silencer and steady bars.
Late engine
I have about 70% of the coolant pipework on the engine itself, but it does not plumb-in to the early van radiator, engine bay, and under-body pipework.
I have most of the late exhaust pipework, but missing a J shaped pipe (£80) and silencer (£175 plus).
Either way.. silly money.
Re: My VERY RUSTY VW T25 Camper Van Project
Little bits n bobs this week.
Dressed and epoxy primered the front panel,

Rust treated three times last week.
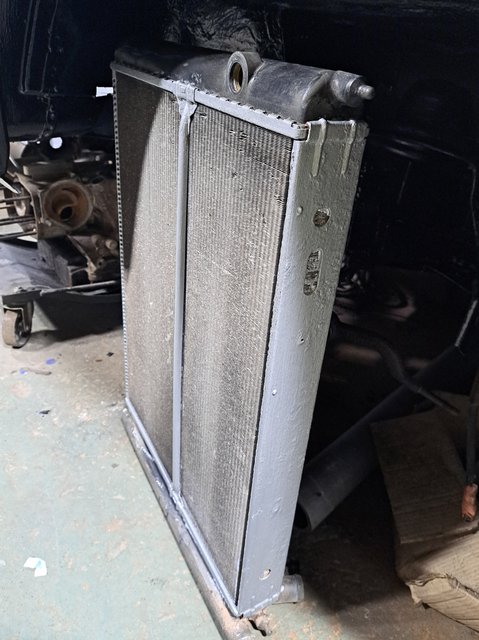
I rubbed down and painted the radiator.
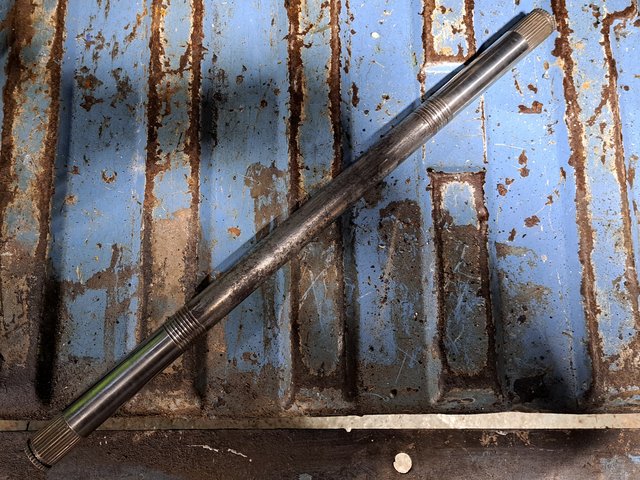
And finished by cleaning up the left drive shaft.
After this, Troy decided to have a tidy up.
Not sure if he meant to, but he had thrown this in the bin.

I did my skip-rat impression and fished it out.
I am 95% certain it is the front grille badge for the Cavalier. As you can see - not used.
Dressed and epoxy primered the front panel,
Rust treated three times last week.
I rubbed down and painted the radiator.
And finished by cleaning up the left drive shaft.
After this, Troy decided to have a tidy up.
Not sure if he meant to, but he had thrown this in the bin.
I did my skip-rat impression and fished it out.
I am 95% certain it is the front grille badge for the Cavalier. As you can see - not used.
-
Envoy CDX
- Club Admin
- Posts: 9681
- Joined: Sun Sep 23, 2007 3:51 pm
- Location: Jarrow, Newcastle Upon Tyne
Re: My VERY RUSTY VW T25 Camper Van Project
Yeah, silly money indeed, personally I'd go with the most robust route. but it's your van and YOU need to be happy with the look and function of it.Robsey wrote: ↑Sat May 27, 2023 11:10 pm Well this is it.
Early van -
I still have all the early coolant pipework, bar one £50 pipe only available in stainless steel.
For the exhaust, I mistakenly binned all the early exhaust except the silencer and steady bars.
Late engine
I have about 70% of the coolant pipework on the engine itself, but it does not plumb-in to the early van radiator, engine bay, and under-body pipework.
I have most of the late exhaust pipework, but missing a J shaped pipe (£80) and silencer (£175 plus).
Either way.. silly money.
Some nice progress there.Robsey wrote: ↑Wed May 31, 2023 8:22 pm Little bits n bobs this week.
Dressed and epoxy primered the front panel,
Rust treated three times last week.
I rubbed down and painted the radiator.
And finished by cleaning up the left drive shaft.
After this, Troy decided to have a tidy up.
Not sure if he meant to, but he had thrown this in the bin.
I did my skip-rat impression and fished it out.
I am 95% certain it is the front grille badge for the Cavalier. As you can see - not used.
As for the badge, aye, its facelift grill sized.
Re: My VERY RUSTY VW T25 Camper Van Project
I put the part number 90 533 060 into EPC, but it is not recognised.
Googling "vauxhall 90533060" is a bit hit & miss, but hints at a Corsa-C badge. ??
Googling "vauxhall 90533060" is a bit hit & miss, but hints at a Corsa-C badge. ??
-
Envoy CDX
- Club Admin
- Posts: 9681
- Joined: Sun Sep 23, 2007 3:51 pm
- Location: Jarrow, Newcastle Upon Tyne
Re: My VERY RUSTY VW T25 Camper Van Project
Though the Corsa C had a newer design than that.
Re: My VERY RUSTY VW T25 Camper Van Project
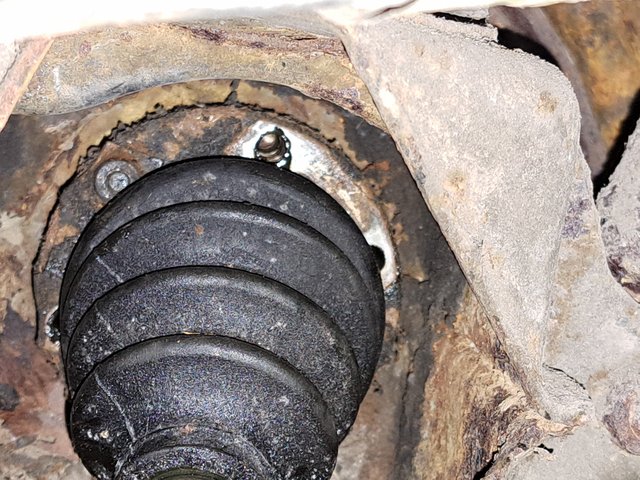
Not quite sure why, but I decided to remove the right (off-side) driveshaft from the rear right hub.
Not brilliant for access, lying on the floor under the van, with coolant pipes and the filthy 'other end' of the shaft complete with mingy greasey inner joint in your face.
Also the outer CV is inside the trailing arm / wishbone.
Nice.

I am not sure that I am particularly a fan of the VW style bolt on CV assemblies.
They are held on by six cap-head bolts, with only shallow sockets for either a hex bit or a splined bit.
Personally I would have used cap-heads with a deeper socket.
After driving the bit into each bolt head with a lump-hammer, I was able to get five out with an initial 'crack' sound as they released.
The sixth bolt, typically decided that it would strip the socket instead. Confirming the reasoning for my dislike of shallow cap head sockets.
Amazingly, when drilling off the bolt head, the drill squarked and chattered as if the metal was very hard.
Clearly not if it had stripped so easily.
I was on a mission, and the shaft was soon removed complete with both joints, packed to the rafters with smelly black grease.
What a hideous job to remove the joints from the shaft and to degrease.

Cleaned the shaft with a stripping head in an angle grinder, then bead blasted the central area, and then polished up on the lathe.
Not perfect, but a lot better - now ready for primer and paint.
Not brilliant for access, lying on the floor under the van, with coolant pipes and the filthy 'other end' of the shaft complete with mingy greasey inner joint in your face.
Also the outer CV is inside the trailing arm / wishbone.
Nice.
I am not sure that I am particularly a fan of the VW style bolt on CV assemblies.
They are held on by six cap-head bolts, with only shallow sockets for either a hex bit or a splined bit.
Personally I would have used cap-heads with a deeper socket.
After driving the bit into each bolt head with a lump-hammer, I was able to get five out with an initial 'crack' sound as they released.
The sixth bolt, typically decided that it would strip the socket instead. Confirming the reasoning for my dislike of shallow cap head sockets.
Amazingly, when drilling off the bolt head, the drill squarked and chattered as if the metal was very hard.
Clearly not if it had stripped so easily.
I was on a mission, and the shaft was soon removed complete with both joints, packed to the rafters with smelly black grease.
What a hideous job to remove the joints from the shaft and to degrease.
Cleaned the shaft with a stripping head in an angle grinder, then bead blasted the central area, and then polished up on the lathe.
Not perfect, but a lot better - now ready for primer and paint.
Re: My VERY RUSTY VW T25 Camper Van Project
In the past when ive felt an Allen head start to strip Ive Locktighted the AllenKey into the head and let set. 2/3rds of the time its held to undo the bolt. Can save a lot of time drilling particuarly if the steel is hard.
-
Envoy CDX
- Club Admin
- Posts: 9681
- Joined: Sun Sep 23, 2007 3:51 pm
- Location: Jarrow, Newcastle Upon Tyne
Re: My VERY RUSTY VW T25 Camper Van Project
Nice progress, and it's a filthy job but someone has to do it.
Re: My VERY RUSTY VW T25 Camper Van Project
It just amazes me how much grease was in those joints.
With age and use, it was like a thick gloopy grey gravy.
Leaking out everywhere like a snotty runny egg.
I am glad that it's done.
Only grease left to deal with is the fitting of the new cv-joints and front wheel bearings.
Waiting on upper and lower ball joints, before I can reassemble the front knuckle.
As usual, that naturally infers waiting until payday.
-
Envoy CDX
- Club Admin
- Posts: 9681
- Joined: Sun Sep 23, 2007 3:51 pm
- Location: Jarrow, Newcastle Upon Tyne
Re: My VERY RUSTY VW T25 Camper Van Project
Aye, it'll come together though. I'm sure there are plenty of non-costing jobs in the meanwhile.
Re: My VERY RUSTY VW T25 Camper Van Project
More cleaning...
Tonight it was the turn of the silencer.
Although I may regret it later, I have decided to stick with the early style exhaust, and early style cooling.
More chance of succeeding at getting the van recognised as a classic if the engine does not 'look' like it has been swapped in the past 30 years.
Anyway the exhaust has been inside the van since 1990, but has been left to get damp for all of those 32 winters.
So tonight I was faced with an orange silencer.
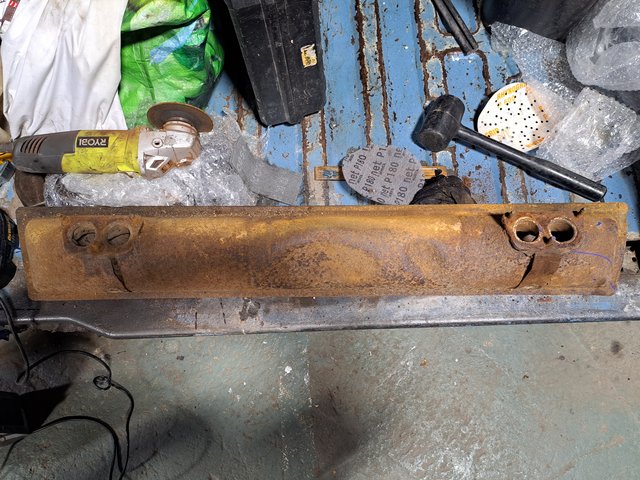
Some cleaning later identifies that the exhaust has only seen approx 18 months of active service, before being abandoned in disgust.
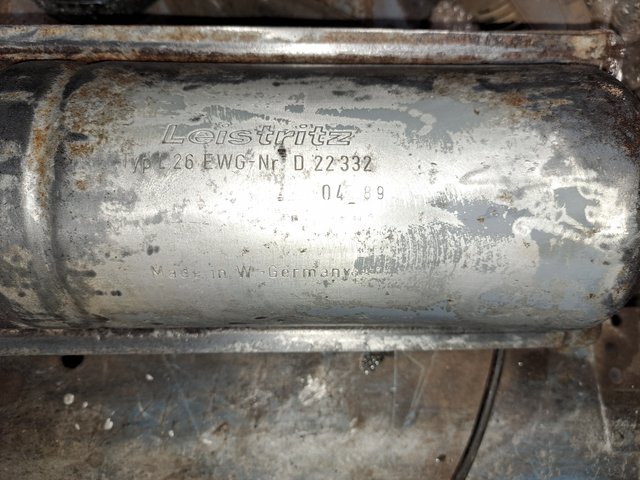
I am reasonably pleased how solid the silencer is.
The studs look a bit ropey, but should be fit to be re-used.
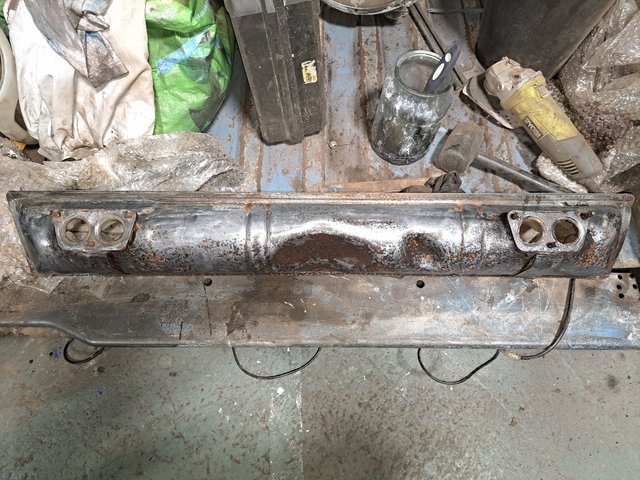

I then set about cleaning the heat shield that sits above the silencer, protecting the coolant tanks and deflecting the heat from the load area.

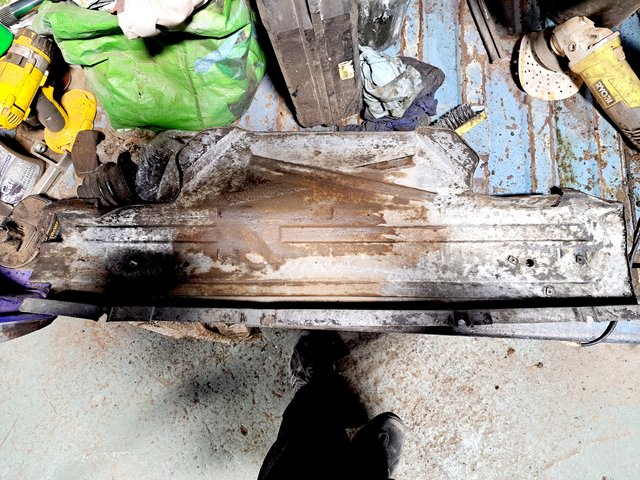
Still plenty of cleaning to do before applying etch primer and high temperature paint.
Tonight it was the turn of the silencer.
Although I may regret it later, I have decided to stick with the early style exhaust, and early style cooling.
More chance of succeeding at getting the van recognised as a classic if the engine does not 'look' like it has been swapped in the past 30 years.
Anyway the exhaust has been inside the van since 1990, but has been left to get damp for all of those 32 winters.
So tonight I was faced with an orange silencer.
Some cleaning later identifies that the exhaust has only seen approx 18 months of active service, before being abandoned in disgust.
I am reasonably pleased how solid the silencer is.
The studs look a bit ropey, but should be fit to be re-used.
I then set about cleaning the heat shield that sits above the silencer, protecting the coolant tanks and deflecting the heat from the load area.
Still plenty of cleaning to do before applying etch primer and high temperature paint.
-
cavalier1990
- Registered user
- Posts: 1463
- Joined: Wed Jun 29, 2011 9:15 pm
- Location: Paisley, Scotland
Re: My VERY RUSTY VW T25 Camper Van Project
Typical the last bolt on the driveshaft gave in, never fancied talking those types of shafts, looks the same on omega with 6 allen bolts. Hope I don't ever have to remove them! That grease is horrible stuff as well, I remember getting that in my hands years ago before the gloves came on the scene. Mingin stuff! Looks like steady progress on the van, all coming together nicely!
Re: My VERY RUSTY VW T25 Camper Van Project
Nothing done tonight... not until Tuesday night.
But, Yesterday, 11 years after being handed the batton for rebuilding the van...
I was finally given:-
The original V5 (pre-V5C era) from 1986,
The original sales receipt for the van.
The wife got a bit tearful to see her late dad's signature on the receipt.
The vans last MOT certificate from 1990.
I love finding or getting history for our vehicles, and this fills a few more gaps.
Re: My VERY RUSTY VW T25 Camper Van Project
Its always nice to get pieces of paper with the vehicles history on. Much better than electronic information such as the mot history online.
-
Envoy CDX
- Club Admin
- Posts: 9681
- Joined: Sun Sep 23, 2007 3:51 pm
- Location: Jarrow, Newcastle Upon Tyne
Re: My VERY RUSTY VW T25 Camper Van Project
Nice to hear things are going well Rob, nice bit of salvage work 
Re: My VERY RUSTY VW T25 Camper Van Project
Tonight there were two main tasks.
First was to re-make two teeny weeny steel repair panels to finish the front footwell and A post.
Due to their size, I had lost the original pieces.
------------------------
Then it was the turn of the clutch operating arm.
The reason for removing the operating arm was because the whole clutch-release shaft assembly moved to the left as the arm pushed-downward - as it would when the clutch slave cylinder is being operated.
I didn"t like the look of this. The clutch release bearing carrier forks on the shaft should not move sideways.
By the looks of it, the operating arm is rubbing on the slave cylinder mount as it rotates.
I have cleaned away a lot of swollen aluminium around the aperture through which the clutch release shaft pertrudes. I need to check if the shaft is centralised in the up / released position, or the down / operated position.
The van had been worked on in the past.
I am presuming by the father in law.
The operating arm was attached to the end of the release shaft and should have been held in place with a circlip. Nope! No circlip, the shaft end had been peined over.
Filing off burrs on the end and then several whallops with a lump hammer got the lever off the shaft.
This allowed me to access the sleeves and seals...
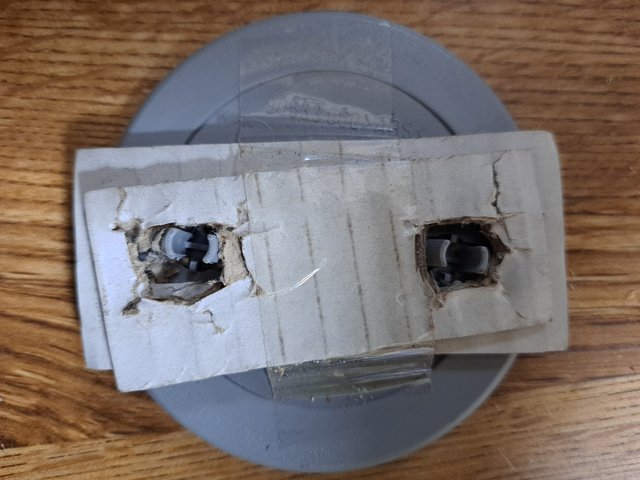
I found what looked like a white plastic tube with a lip around one end. Hmm, looks like one of those tubes of orange vitamin tablets or denture cleaning tablets.

And inside this were two ribbed rubber seals.
They were looking a bit soft and soggy.
The rubber seals came out easy enough, but the plastic sleeve is playing awkward buggers. Still, I will give it another go on Friday.
There is also excess waggle on the output shaft.
I hope that this is quite normal and the spigot bearing takes care of any excessive lateral play.
The plan is to replace all the seals and gaskets in the 'box. Looks like the odd bearing may be needed too.
But I will not be doing a full 'box refurb.
A full kit with circlips, gears and bearings etc is about £700. Virtually the same price as a tired 2nd hand 'box.

The joys of VW ownership.
First was to re-make two teeny weeny steel repair panels to finish the front footwell and A post.
Due to their size, I had lost the original pieces.
------------------------
Then it was the turn of the clutch operating arm.
The reason for removing the operating arm was because the whole clutch-release shaft assembly moved to the left as the arm pushed-downward - as it would when the clutch slave cylinder is being operated.
I didn"t like the look of this. The clutch release bearing carrier forks on the shaft should not move sideways.
By the looks of it, the operating arm is rubbing on the slave cylinder mount as it rotates.
I have cleaned away a lot of swollen aluminium around the aperture through which the clutch release shaft pertrudes. I need to check if the shaft is centralised in the up / released position, or the down / operated position.
The van had been worked on in the past.
I am presuming by the father in law.
The operating arm was attached to the end of the release shaft and should have been held in place with a circlip. Nope! No circlip, the shaft end had been peined over.
Filing off burrs on the end and then several whallops with a lump hammer got the lever off the shaft.
This allowed me to access the sleeves and seals...
I found what looked like a white plastic tube with a lip around one end. Hmm, looks like one of those tubes of orange vitamin tablets or denture cleaning tablets.
And inside this were two ribbed rubber seals.
They were looking a bit soft and soggy.
The rubber seals came out easy enough, but the plastic sleeve is playing awkward buggers. Still, I will give it another go on Friday.
There is also excess waggle on the output shaft.
I hope that this is quite normal and the spigot bearing takes care of any excessive lateral play.
The plan is to replace all the seals and gaskets in the 'box. Looks like the odd bearing may be needed too.
But I will not be doing a full 'box refurb.
A full kit with circlips, gears and bearings etc is about £700. Virtually the same price as a tired 2nd hand 'box.
The joys of VW ownership.
-
Envoy CDX
- Club Admin
- Posts: 9681
- Joined: Sun Sep 23, 2007 3:51 pm
- Location: Jarrow, Newcastle Upon Tyne
Re: My VERY RUSTY VW T25 Camper Van Project
Ooooosh, that is a bit of a stinger, but you're making progress
Re: My VERY RUSTY VW T25 Camper Van Project
It is still that challenging phase of stripping, clean and refurbing parts...
But I know that I will be doing 'some' re-assembly work soon.
Things always feel better when you start rebuilding stuff rather than stripping.
But I know that I will be doing 'some' re-assembly work soon.
Things always feel better when you start rebuilding stuff rather than stripping.
-
Envoy CDX
- Club Admin
- Posts: 9681
- Joined: Sun Sep 23, 2007 3:51 pm
- Location: Jarrow, Newcastle Upon Tyne
Re: My VERY RUSTY VW T25 Camper Van Project
Huge difference can be seen by the casual observer as it comes to bits and gets cleaned up though. Massive difference (my perspective anyhow).
Re: My VERY RUSTY VW T25 Camper Van Project
Cheers -
that is usually the way.
When you are "in the midst" of doing the work, you cannot see the wider picture.
It is all one big blur.
I am still waiting for my parts to go for blasting and coating.
When they come back, I will be able to plough on with a lot of building-up.
Still, it gives me time to prepare other parts. And save up for others.
Re: My VERY RUSTY VW T25 Camper Van Project
Had a fun night tonight.
I have been practicing my turning skills on a very old Harrison lathe.
Plan was to make up a few bolts for XE / XEV timing belt covers.
The odd one turns up from time to time in Poland, but they are like rocking horse doo over here in sunny old blighty.
The sample bolt for me to copy.

That was the plan, but the hex bar hasn't arrived yet
So instead I partially made a speedometer adapter bush.
Using a piece of scrap brass, I came up with this.
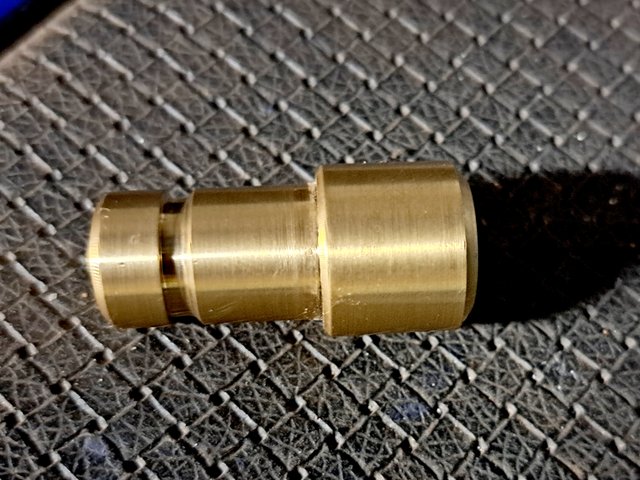
Just waiting for an M18 fine-thread split-die, before I can cut a thread on the large diameter end.
The narrow end will take a standard VW camper clip on speedo cable.
Last job of the night was to get that pesky clutch release shaft out.
It turns out, that all the bushes on the lever end of the shaft were fubarred...but then the main sleeve comprised of a plastic sleeve inside a plastic tube not the original phosphor-bronze sleeve.
Hopefully new bushes, sleeve, seals, and circlips will fix that.
Talking of fubarred, so is the bell-housing casting.
It should be level with the bush in the clutch-slave mounting bracket.
As you can see here, it is badly corroded away at the bottom.
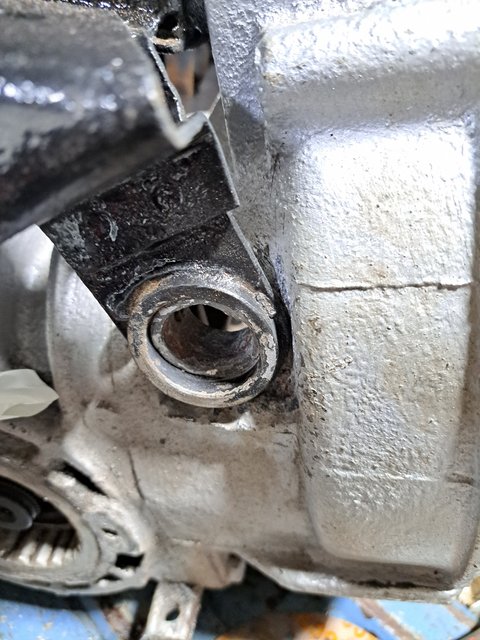
Fingers crossed that the phosphor-bronze sleeve will stabilise the lever and stop lateral movement.
Worst case scenario, is a replacement (used) bell housing.
I have been practicing my turning skills on a very old Harrison lathe.
Plan was to make up a few bolts for XE / XEV timing belt covers.
The odd one turns up from time to time in Poland, but they are like rocking horse doo over here in sunny old blighty.
The sample bolt for me to copy.
That was the plan, but the hex bar hasn't arrived yet
So instead I partially made a speedometer adapter bush.
Using a piece of scrap brass, I came up with this.
Just waiting for an M18 fine-thread split-die, before I can cut a thread on the large diameter end.
The narrow end will take a standard VW camper clip on speedo cable.
Last job of the night was to get that pesky clutch release shaft out.
It turns out, that all the bushes on the lever end of the shaft were fubarred...but then the main sleeve comprised of a plastic sleeve inside a plastic tube not the original phosphor-bronze sleeve.
Hopefully new bushes, sleeve, seals, and circlips will fix that.
Talking of fubarred, so is the bell-housing casting.
It should be level with the bush in the clutch-slave mounting bracket.
As you can see here, it is badly corroded away at the bottom.
Fingers crossed that the phosphor-bronze sleeve will stabilise the lever and stop lateral movement.
Worst case scenario, is a replacement (used) bell housing.
Re: My VERY RUSTY VW T25 Camper Van Project
I've had good results with making ali back up with plastic metal.
Re: My VERY RUSTY VW T25 Camper Van Project
The campervan forum appear to rave about JB Weld Liquid Metal.
It is reportedly 'steel reinforced'.
I am just gauging interest as to the most appropriate solution...
Re-bushing with OEM parts,
Liquid metal build-up and ream, then re-bushing with OEM parts,
Or replacing the bell-housing.
I tried to advise them that I am a skin-flint, so no silly ideas about replacing the whole box.