
Not bought them yet.
The supplier is quite local, so I can just get a few panels at a time, as work progresses.
I have to hang my head in shame, as I have been faffing with the Cav and car shows,
But hopefully get started soon.
Fingers crossed.
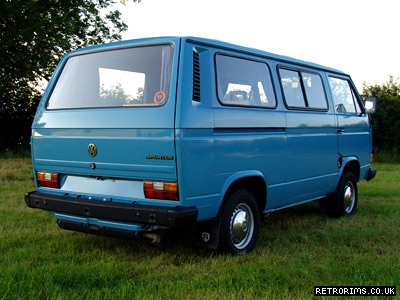
My VERY RUSTY VW T25 Camper Van Project
-
Envoy CDX

- Club Admin
- Posts: 9698
- Joined: Sun Sep 23, 2007 3:51 pm
- Location: Jarrow, Newcastle Upon Tyne
Re: My VERY RUSTY VW T25 Camper Van Project
sounds like this is goin to get interesting 
If I can get on top of things here this year I'm happy to come down for a couple of weekends next year and help get the welding started Rob.
If I can get on top of things here this year I'm happy to come down for a couple of weekends next year and help get the welding started Rob.
Re: My VERY RUSTY VW T25 Camper Van Project
Thanks Gary, but we really need to get you Cav back into rude health first.
The camper will get done soon enough.
As soon as I can find somewhere to store it at a sensible cost.
The camper will get done soon enough.
As soon as I can find somewhere to store it at a sensible cost.
-
Envoy CDX
- Club Admin
- Posts: 9698
- Joined: Sun Sep 23, 2007 3:51 pm
- Location: Jarrow, Newcastle Upon Tyne
Re: My VERY RUSTY VW T25 Camper Van Project
sadly, the cav at the moment is something of a dream.
Re: My VERY RUSTY VW T25 Camper Van Project
The van is the wife's dream.Envoy CDX wrote:sadly, the cav at the moment is something of a dream.
A hassle and an expense that I do not need.
But hey ho.. I am sure that something will get sorted.
2k in body panels.
Lots of welding.
Expensive storage / work space fees.
Then there will be the ongoing cost of tax, mot, servicing and running costs of a 3rd vehicle.
Damn - I can only drive one vehicle at a time !!
Just lacking the motivation to taking on another money pit.
Re: My VERY RUSTY VW T25 Camper Van Project
No major progress, just starting to buy parts.
Including a used rear hatch for just over £300. Yes parts are stupidly expensive.
It will need a new rear window seal, as the existing one has a split in it.
Just as well that the glass has to come out as the hatch will need painting in due course.
One less part that will need repair patches fabricating.
Next up will be an electric power steering collumn. (Corsa EPAS conversion), as the van is just under 1.4 tons unladen.
In these modern days of power assisted everything, it makes you wonder how you were able to drive these old tanks with no assistance.
Still not found anywhere to store the van so that work can start.
UPDATE - 6/9/2018.
Hatch arrived today. Blimey that was quick. It wasn't due until next Monday.
It is currently taking up half my hallway.
Re: My VERY RUSTY VW T25 Camper Van Project
No power steering in the old days - men were men!
My Morris Minor always had light steering but I am now used to assistance, it seems heavy.
Alan
My Morris Minor always had light steering but I am now used to assistance, it seems heavy.
Alan
Re: My VERY RUSTY VW T25 Camper Van Project
Okay - confession to make...
Nope, I am not abandoning the project and scrapping the van.
You would have thought that I would have seen sense and done so but alas not.
I have little money and even less sense.
So pray welcome to the adventure that will be money pit number 2.
Yes the camper van will indeed be getting started this Autumn.
Now the true confession - I have side stepped the welding - again!!.
After looking at the price of renting a unit and buying all the gear, and paying for utilities, it worked out cheaper to go into collaboration with Troy again.
(The chap who virtually converted water to wine... or in reality a rusted out wreck into my now lovely Cavalier)
In essence, the cost of renting a bit of space in his unit, and getting him to do only the welding, works out cheaper than renting my own unit and doing it myself.
And I know the van will be solid when he has done with it.
As for my welding efforts. Truth be told, I would not be as confident with my own abilities and my lack of patience.
Major welding work will be - (lots to do).
Thankfully there are new panels available for most of the work.
Replace inner and outer sills,
Repair cab floor,
Repair missing front door steps,
Replace missing front lower panel,
Repair front corner panels,
Address scabby seam rash,
Replace missing offside rear bottom corner,
Replace or rebuild structural / jacking points.
Repair all window frames.
For me the project comprises.
Strip and rebuild the suspension, brakes etc.
Strip and rebuild the engine and gearbox.
Strip refurbish and fit the dash.
Strip, modernise / upgrade all electrics.
Along with all plumbing (cooling and fuel).
Strip, modernise / rebuild the interior.
Refurbish and fit replacement doors and hatch.
So a long WIP anticipated.
And very expensive. Gulp!!
This is not planned to be a full restoration like the Cav ended up being. So hopefully no more expensive or time consuming.
Although - best laid plans...
Just awaiting Troy to let me know that a few of his current jobs have left the unit, and we will be getting the rusty bucket battle bus trailered to his unit.
Much to the relief of the mother in law, who stitched me up with this project in the first place...
-
ilovedmymantas
- Registered user
- Posts: 1211
- Joined: Sat Jan 12, 2013 2:54 am
Re: My VERY RUSTY VW T25 Camper Van Project
That's crazy, It's rare that the cheapest option is the best one.Robsey wrote:After looking at the price of renting a unit and buying all the gear, and paying for utilities, it worked out cheaper to go into collaboration with Troy again.
In essence, the cost of renting a bit of space in his unit, and getting him to do only the welding, works out cheaper than renting my own unit and doing it myself.
Good decision on your part, that should remove a lot of stress (except for your wallet).
Looking forward to seeing the resurrection!
" It's not rust. It's age-related patina " 
1980 vauxhall cavalier MK1 1.6L, 1982 opel manta berlinetta 1.8s, 1985 opel manta 2.0 gte, 1990 cavalier 2.0 gl ,1994 cavalier sri x20xev
-1995 cdx x20xev
---------------
Matt
1980 vauxhall cavalier MK1 1.6L, 1982 opel manta berlinetta 1.8s, 1985 opel manta 2.0 gte, 1990 cavalier 2.0 gl ,1994 cavalier sri x20xev
-1995 cdx x20xev
---------------
Matt
Re: My VERY RUSTY VW T25 Camper Van Project
It becomes more cost effective, the longer the van lives in his unit.
Which needs to be at least until it is taxed and tested.
Sadly most units within a 10 mile radius of me have been modernised or are just damp old lock ups.
The cheapest decent unit I could find was five miles away and cost £325 per month plus utilities (electric etc), and was reported to be big enough to work on a long wheelbase sprinter.
So not masses of spare room.
Many other units are considered commercial premises, and so incur business related taxes and fees.
I am not expecting loads of area in Troy's unit, but I know it will be enough for what is necessary to get the van done.
I will be junking off the old doors and hatch and fitting the replacements before transferring the van off the mother in law's drive to keep the amount of parts to store and transport to a minimum.
The dash is out already, so some bits could be cleaned and powder coated as soon as I get my back-side into gear.
The dash itself is a big sheet steel item, plus there are various mounting brackets that would benefit from a freshen up.
Time to dig out a big box to put the parts into for coating.
Due to the van colour scheme.
All dash and interior parts will be black.
Engine bay stuff - hmm probably a nice bright red for the hell of it -
-
cavalier1990
- Registered user
- Posts: 1465
- Joined: Wed Jun 29, 2011 9:15 pm
- Location: Paisley, Scotland
Re: My VERY RUSTY VW T25 Camper Van Project
Good luck with it Robsey. I know how daunting it can feel looking at a pile of bits and a car needing mountains of work. Just pick away bit at a time and it'll come together. Shouldn't be quite as challenging I would have thought as it's a panel van, so the top bits should require less fabrication, although you still have the same metalwork bits on the bottom half as most cars.
Re: My VERY RUSTY VW T25 Camper Van Project
Aye - structure wise it should be easy enough.
It is indeed a panel van with the extra challenge of having 3 additional side windows.
One on each side towards the rear and one in the sliding door.
All of which look to have corroded frames and perished rubber seals.
It is indeed a panel van with the extra challenge of having 3 additional side windows.
One on each side towards the rear and one in the sliding door.
All of which look to have corroded frames and perished rubber seals.
Re: My VERY RUSTY VW T25 Camper Van Project
Moved the van tonight to the opposite side of the mother in law's drive.
(Thank the lord for dollies).
It has been stood next to a 6ft + tall wall to the left of the van since Winter 1990 / 91.
(An indication of how long it has been stood neglected is that the last tax disc ran out in January 1991 - long before SORN notifications were dreamt up.)
So I moved the van approx 20 or so inches to the right, up against the wall of the house to allow access for repairs to the opposite wall.
(Another story, for another day).
It was too dark tonight to take pictures, but 28 years up against a wall means that much of the nearside is in very bad condition.
Most notable was the bottom rear corner, which resembled a very flimsy rusty doily.
This panel will probably fall off as soon as day-light hits it...
Not quite but it is very poor.
I managed to briefly access the whole side of the van including the sliding side door.
The long vault like handle moves, but I was not brave enough to open the door incase it fell off / broke free of it's runners.
The whole side of the van is covered in a thick black algae like substance.
It will need washing off before a true picture of the severity of rot can be determined.
Time to prepare myself for the monumental task ahead.
Just need to tell myself, that it could look as good as this when finished...

I will worry about how to afford tax and insurance and general up-keep later.
Suffice to say these things are more needy than any Cavalier - Oh crumbs..
(Thank the lord for dollies).
It has been stood next to a 6ft + tall wall to the left of the van since Winter 1990 / 91.
(An indication of how long it has been stood neglected is that the last tax disc ran out in January 1991 - long before SORN notifications were dreamt up.)
So I moved the van approx 20 or so inches to the right, up against the wall of the house to allow access for repairs to the opposite wall.
(Another story, for another day).
It was too dark tonight to take pictures, but 28 years up against a wall means that much of the nearside is in very bad condition.
Most notable was the bottom rear corner, which resembled a very flimsy rusty doily.
This panel will probably fall off as soon as day-light hits it...
Not quite but it is very poor.
I managed to briefly access the whole side of the van including the sliding side door.
The long vault like handle moves, but I was not brave enough to open the door incase it fell off / broke free of it's runners.
The whole side of the van is covered in a thick black algae like substance.
It will need washing off before a true picture of the severity of rot can be determined.
Time to prepare myself for the monumental task ahead.
Just need to tell myself, that it could look as good as this when finished...
I will worry about how to afford tax and insurance and general up-keep later.
Suffice to say these things are more needy than any Cavalier - Oh crumbs..
-
cavalier1990
- Registered user
- Posts: 1465
- Joined: Wed Jun 29, 2011 9:15 pm
- Location: Paisley, Scotland
Re: My VERY RUSTY VW T25 Camper Van Project
All you can do is take it bit by bit, cutting off all the rotten bits will start to build a picture of the work involved and hopefully inspire you as it will start to feel like you're making some progress, and where you are going with it. When you see all the rust it's fairly depressing but once you see it all cut out, its actually quite enlightening, and strangely looks better even though a lot of it is missing.
Re: My VERY RUSTY VW T25 Camper Van Project
As per my usual mixed up crazy life,
I ordered something on Monday that is really one of the final items of the rebuild, and therefore not needed for ages yet.
But a message from ebay declared a reduction in price, so I snapped it up.
That is Corsa-C EPAS.
A ready fabricated / converted Corsa-C electric power steering collumn, that will simply bolt into where the manual T25 steering collumn would sit.
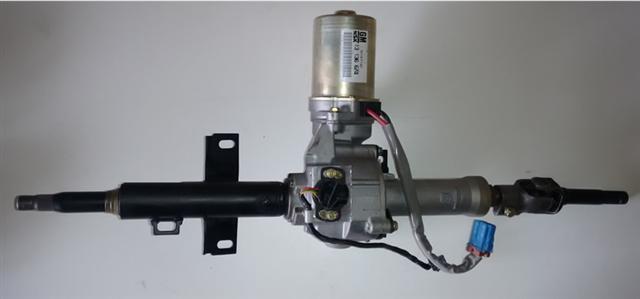
Physically fitting it is quite easy - Four M8 mounting bolts and a single universal joint knuckle clamp bolt.
(Of course there will be the complexities of transferring the steering lock and switch gear from the original manual collumn.
Plus the routing of cabling.)
Wiring is just 6 wires.
One of these is a fat red wire to the battery via a big 50 amp fuse.
A fat brown to chassis ground.
The rest is connecting up the variable power assistance control rheostat.
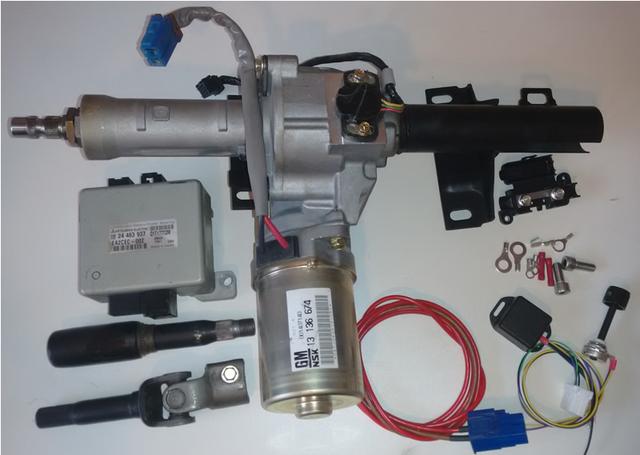
So - even though it is a VW bus, it will still have GM parts fitted.
As said though - the collumn will be fitted much later in the build, after all the welding is complete so that none of the electronics get damaged.
I need to pull my finger out this Sunday and get the wheels out ready for fitting, so that the van can be towed out in a week or two.
I ordered something on Monday that is really one of the final items of the rebuild, and therefore not needed for ages yet.
But a message from ebay declared a reduction in price, so I snapped it up.
That is Corsa-C EPAS.
A ready fabricated / converted Corsa-C electric power steering collumn, that will simply bolt into where the manual T25 steering collumn would sit.
Physically fitting it is quite easy - Four M8 mounting bolts and a single universal joint knuckle clamp bolt.
(Of course there will be the complexities of transferring the steering lock and switch gear from the original manual collumn.
Plus the routing of cabling.)
Wiring is just 6 wires.
One of these is a fat red wire to the battery via a big 50 amp fuse.
A fat brown to chassis ground.
The rest is connecting up the variable power assistance control rheostat.
So - even though it is a VW bus, it will still have GM parts fitted.
As said though - the collumn will be fitted much later in the build, after all the welding is complete so that none of the electronics get damaged.
I need to pull my finger out this Sunday and get the wheels out ready for fitting, so that the van can be towed out in a week or two.
-
ilovedmymantas
- Registered user
- Posts: 1211
- Joined: Sat Jan 12, 2013 2:54 am
Re: My VERY RUSTY VW T25 Camper Van Project
You've obviously done your research and found exactly what you needed and at a good price.Robsey wrote:As per my usual mixed up crazy life,
I ordered something on Monday that is really one of the final items of the rebuild, and therefore not needed for ages yet.
But a message from ebay declared a reduction in price, so I snapped it up.
That is Corsa-C EPAS.
A ready fabricated / converted Corsa-C electric power steering collumn, that will simply bolt into where the manual T25 steering collumn would sit.
I'm a big fan of bargains, especially long-term.
They don't come up that often but when I buy them It seems to reduce the worries I have about getting to the end.
It's all about the bigger picture
a little random
I bought a pair of front wings, Veng I think, for "future-proofing" or accident. I think they only cost £36 delivered!
That was twelve years ago and I still haven't had to use them. The only rust I ever have is on the section at the back of the wing arch, behind the mudflap. It's basically the area that cosmetically matches the sill.
note to self
There's a fine line between future-proofing and hoarding. lol.
" It's not rust. It's age-related patina "
1980 vauxhall cavalier MK1 1.6L, 1982 opel manta berlinetta 1.8s, 1985 opel manta 2.0 gte, 1990 cavalier 2.0 gl ,1994 cavalier sri x20xev
-1995 cdx x20xev
---------------
Matt
1980 vauxhall cavalier MK1 1.6L, 1982 opel manta berlinetta 1.8s, 1985 opel manta 2.0 gte, 1990 cavalier 2.0 gl ,1994 cavalier sri x20xev
-1995 cdx x20xev
---------------
Matt
Re: My VERY RUSTY VW T25 Camper Van Project
As hydraulic hoses are becoming hard to come by on the Cavalier, it is possibly a good back-up plan to consider fitting an EPAS column.
A bit expensive, but for some it could mean the difference between scrapping or converting their Cavalier.
I know there are two main varieties of GM based EPAS.
The two varieties that I am aware of are:-
Corsa-B as used on Opel Manta-B
Corsa-C with a larger motor assembly as used on VW Transporter Type 2 T25, and can be adapted to suit other vehicles.
Re: My VERY RUSTY VW T25 Camper Van Project
Hmm - did I say the van was rusty.??
Well after standing for about 6 years, so are some of the donor parts.
My replacement engine has been stored in my back yard under plastic sheeting since May 2012.
And for good measure it has been kept away from the ground by being sat on my spare set of van wheels, that I picked up for a bargain price at a similar time.
Sadly, six years in mixed weather has not left anything looking particularly healthy.
Spider webs don't help with the look.
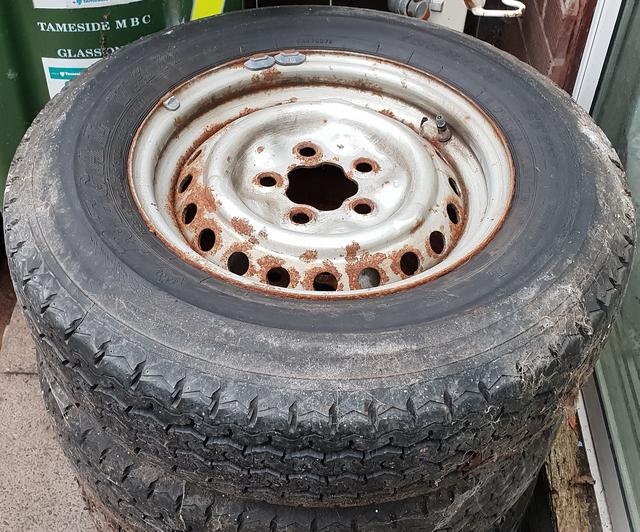
Not the end of the world, as I plan to strip and powder coat all steel parts that are not exposed to high temperatures.
These rusty blighters are only there to be fitted as temporary items.
(By the way - this was the best of the four wheels, the other three are horrendous).
Despite being 14" rims, and 185-14C 8ply commercial / van tyres they seem so much bigger than the same size car wheels.
The reason being that the C after the 14 means that it is 80 profile - typical for a van apparently.
Price wise, van tyres are a similar price to car tyres of the same or similar brand, so all good.
For information, I had to hoist the engine off the van wheels and put the Cavalier steel rims in their place. I seem to have gained a large chunk of space in my yard by having the smaller wheels there now.
Well after standing for about 6 years, so are some of the donor parts.
My replacement engine has been stored in my back yard under plastic sheeting since May 2012.
And for good measure it has been kept away from the ground by being sat on my spare set of van wheels, that I picked up for a bargain price at a similar time.
Sadly, six years in mixed weather has not left anything looking particularly healthy.
Spider webs don't help with the look.
Not the end of the world, as I plan to strip and powder coat all steel parts that are not exposed to high temperatures.
These rusty blighters are only there to be fitted as temporary items.
(By the way - this was the best of the four wheels, the other three are horrendous).
Despite being 14" rims, and 185-14C 8ply commercial / van tyres they seem so much bigger than the same size car wheels.
The reason being that the C after the 14 means that it is 80 profile - typical for a van apparently.
Price wise, van tyres are a similar price to car tyres of the same or similar brand, so all good.
For information, I had to hoist the engine off the van wheels and put the Cavalier steel rims in their place. I seem to have gained a large chunk of space in my yard by having the smaller wheels there now.
Re: My VERY RUSTY VW T25 Camper Van Project
If anyone ever visited my home, the back yard, kennel and shed look like Steptoe and Son are based there... or the Clampets.
Much to my neighbours' dismay I am sure...
This is the starting point for an engine refurb - notoriously painful because it is a flat four boxer with internal "O" rings rather than gaskets.
Replacing some O rings require stripping of the gudgeon pins from the piston assemblies. A challenge even for the most patient.
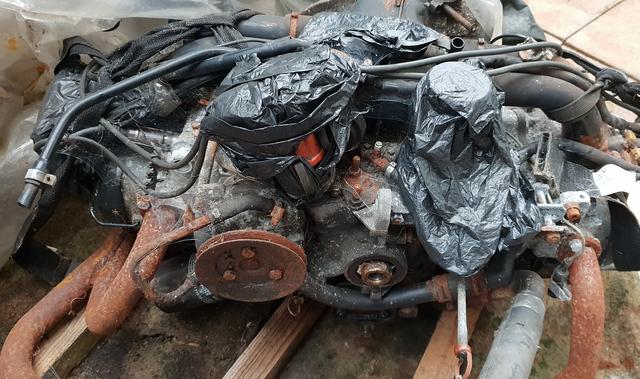
The engine looks a lot worse than it is.
The black dog-poo bags are protecting the electronics from the rain and muck.
The carpet protects the tyresfrom UV damage.
The wooden battens keep the metal underside in the air and so minimises sitting in the damp.
Although a mucky oily engine also keeps corrosion to a minimum.
And as said above, all covered in a plastic sheet to keep the bulk of the elements off.
The really rusty pipework is exhaust pipes and coolant pipes. All of which will be replaced anyway.
Just a side-thought -
Next time you go to get an exhaust, and the price brings you into a cold sweat -
Remember it could be so much worse, a full exhaust on a 1987 2.1 flat four DJ wasserboxer costs in excess of £450.
A full stainless exhaust is only £50 more.
No surprises then that I plan to go down the stainless route with a lifetime guarantee.
As with the air cooled engines of old, the exhaust pipes are bolted to the engine to make up one complete assembly.
The pipework wraps around the base of the engine, in a whacky convoluted network, with each cylinder having its own exit pipe.
Much to my neighbours' dismay I am sure...
This is the starting point for an engine refurb - notoriously painful because it is a flat four boxer with internal "O" rings rather than gaskets.
Replacing some O rings require stripping of the gudgeon pins from the piston assemblies. A challenge even for the most patient.
The engine looks a lot worse than it is.
The black dog-poo bags are protecting the electronics from the rain and muck.
The carpet protects the tyresfrom UV damage.
The wooden battens keep the metal underside in the air and so minimises sitting in the damp.
Although a mucky oily engine also keeps corrosion to a minimum.
And as said above, all covered in a plastic sheet to keep the bulk of the elements off.
The really rusty pipework is exhaust pipes and coolant pipes. All of which will be replaced anyway.
Just a side-thought -
Next time you go to get an exhaust, and the price brings you into a cold sweat -
Remember it could be so much worse, a full exhaust on a 1987 2.1 flat four DJ wasserboxer costs in excess of £450.
A full stainless exhaust is only £50 more.
No surprises then that I plan to go down the stainless route with a lifetime guarantee.
As with the air cooled engines of old, the exhaust pipes are bolted to the engine to make up one complete assembly.
The pipework wraps around the base of the engine, in a whacky convoluted network, with each cylinder having its own exit pipe.
Re: My VERY RUSTY VW T25 Camper Van Project
Hmm - what can I say.
Doing my usual thing of getting my priorities wrong.
I went and bought a full stainless exhaust system, engine mounts and exhaust clamps and had them all delivered to work.
I was half expecting a load of grief from either reception staff or management, especially as we are expecting the CQC inspectors round.
Alas the box was there to greet me this morning and it was amazingly smaller than expected. No dirty looks or grumbles from anyone.
All I will say, is that there wasn't much change out of £600.
Expensive on the face of it, but we are talking a genuine VW Heritage full stainless steel kit including every single nut, bolt, washer and clamp needed.
I have seen lesser quality kits for £840 +...
So I didn't do too bad.
As with Beetle air-cooled boxer engines of old, it is possible to sort out and assemble the engine, the exhaust, clamps and engine support bar in my back yard.
And then simply lift and fit the whole lot into the back of the van as a single complete unit when the engine bay has been stripped, cleaned, repaired and painted.
Amazingly it should take less than 30 minutes to fit when the time comes.
It is just so easy.
The time consuming bit is connecting up the coolant pipes, accelerator cable, wiring harness and induction pipework.
Re: My VERY RUSTY VW T25 Camper Van Project
I'm surprised to see the beetle type engine as the last one of these that I worked on had a vw 1.6 Diesel engine under the rear floor, factory fitted. It was a pickup version so at least access wasn't bad through the bed. I seem to remember the one head stud had fused to the head and caused some sort of fun . Good luck with the project, going to be a lot of work.
Re: My VERY RUSTY VW T25 Camper Van Project
Back on track! I'm sure if you keep chipping away at it you will make good progress.
Alan
Alan
Re: My VERY RUSTY VW T25 Camper Van Project
I finally got off my butt and did some work on the van - in preparation for it being trailered away.
First job was to get the old wheels off as the tyres had set with a flat bottom.
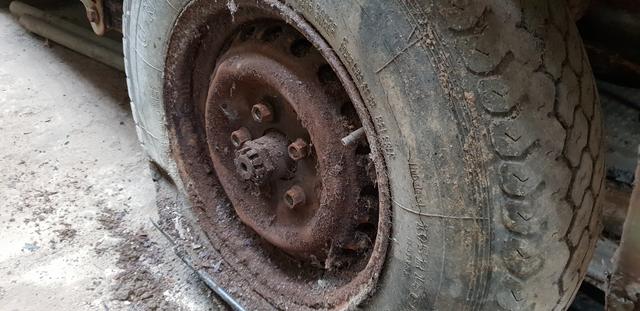
Then free off the brakes on each wheel.
Then fit the wheels with round tyres.
I believe they roll better that way.
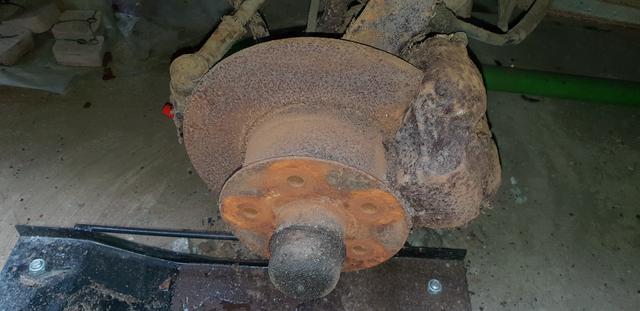
What joy I had... amazingly none of the twenty wheel studs (front wheels) and nuts (rear wheels) were seized. All yielded willingly.
Sadly none of the brakes were quite so helpful. All were rusted solid.
After four hours, managed to free off three brakes. Only the near-side rear drum refused stubbonly.
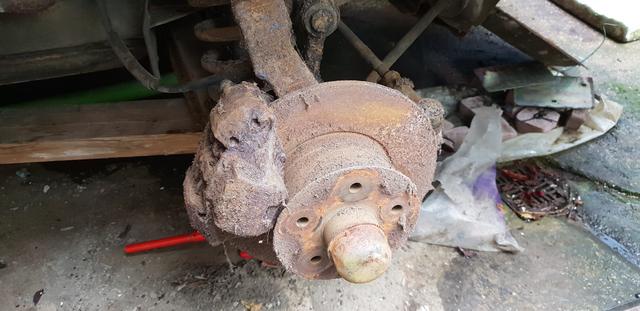
The off-side front needed the calliper to be split to get at least one pad out.
And the off-side drum only spun when the back-plate disintegrated.
Yikes!!
Anyway round wheels now fitted, but the van is still supported on dollies.
First job was to get the old wheels off as the tyres had set with a flat bottom.
Then free off the brakes on each wheel.
Then fit the wheels with round tyres.
I believe they roll better that way.
What joy I had... amazingly none of the twenty wheel studs (front wheels) and nuts (rear wheels) were seized. All yielded willingly.
Sadly none of the brakes were quite so helpful. All were rusted solid.
After four hours, managed to free off three brakes. Only the near-side rear drum refused stubbonly.
The off-side front needed the calliper to be split to get at least one pad out.
And the off-side drum only spun when the back-plate disintegrated.
Yikes!!
Anyway round wheels now fitted, but the van is still supported on dollies.
Re: My VERY RUSTY VW T25 Camper Van Project
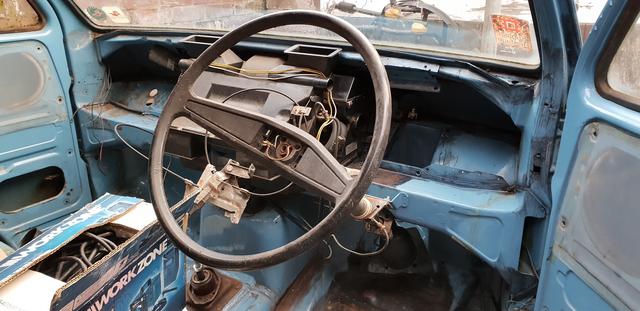
With the wheels done, I then loosely fitted the steering collumn and wheel.
All purely for trailering / manoeuvring
I discovered that it turns easier when I unlock the steering collumn.
D'oh.
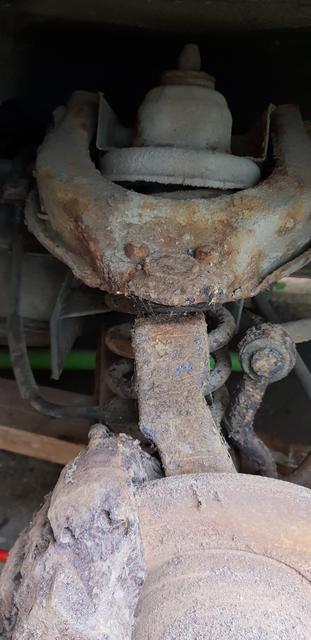
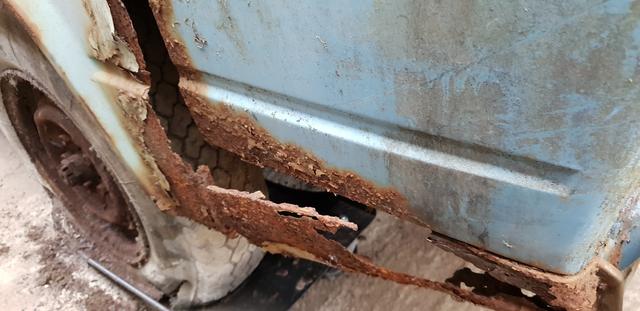
I must point out that the rear wheel arch fell off due to rust by the time I had that wheel in place.
This picture is before the arch fell off.
All purely for trailering / manoeuvring
I discovered that it turns easier when I unlock the steering collumn.
D'oh.
I must point out that the rear wheel arch fell off due to rust by the time I had that wheel in place.
This picture is before the arch fell off.
Re: My VERY RUSTY VW T25 Camper Van Project
Had to move the van sideways again tonight.
Not a problem as the van is on dollies.
Or so I thought.
The rear off-side dolly outer castors had collapsed under the weight of the van.
Got the van moved eventually by jacking up the van and moving the bulk of the tyre over the side of the dolly where the castors were still in their upright position.
Just ordered a hub puller to suit a 5-stud wheel pattern, a heavy duty 46mm impact socket and a 1 metre breaker bar to get the rear wheels off per the book.
It will be interesting working out how I will re-torque up the rear bearings at about 240 lb/ft.
Just priced up the brake assemblies and hub bearings... it would be pennies of £400 plus another £130 if I get new ATE callipers. - eek!!