My VERY RUSTY VW T25 Camper Van Project
-
Envoy CDX

- Club Admin
- Posts: 9680
- Joined: Sun Sep 23, 2007 3:51 pm
- Location: Jarrow, Newcastle Upon Tyne
Re: My VERY RUSTY VW T25 Camper Van Project
Happy days! 
Re: My VERY RUSTY VW T25 Camper Van Project
Its always good when you can tick a large item off the to do list.

Re: My VERY RUSTY VW T25 Camper Van Project
One down... ninety-five more big items to go.
It looks never ending, but hopefully I will get to see a chink of light in a few years.
It looks never ending, but hopefully I will get to see a chink of light in a few years.
Re: My VERY RUSTY VW T25 Camper Van Project
I have been umming and harring about doing my nearside steering knuckle for weeks.
As with all suspension legs, it is a bit like a game of chess where you need to plan three moves ahead.
1 - Press in the bottom ball joint.
Notoriously tight, and also stupidly close to the casting.
But mounting the knuckle upside down in the hydraulic press got the job done - 8 tons of force and the joint slid into place.
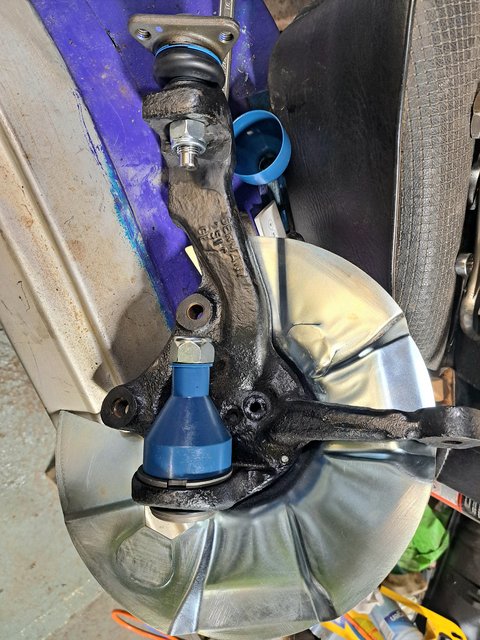
2 - followed by the upper ball joint.
A simple bolt in job - using a 24mm ring spanner on the nut and an 11mm holding spanner on the joint pin.
3 - Fit the dust shield.
Just three M6 bolts.

Then the pain in the bum bit...
4 - Back to the hydraulic press, to press the outer races into the brake disc, which also acts as the hub.
This is where it got silly.
Fitted the inner bearing, inner race so that I could fit the grease seal.
Every time I pushed the seal in by hand, one section would go too deep towards the bearing.
It took 5 or 6 goes before it could be seated flat.
5 - finally fit the disc / hub, followed by outer bearing inner race and location nut.
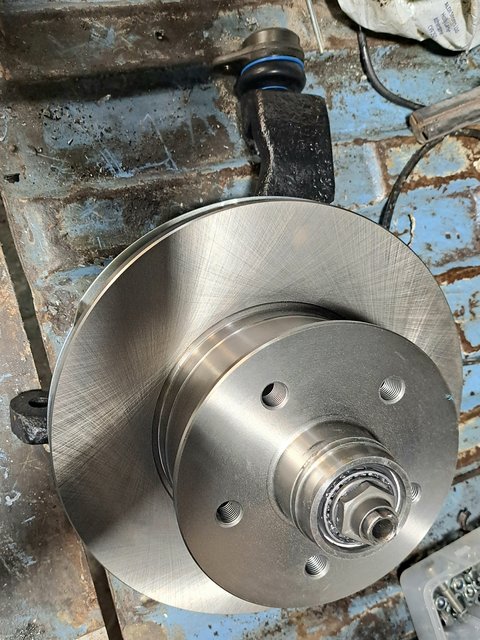
There should be a washer before the nut, but I have put it somewhere 'safe' - lol.
It will turn up in due course.
One leg fully assembled.
Still waiting for many parts to be bead-blasted and powder coated, before I can fit the knuckle.
As with all suspension legs, it is a bit like a game of chess where you need to plan three moves ahead.
1 - Press in the bottom ball joint.
Notoriously tight, and also stupidly close to the casting.
But mounting the knuckle upside down in the hydraulic press got the job done - 8 tons of force and the joint slid into place.
2 - followed by the upper ball joint.
A simple bolt in job - using a 24mm ring spanner on the nut and an 11mm holding spanner on the joint pin.
3 - Fit the dust shield.
Just three M6 bolts.
Then the pain in the bum bit...
4 - Back to the hydraulic press, to press the outer races into the brake disc, which also acts as the hub.
This is where it got silly.
Fitted the inner bearing, inner race so that I could fit the grease seal.
Every time I pushed the seal in by hand, one section would go too deep towards the bearing.
It took 5 or 6 goes before it could be seated flat.
5 - finally fit the disc / hub, followed by outer bearing inner race and location nut.
There should be a washer before the nut, but I have put it somewhere 'safe' - lol.
It will turn up in due course.
One leg fully assembled.
Still waiting for many parts to be bead-blasted and powder coated, before I can fit the knuckle.
Re: My VERY RUSTY VW T25 Camper Van Project
Also tonight -
I was not happy with how stiff the clutch release arm was.
A transmission builder on the VW forum suggested that the casting around the release shaft had rotted and swollen due to brake fluid leaking from the clutch slave cylinder.
Remember this?...
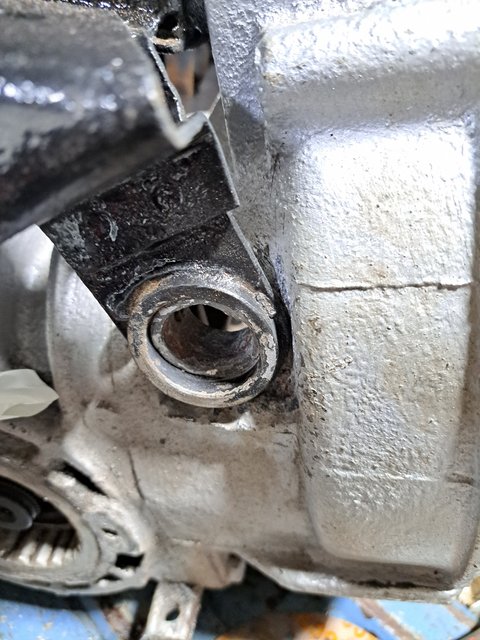
I had rebuilt with new OEM plastic bushes.
A quick dress-out of the aluminium bore with emery-cloth wrapped around a spindle soon removed the swollen metal.
Plastic and rubber bush assembly rebuilt again.
The arm now moves with moderate ease.

Another job re-ticked off.
I was not happy with how stiff the clutch release arm was.
A transmission builder on the VW forum suggested that the casting around the release shaft had rotted and swollen due to brake fluid leaking from the clutch slave cylinder.
Remember this?...
I had rebuilt with new OEM plastic bushes.
A quick dress-out of the aluminium bore with emery-cloth wrapped around a spindle soon removed the swollen metal.
Plastic and rubber bush assembly rebuilt again.
The arm now moves with moderate ease.
Another job re-ticked off.
Re: My VERY RUSTY VW T25 Camper Van Project
Like you I had a lot of fun and games with my front struts, I must have the only vauxhall in history that uses those bearings with those size hubs, or so it seems? I remember spending weeks in them getting it sorted, then had to do the same job on my Cavalier days later for the mot. Almost have worn my springs compressors out.Robsey wrote: ↑Sat Aug 05, 2023 1:05 am I have been umming and harring about doing my nearside steering knuckle for weeks.
As with all suspension legs, it is a bit like a game of chess where you need to plan three moves ahead.
1 - Press in the bottom ball joint.
Notoriously tight, and also stupidly close to the casting.
But mounting the knuckle upside down in the hydraulic press got the job done - 8 tons of force and the joint slid into place.
2 - followed by the upper ball joint.
A simple bolt in job - using a 24mm ring spanner on the nut and an 11mm holding spanner on the joint pin.
3 - Fit the dust shield.
Just three M6 bolts.
Then the pain in the bum bit...
4 - Back to the hydraulic press, to press the outer races into the brake disc, which also acts as the hub.
This is where it got silly.
Fitted the inner bearing, inner race so that I could fit the grease seal.
Every time I pushed the seal in by hand, one section would go too deep towards the bearing.
It took 5 or 6 goes before it could be seated flat.
5 - finally fit the disc / hub, followed by outer bearing inner race and location nut.
There should be a washer before the nut, but I have put it somewhere 'safe' - lol.
It will turn up in due course.
One leg fully assembled.
Still waiting for many parts to be bead-blasted and powder coated, before I can fit the knuckle.
Its very frustrating when you've put something safe. As my project is getting on for 5 years now, several times I've had to resort to buying or making replacements for items that I have put somewhere safe.
-
cavalier1990
- Registered user
- Posts: 1463
- Joined: Wed Jun 29, 2011 9:15 pm
- Location: Paisley, Scotland
Re: My VERY RUSTY VW T25 Camper Van Project
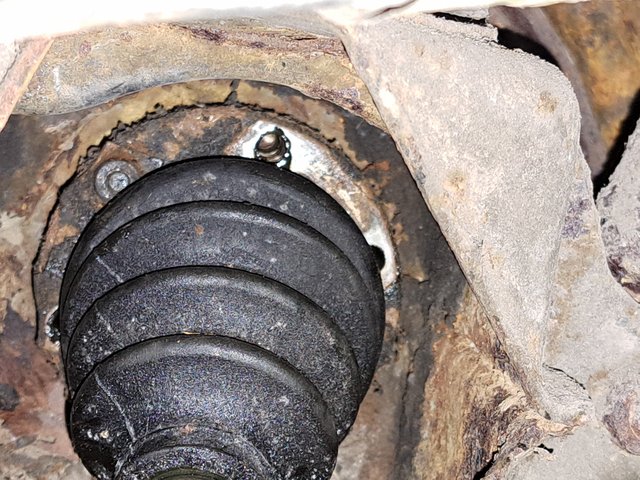
Tricky one, it's always the last one isn't it! Never a fan of allen key fittings in dark dingy places, they fill with grease and dirt then when you put an allen fitting in it, it sits high on the shite inside leading to a much bigger chance of the key slipping out and ruining the bolt.Robsey wrote: ↑Sat Jun 03, 2023 9:06 am Not quite sure why, but I decided to remove the right (off-side) driveshaft from the rear right hub.
Not brilliant for access, lying on the floor under the van, with coolant pipes and the filthy 'other end' of the shaft complete with mingy greasey inner joint in your face.
Also the outer CV is inside the trailing arm / wishbone.
Nice.
I am not sure that I am particularly a fan of the VW style bolt on CV assemblies.
They are held on by six cap-head bolts, with only shallow sockets for either a hex bit or a splined bit.
Personally I would have used cap-heads with a deeper socket.
After driving the bit into each bolt head with a lump-hammer, I was able to get five out with an initial 'crack' sound as they released.
The sixth bolt, typically decided that it would strip the socket instead. Confirming the reasoning for my dislike of shallow cap head sockets.
Amazingly, when drilling off the bolt head, the drill squarked and chattered as if the metal was very hard.
Clearly not if it had stripped so easily.
I was on a mission, and the shaft was soon removed complete with both joints, packed to the rafters with smelly black grease.
What a hideous job to remove the joints from the shaft and to degrease.
Cleaned the shaft with a stripping head in an angle grinder, then bead blasted the central area, and then polished up on the lathe.
Not perfect, but a lot better - now ready for primer and paint.


Interesting tip. I've found sometimes hammering the top of the bolt head in a bit with an extension bar end (Or hammer head if you can get to it easily) to flatten it out and see if you can get either the matching size to fit tightly, or another slightly smaller key to fit. Usually involves hammering the allen socket into it for a snug fit.
Re: My VERY RUSTY VW T25 Camper Van Project
Painted parts now fitted...
Last night's challenge was fitting the brake master and clutch master cylinders....
This meant stripping out the instrument cluster and the steering collumn shrouds.
The brake master was easy enough to do.
Two M8 nyloc nuts (13mm spanner),
Then tighten the brake pipes using a 12mm open ended spanner.

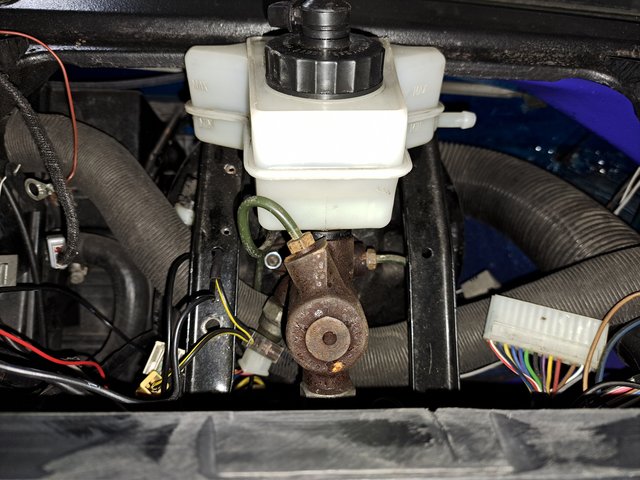
This master cylinder comes with dual brake light switches (hydraulic pressure switch),
and the reservoir comes with a level switch.
Something that I have always wanted, as there is no warning of fluid loss and imminent brake failure without it.
The clutch master was a total heffer...
On my back, twisted and contorted across the front footwells reaching up behind the steering collumn.
Just to make things impossible, the clutch hydrauluc pipe looks like it hits the steering universal joint....
Bugger!!.

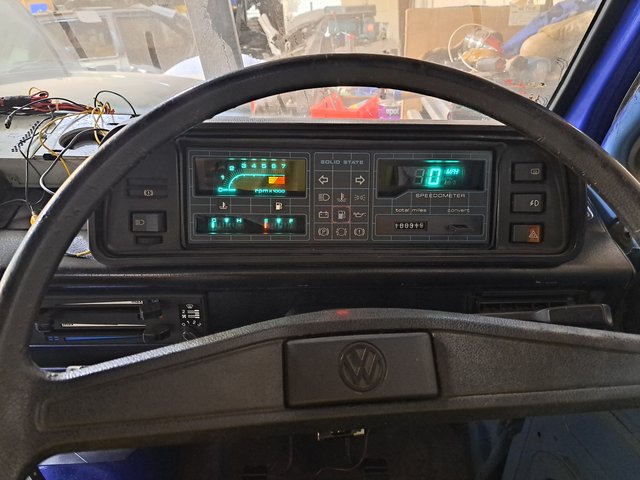
And finally - a trial fit of the cut-back instrument binnacle.

I will trial fit the 'solid state instruments' in my kitchen tomorrow.
Your eyes do not deceive you -
The brake fluid is topped up in the top of the dash, behind the instrument cluster.
Eeek!!
A crazy idea. Those crazy Germans - lol.
Last night's challenge was fitting the brake master and clutch master cylinders....
This meant stripping out the instrument cluster and the steering collumn shrouds.
The brake master was easy enough to do.
Two M8 nyloc nuts (13mm spanner),
Then tighten the brake pipes using a 12mm open ended spanner.
This master cylinder comes with dual brake light switches (hydraulic pressure switch),
and the reservoir comes with a level switch.
Something that I have always wanted, as there is no warning of fluid loss and imminent brake failure without it.
The clutch master was a total heffer...
On my back, twisted and contorted across the front footwells reaching up behind the steering collumn.
Just to make things impossible, the clutch hydrauluc pipe looks like it hits the steering universal joint....
Bugger!!.
And finally - a trial fit of the cut-back instrument binnacle.
I will trial fit the 'solid state instruments' in my kitchen tomorrow.
Your eyes do not deceive you -
The brake fluid is topped up in the top of the dash, behind the instrument cluster.
Eeek!!
A crazy idea. Those crazy Germans - lol.
-
cavalier1990
- Registered user
- Posts: 1463
- Joined: Wed Jun 29, 2011 9:15 pm
- Location: Paisley, Scotland
Re: My VERY RUSTY VW T25 Camper Van Project
The master cylinder looks preety neat, nice job!
What's the deal with the clutch slave hitting the UJ? Is it a different part to the original?
I remember topping one of those fluid resevoirs up back in my apprentice days (30 years ago!). I'm sure it must have been one of those types of vans, maybe the bigger one, is it the LT? I don't think any other car/van uses that set up?
Re: My VERY RUSTY VW T25 Camper Van Project
Yep just the LT and the Transporter T3.
The universal joint is for the Corsa-C electric power steering column.
But I have never heard of anyone else having issues.
Sod's Law is now called Rob's law.
If it can go belly up, then it will.
The universal joint is for the Corsa-C electric power steering column.
But I have never heard of anyone else having issues.
Sod's Law is now called Rob's law.
If it can go belly up, then it will.
Re: My VERY RUSTY VW T25 Camper Van Project
The resivour location looks simply nuts, do have to take the instruments out to check it, or is there an access flap. The cabstar uses one in the dash next to the cluster but with the door open you can remove the cover for easy access, but you just have to be extra careful not to spill any when topping up.Robsey wrote: ↑Sat Aug 12, 2023 10:02 pm Painted parts now fitted...
Last night's challenge was fitting the brake master and clutch master cylinders....
This meant stripping out the instrument cluster and the steering collumn shrouds.
The brake master was easy enough to do.
Two M8 nyloc nuts (13mm spanner),
Then tighten the brake pipes using a 12mm open ended spanner.
This master cylinder comes with dual brake light switches (hydraulic pressure switch),
and the reservoir comes with a level switch.
Something that I have always wanted, as there is no warning of fluid loss and imminent brake failure without it.
The clutch master was a total heffer...
On my back, twisted and contorted across the front footwells reaching up behind the steering collumn.
Just to make things impossible, the clutch hydrauluc pipe looks like it hits the steering universal joint....
Bugger!!.
And finally - a trial fit of the cut-back instrument binnacle.
I will trial fit the 'solid state instruments' in my kitchen tomorrow.
Your eyes do not deceive you -
The brake fluid is topped up in the top of the dash, behind the instrument cluster.
Eeek!!
A crazy idea. Those crazy Germans - lol.
Re: My VERY RUSTY VW T25 Camper Van Project
There is a cover over the dash pod,
It unclips from the rear, and then lifts forward off the cluster.
There is a soft plastic cover over the instrument area, with an access hole for the reservoir.
Like you say though, you have to be slow and careful topping up to avoid spillages down the back of the dash, instruments and steering column.
Re: My VERY RUSTY VW T25 Camper Van Project
"There is a cover over the dash pod,
It unclips from the rear, and then lifts forward off the cluster.
There is a soft plastic cover over the instrument area, with an access hole for the reservoir.
Like you say though, you have to be slow and careful topping up to avoid spillages down the back of the dash, instruments and steering column."
As you say, a bit of a crazy location for the brake master cylinder.
Still, I remember an Austin A35 that I had years ago where you had to remove a hatch in the driver's footwell to access the master cylinder, which of course was covered with road muck. You had to take off the filler cap even just to check the fluid level and had to be very careful not to dislodge mud and grit that would then fall into the fluid. Not a good design at all!
1993 Cavalier V6 Auto in Smoke Grey Metallic
Re: My VERY RUSTY VW T25 Camper Van Project
As a carry over from the random thread...
The dash looks pretty groovy.
But I am totally baffled as to where to hide the voice unit.
It is so big - lol.
Anyway - moving onto this week -
It was the turn of the gear linkages.
Gear lever attached to the front linkage rod.
After I re-fitted an internal spacer ring the correct way up.
(You can see it above the vertical gear lever -above )
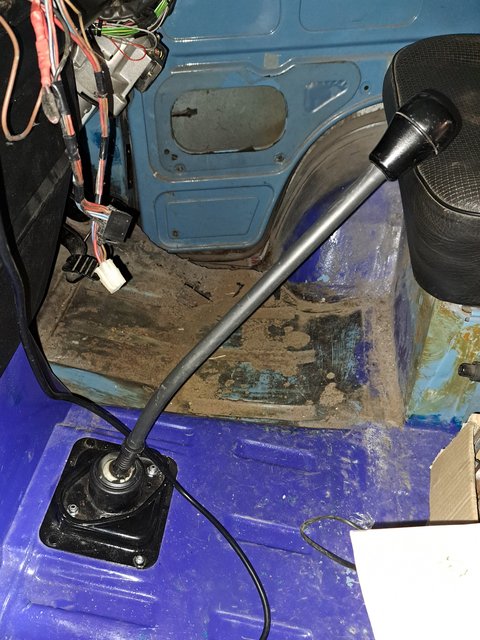
Rear support bearing for the front linkage rod.
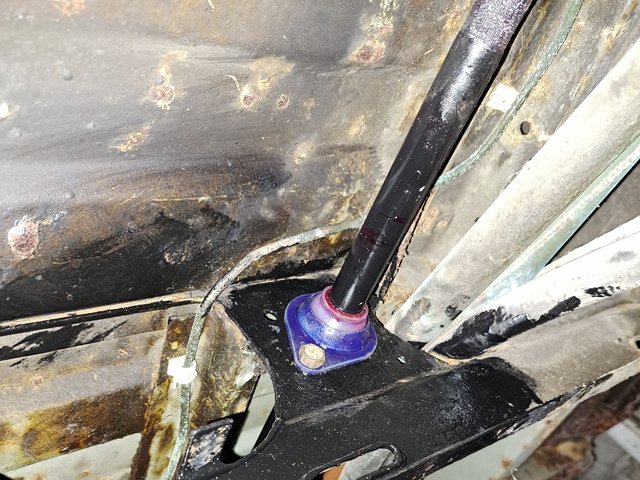
Then it was the rear support bush and relay arm.

I used red rubber grease, as I thought that thiswould be better for the white plasticky-rubbery bushes.
I had a few rusty parts,
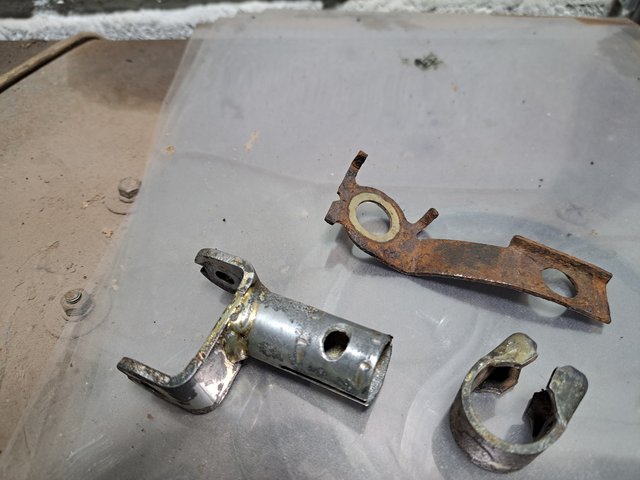
so bead blasted
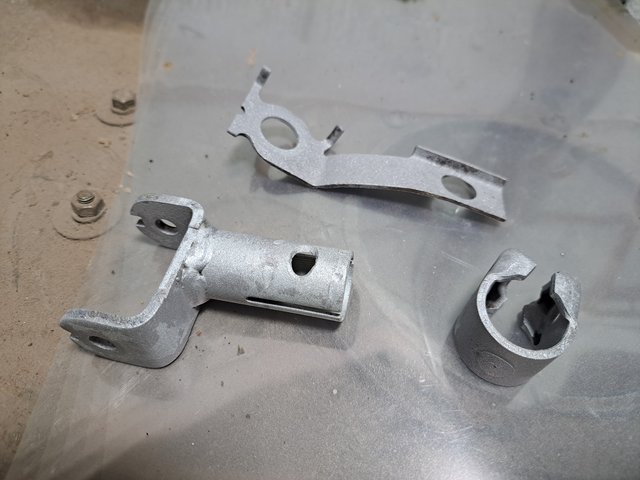
and painted for the win.

Hopefully be able to attach the rear linkage rod next week... if I can find the pivot pins and circlips for the universal joint...
The dash looks pretty groovy.
But I am totally baffled as to where to hide the voice unit.
It is so big - lol.
Anyway - moving onto this week -
It was the turn of the gear linkages.
Gear lever attached to the front linkage rod.
After I re-fitted an internal spacer ring the correct way up.
(You can see it above the vertical gear lever -above )
Rear support bearing for the front linkage rod.
Then it was the rear support bush and relay arm.
I used red rubber grease, as I thought that thiswould be better for the white plasticky-rubbery bushes.
I had a few rusty parts,
so bead blasted
and painted for the win.
Hopefully be able to attach the rear linkage rod next week... if I can find the pivot pins and circlips for the universal joint...
Re: My VERY RUSTY VW T25 Camper Van Project
Always looks better for a coat of paint.
-
cavalier1990
- Registered user
- Posts: 1463
- Joined: Wed Jun 29, 2011 9:15 pm
- Location: Paisley, Scotland
Re: My VERY RUSTY VW T25 Camper Van Project
For a minute I was wondering why do you need all those linkages and rods for the gearbox then the penny dropped of course the box is in the back! Lots of pins, clips and rods to keep you entertained I suppose. I imagine with the length of the linkages in those vans if there is any play or worn bushes you really feel it. Progressing nicely otherwise!
-
Envoy CDX
- Club Admin
- Posts: 9680
- Joined: Sun Sep 23, 2007 3:51 pm
- Location: Jarrow, Newcastle Upon Tyne
Re: My VERY RUSTY VW T25 Camper Van Project
Excellent stuff Rob, some hellish progress.
Re: My VERY RUSTY VW T25 Camper Van Project
Hellish progress...
Hellish? - yes, definitely.
progress? - I am not so sure.
Between finances (again) and a lapse in motivation this week, I haven't really made that much progress on either night.
I spent most of last evening tidying up the workshop, as it soon gets cluttered with waste materials, strewn tools and random nuts and bolts.
In a final burst of cleaning, I cleaned the nearside rear corner of the van.
Not sure why.... shits and giggles maybe.
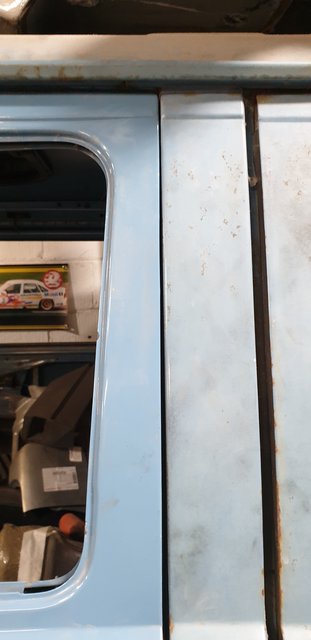
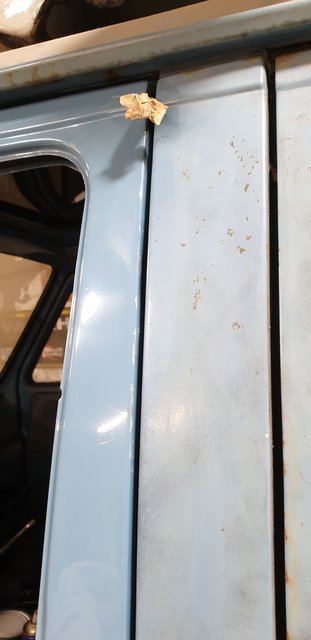
Anyway, I was surprised to find a 'Rust Free' panel.
The near side rear vent panel.... I almost forgot that the van was 'Mittel Blau' (medium blue).

Unlike the rest of the van that is mainly ferrous-oxide brown.
Or completely missing.
Hellish? - yes, definitely.
progress? - I am not so sure.
Between finances (again) and a lapse in motivation this week, I haven't really made that much progress on either night.
I spent most of last evening tidying up the workshop, as it soon gets cluttered with waste materials, strewn tools and random nuts and bolts.
In a final burst of cleaning, I cleaned the nearside rear corner of the van.
Not sure why.... shits and giggles maybe.
Anyway, I was surprised to find a 'Rust Free' panel.
The near side rear vent panel.... I almost forgot that the van was 'Mittel Blau' (medium blue).
Unlike the rest of the van that is mainly ferrous-oxide brown.
Or completely missing.
Re: My VERY RUSTY VW T25 Camper Van Project
I know that feeling only too well. The never ending chasing rust , cutting out then welding in new metal seems to never end. Then there comes the same never ending feeling of continuous sanding, filling, priming then repeat with paint prep, hence why I havent updated my project for weeks as its boring me to tears so dread to think what it would do to others. I'm sure you'll reach a point like me when one day you'll realise there's no more rot left.
Re: My VERY RUSTY VW T25 Camper Van Project
I have not had any major metal work done for nearly a year.
I dare not cut any more metal out before welding some stuff back in.
Otherwise the van will simply fold in on itself.
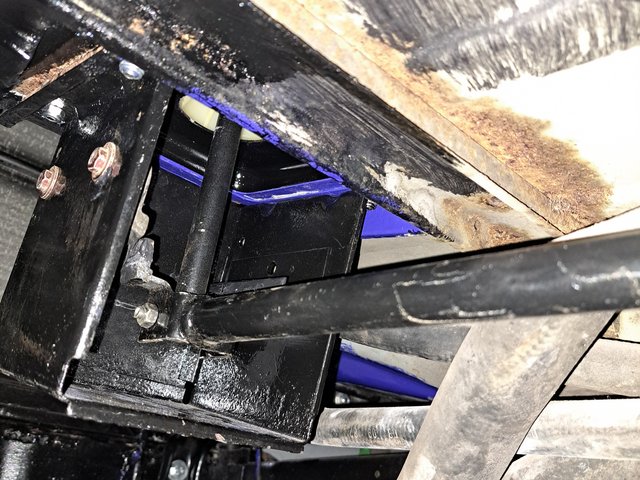
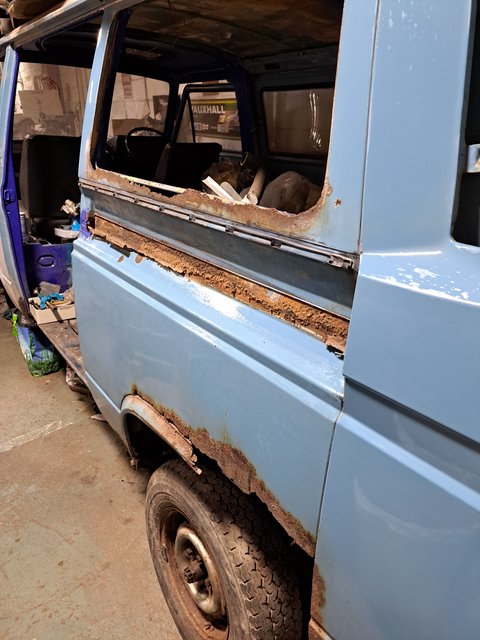
Going back at least 18 months...
I have already had issues with the front corner where the door did not fit,
so we chocked the front end against one of the main beams.
That sorted the door alignment, but I fear that the front corner is now 16mm (5/8") out.
Thus causing none of the three (!!) replacement panels to fit... yep I have tried panels from 3 suppliers, and none fit without a lot of cutting and shutting.
I dare not cut any more metal out before welding some stuff back in.
Otherwise the van will simply fold in on itself.
Going back at least 18 months...
I have already had issues with the front corner where the door did not fit,
so we chocked the front end against one of the main beams.
That sorted the door alignment, but I fear that the front corner is now 16mm (5/8") out.
Thus causing none of the three (!!) replacement panels to fit... yep I have tried panels from 3 suppliers, and none fit without a lot of cutting and shutting.
Re: My VERY RUSTY VW T25 Camper Van Project
On top of that....
I am going through a phase of dash switches breaking up on me.
I am not clumsy or ham-fisted by any measure, but 40 year old plastic parts seem to become as brittle as a swatted moth.
One look, and pooff.... they disintegrate and scatter their guts into the abyss of a dusty old van shell.
I am going through a phase of dash switches breaking up on me.
I am not clumsy or ham-fisted by any measure, but 40 year old plastic parts seem to become as brittle as a swatted moth.
One look, and pooff.... they disintegrate and scatter their guts into the abyss of a dusty old van shell.
Re: My VERY RUSTY VW T25 Camper Van Project
Are the replacement panels pattern parts? If so from experience that could account for a lot of the fitting issues. That's one of the reasons I always try and obtain genuine if I can, even then they often don't fit properly. I lost count of how many hours I've spent getting my doors to resemble lining up.
Re: My VERY RUSTY VW T25 Camper Van Project
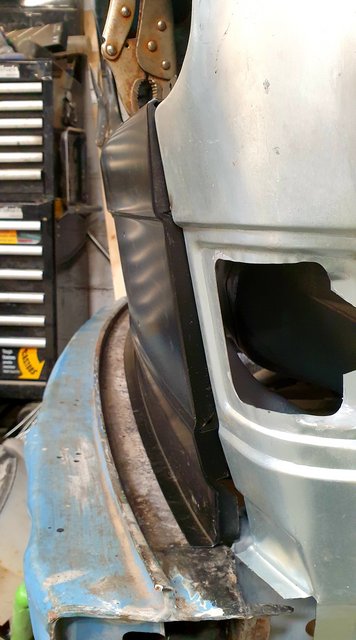
They are Klokkerholme and locally made (Schofields) parts.
The lower front corners are renowned for being a rubbish fit.
The only tidy solution is to replace the whole of the A pillar from the sill to the roof-line.
Currently priced at £300 per side.
I added images above to show the shocking difference between the centre panel and the corner panel.
UPDATE - I should also mention that I measured the distance between the bottom of the A pillar on the off-side, and the vertical seem on the blue deformation beam, and then transposed this to the passenger side A pillar seam and the deformation beam.
65mm gap rings a bell.
As yet, the passenger side A pillar has still not been tacked in.
I mangled them all too much doing a bad job of trying to cut and shut a repair panel.
I will use the old panels to make up repair panels elsewhere.
Re: My VERY RUSTY VW T25 Camper Van Project
Looks like the fit of my new genuine door. Had to cut the hinges off and relocate.