
Aye, my first car had the air-diversion flap on the lid of the air-filter casing. It was an 1980 Toyota, so very typical of many Japanese cars of the time. (Datsun etc).
In the late 80s, they moved to self-operating flaps.
You should have those on the Cavalier mk3.
Although I recall a few Sierras where they used to seize in the 'Winter' position.
Strangely I never had many problems with the corrugated trunking hoses.
Just like any pipe, you would get the odd split, but that was purely age related.
From memory, the carb and single point injection Cavaliers all have a hot air duct corrugated tube from the top of the exhaust manifold shield. But a lot smaller diameter / bore than those from yesteryear.
My VERY RUSTY VW T25 Camper Van Project
Re: My VERY RUSTY VW T25 Camper Van Project
I did a day shift today...
Managed to get a few small bits sorted.
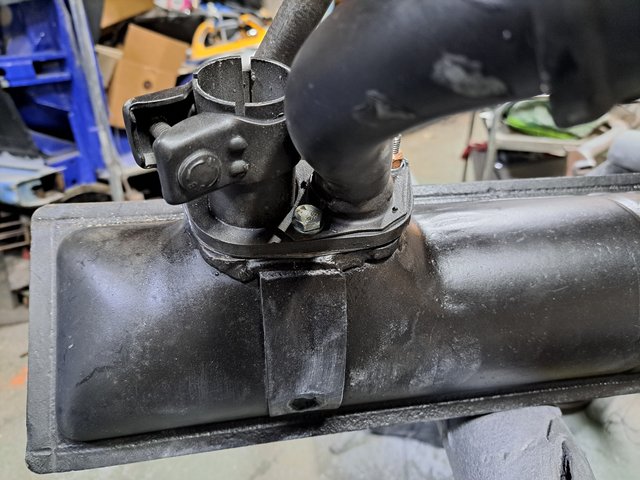
1) - Fully assembled the exhaust system complete with steady bars.
Unfortunately the thread for the left steady bar was a bit worn, so the nut just spun without tightening.
I had to drill and tap the hole so that a replacement stud can be fitted - another item for the shopping list. :/
I actually fancy replacing all six studs for completeness.
2) - Make up a better fitting adapter for the coolant temperature sensor for the digi-dash.
I made one last year, but the thread was nearer 9mm than the desired 10mm dia.
This one today was 9.96mm dia, so near enough.
A good fit.
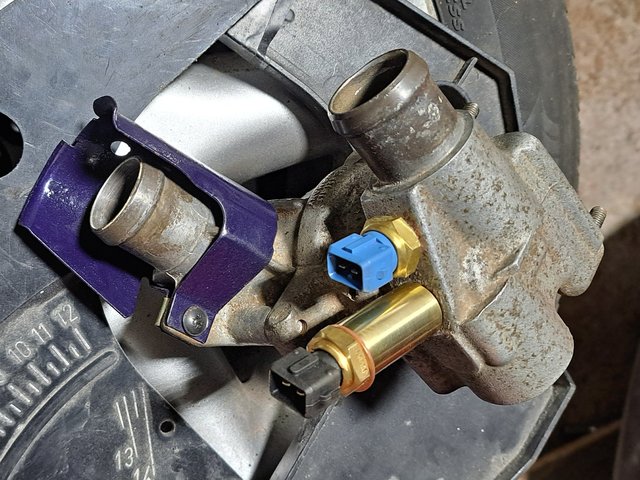
All tightened and fitted with copper washers.
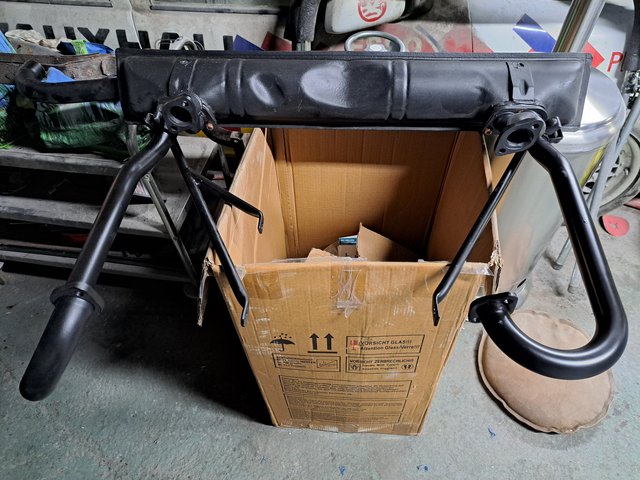
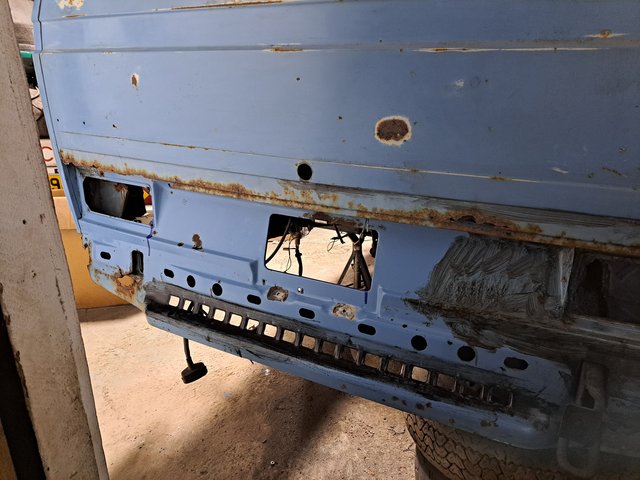
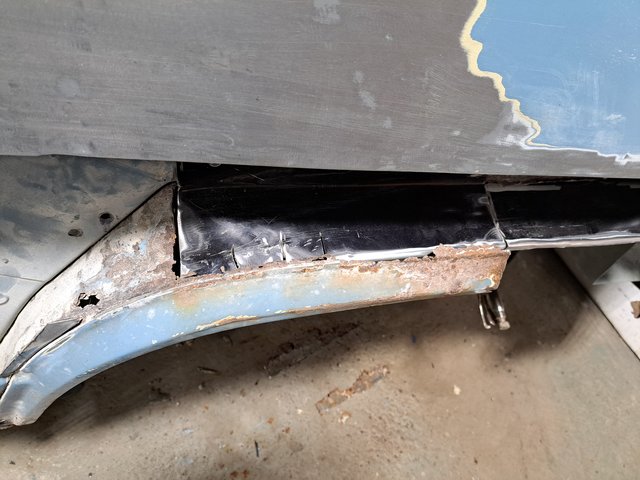
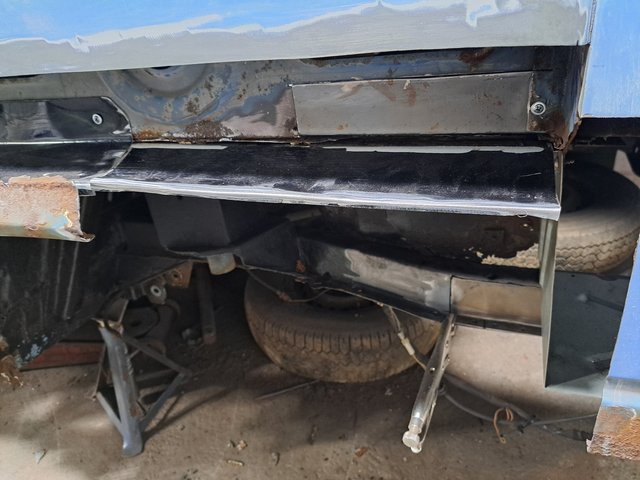
3) - Cut out the void panel behind the left tail light.
An absolute pig to pick the panel off from the surrounding panels.
Not really enough space to get a cutting disc, and no space at all for a spot-drill.
I had to do a lot of chiselling with a club hammer to break the inaccessible spot welds.
4) - Drilling the repair panel ready for puddle welding in.
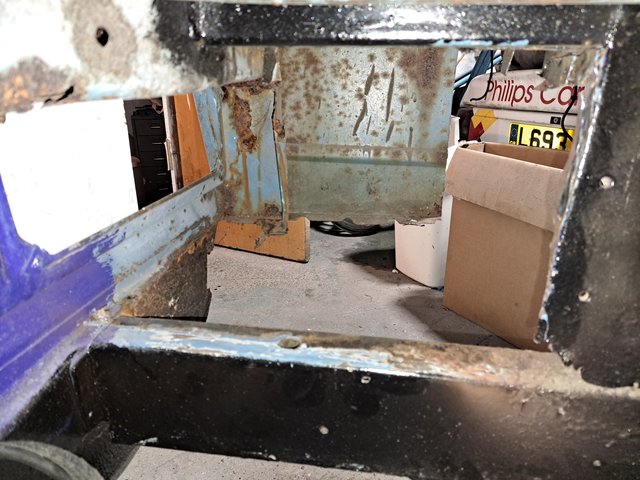
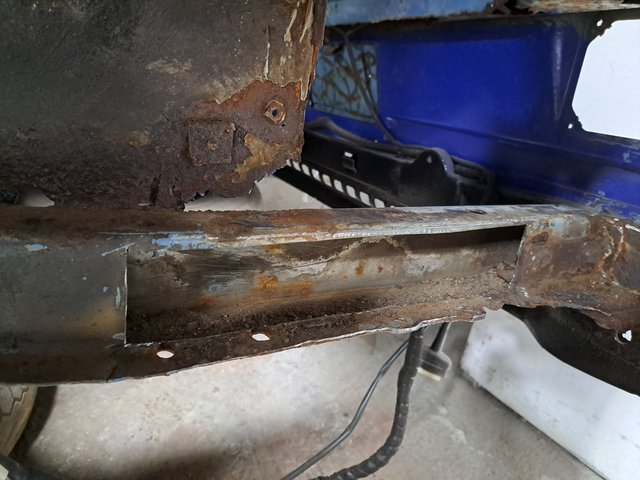
5) - Removing the void panel made the chassis rail more visible - what was left of it.
Had to cut a big hole out to make way for some fresh steel.
Hopefully more progress on Thursday.
I have to find a way to drill out the bumper iron bolts.
They are so denatured, that it all looks like one piece of metal.
If you look closely, you can almost see the bolt heads on the chassis rail behind the long cut-out.
Managed to get a few small bits sorted.
1) - Fully assembled the exhaust system complete with steady bars.
Unfortunately the thread for the left steady bar was a bit worn, so the nut just spun without tightening.
I had to drill and tap the hole so that a replacement stud can be fitted - another item for the shopping list. :/
I actually fancy replacing all six studs for completeness.
2) - Make up a better fitting adapter for the coolant temperature sensor for the digi-dash.
I made one last year, but the thread was nearer 9mm than the desired 10mm dia.
This one today was 9.96mm dia, so near enough.
A good fit.
All tightened and fitted with copper washers.
3) - Cut out the void panel behind the left tail light.
An absolute pig to pick the panel off from the surrounding panels.
Not really enough space to get a cutting disc, and no space at all for a spot-drill.
I had to do a lot of chiselling with a club hammer to break the inaccessible spot welds.
4) - Drilling the repair panel ready for puddle welding in.
5) - Removing the void panel made the chassis rail more visible - what was left of it.
Had to cut a big hole out to make way for some fresh steel.
Hopefully more progress on Thursday.
I have to find a way to drill out the bumper iron bolts.
They are so denatured, that it all looks like one piece of metal.
If you look closely, you can almost see the bolt heads on the chassis rail behind the long cut-out.
-
Envoy CDX

- Club Admin
- Posts: 9681
- Joined: Sun Sep 23, 2007 3:51 pm
- Location: Jarrow, Newcastle Upon Tyne
Re: My VERY RUSTY VW T25 Camper Van Project
Some thick metal there. Hopefully more progress to follow and some nice shiny metal 
Re: My VERY RUSTY VW T25 Camper Van Project
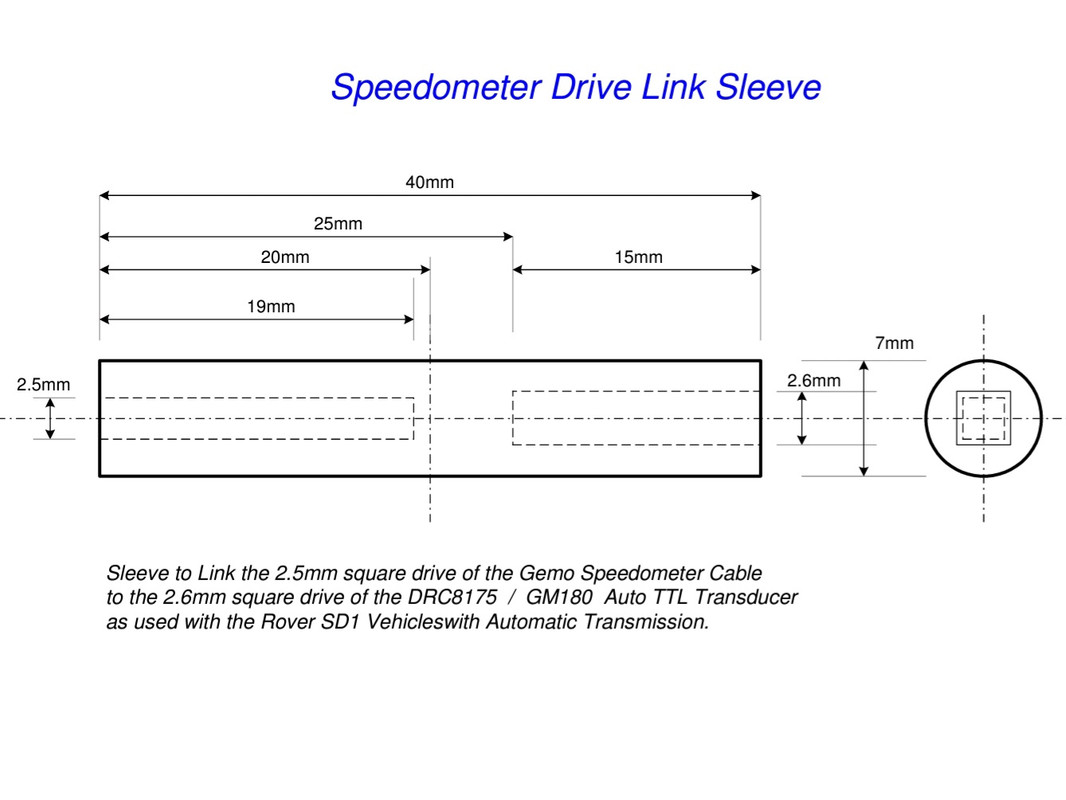
I finally allowed my speed transducer and adapter to see my brand new Gemo speedo cable.
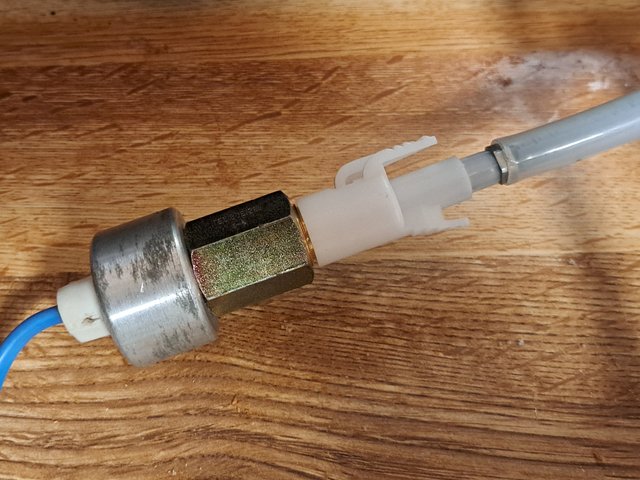
A perfect fit.
Latches and releases perfectly.
Just need to get Troy to 3D print the link between the square drive of the cable, and the square drive of the transducer.
A perfect fit.
Latches and releases perfectly.
Just need to get Troy to 3D print the link between the square drive of the cable, and the square drive of the transducer.
Re: My VERY RUSTY VW T25 Camper Van Project
At least I'm not the only one having to cut out big sections. Looks some good progress.
Re: My VERY RUSTY VW T25 Camper Van Project
Another day of fettling.
Todays tasks.
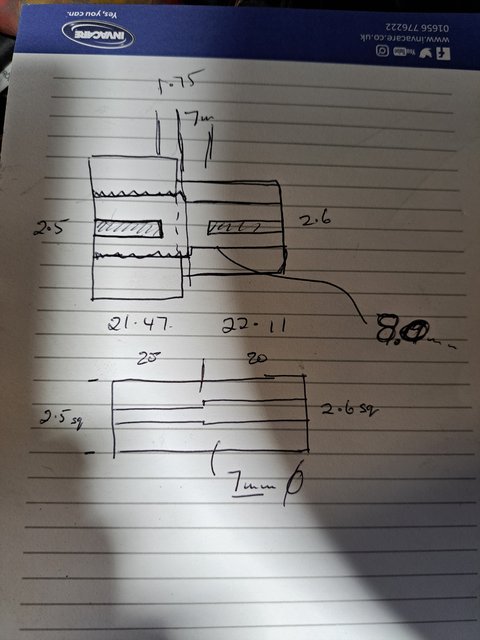
1) - I measured the speedo cable, transducer, and the adapter bush.
I need Troy to 3D print a link bar - 40mm long x 7mm dia, with a square bore through the middle.
2.6mm square at one end. 2.5mm square at the other.
2) - I drilled out and re-tapped the remaining manifold studs. - five today.
I have six new studs due in the post tomorrow.
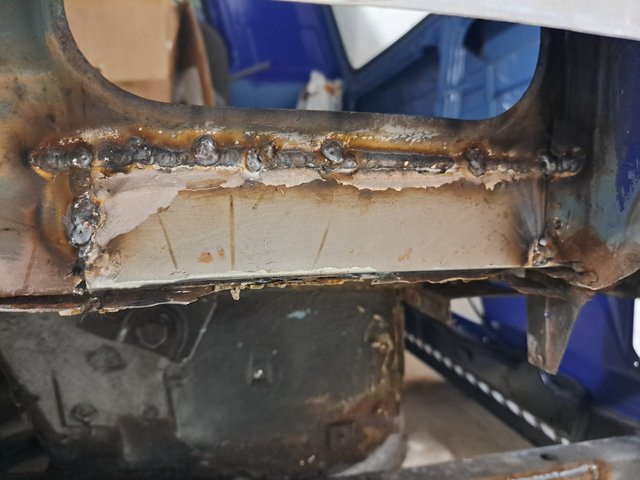
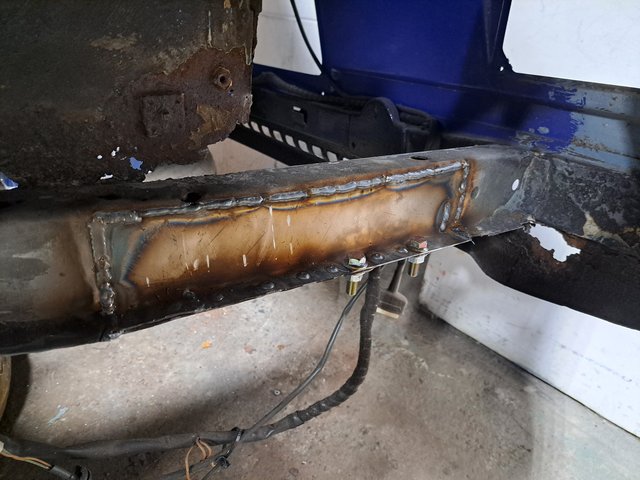
3) - I cleaned up the chassis rail hole,
And made up a repair panel using 2mm thick steel.
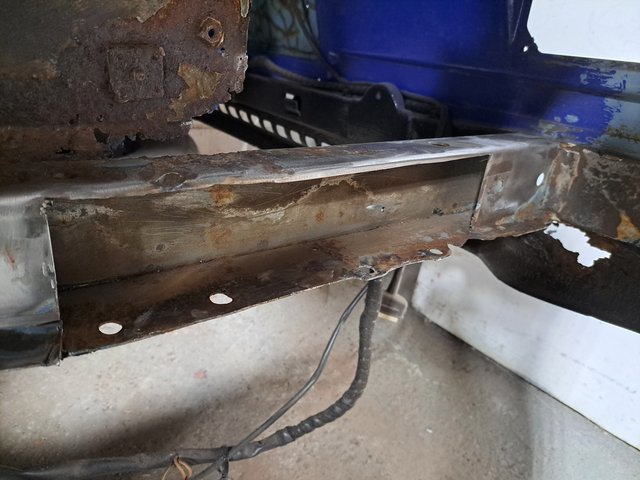
And drill the puddle-weld holes.. only for Troy to say he had planned to spot weld the bottom flange. Ooops.
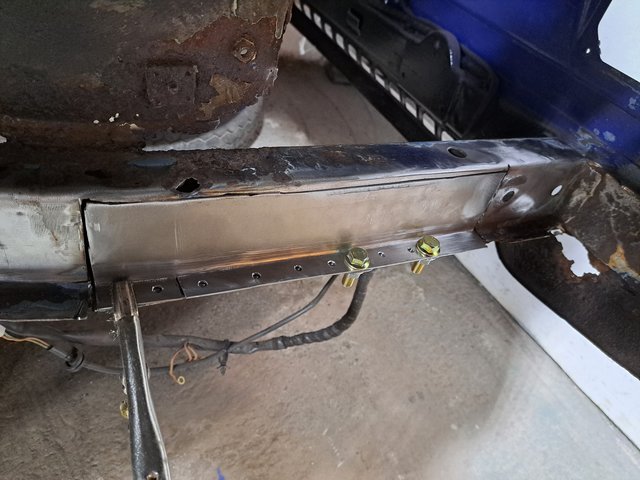
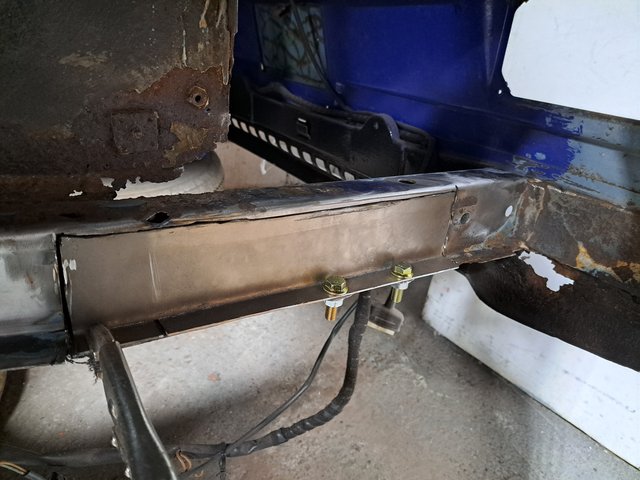
4) - I had to cut the bolt heads off from the bumper-iron.
It was at this time that we realised that there were extra angle-irons that were not factory fitted.
I presume from a long-since redundant and removed towbar.
The bolts were so severely rusted into the iron that I had to drill them out.
Thankfully my drilling was very accurate, and the studs eventually unscrewed themselves with a large drill bit.
Just to add insult to injury, I was drawing up the link bar, and my laptop crashed and lost everything.
After doing a self-reboot, all I got was a black screen and white cursor... nothing else.
And we wonder why I hate Windows 10.
It was a bit like a flashback to 2018 when the computer crashed completely, with a blue screen of death.
Todays tasks.
1) - I measured the speedo cable, transducer, and the adapter bush.
I need Troy to 3D print a link bar - 40mm long x 7mm dia, with a square bore through the middle.
2.6mm square at one end. 2.5mm square at the other.
2) - I drilled out and re-tapped the remaining manifold studs. - five today.
I have six new studs due in the post tomorrow.
3) - I cleaned up the chassis rail hole,
And made up a repair panel using 2mm thick steel.
And drill the puddle-weld holes.. only for Troy to say he had planned to spot weld the bottom flange. Ooops.
4) - I had to cut the bolt heads off from the bumper-iron.
It was at this time that we realised that there were extra angle-irons that were not factory fitted.
I presume from a long-since redundant and removed towbar.
The bolts were so severely rusted into the iron that I had to drill them out.
Thankfully my drilling was very accurate, and the studs eventually unscrewed themselves with a large drill bit.
Just to add insult to injury, I was drawing up the link bar, and my laptop crashed and lost everything.
After doing a self-reboot, all I got was a black screen and white cursor... nothing else.
And we wonder why I hate Windows 10.
It was a bit like a flashback to 2018 when the computer crashed completely, with a blue screen of death.
Re: My VERY RUSTY VW T25 Camper Van Project
XP Laptop to the Rescue.
Re: My VERY RUSTY VW T25 Camper Van Project
Day three, and I got quite a lot done.
1) - Open out the holes on the chassis leg repair panel to 8mm dia, as instructed.

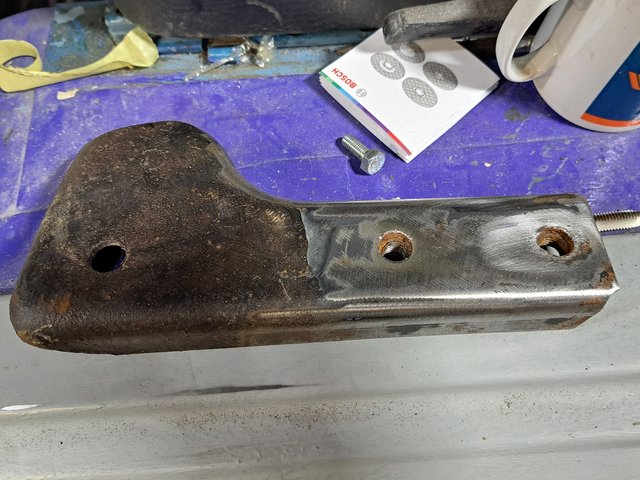
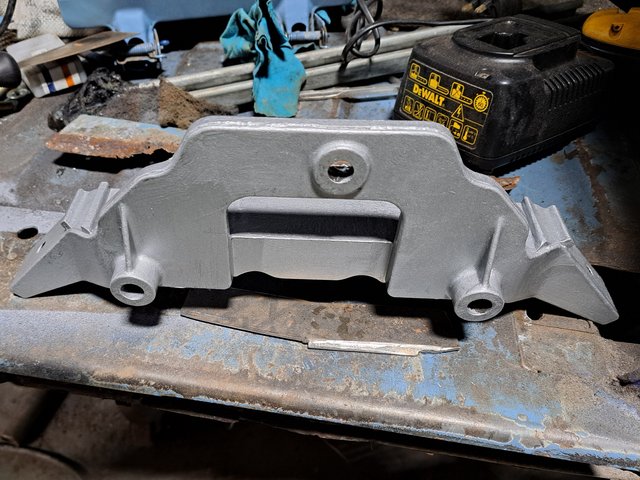
2) - Shot blast, prime and paint the bumper iron.
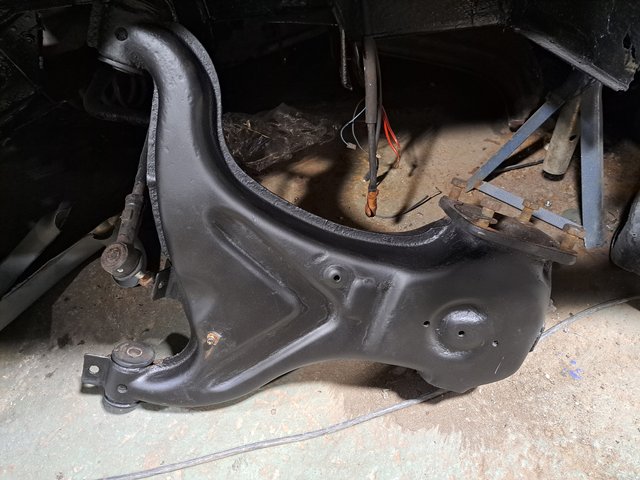
3) - Clean, rust-treat, painting of the left trailing arm (wishbone).

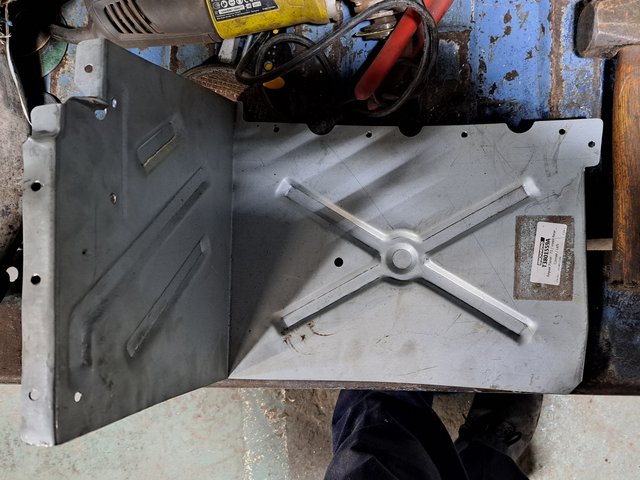
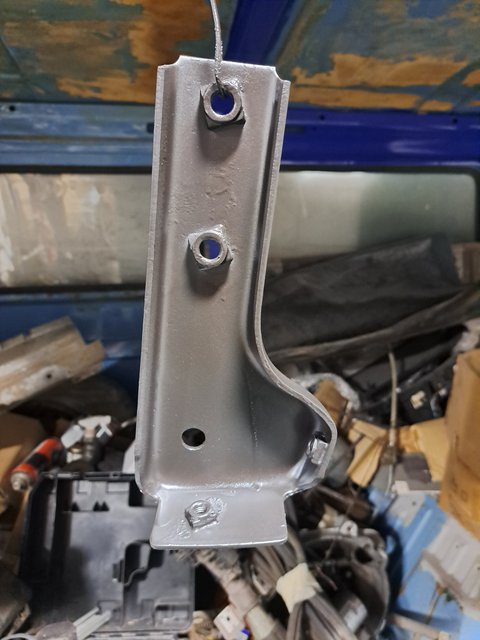
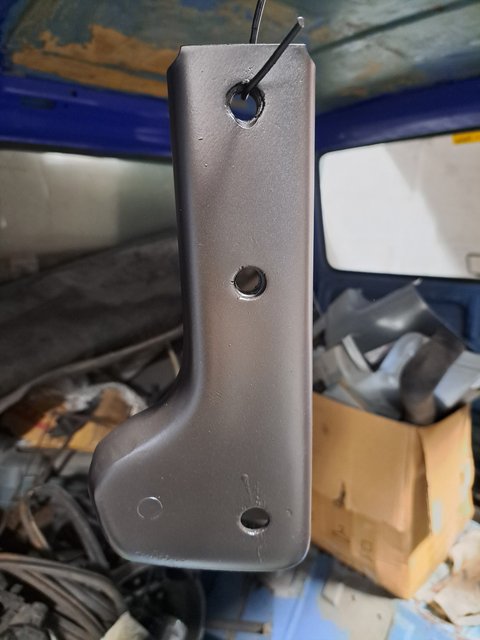
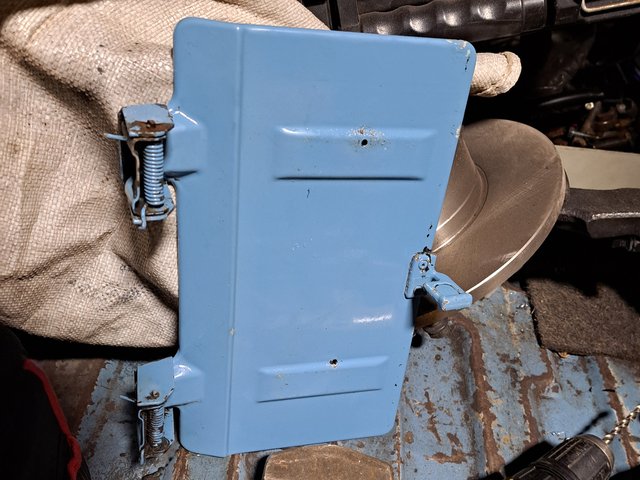
4) - Remove the engine-bay access flap and clean it.
5) - Repair panels were made from a scrap Golf mk7 door skin.
These are to support the outer skin of the van.
After all the panels were made up, Troy was kind enough to weld the two main ones in.
I was knackered by the end of play,
So I have not dressed, cleaned and primed the welded plates yet.
A job for next week.
1) - Open out the holes on the chassis leg repair panel to 8mm dia, as instructed.
2) - Shot blast, prime and paint the bumper iron.
3) - Clean, rust-treat, painting of the left trailing arm (wishbone).
4) - Remove the engine-bay access flap and clean it.
5) - Repair panels were made from a scrap Golf mk7 door skin.
These are to support the outer skin of the van.
After all the panels were made up, Troy was kind enough to weld the two main ones in.
I was knackered by the end of play,
So I have not dressed, cleaned and primed the welded plates yet.
A job for next week.
Re: My VERY RUSTY VW T25 Camper Van Project
Day three, and I got quite a lot done.
1) - Open out the holes on the chassis leg repair panel to 8mm dia, as instructed.
2) - Shot blast, prime and paint the bumper iron.
3) - Clean, rust-treat, painting of the left trailing arm (wishbone).
4) - Remove the engine-bay access flap and clean it.
5) - Repair panels were made from a scrap Golf mk7 door skin.
These are to support the outer skin of the van.
After all the panels were made up, Troy was kind enough to weld the two main ones in.
I was knackered by the end of play,
So I have not dressed, cleaned and primed the welded plates yet.
A job for next week.
-
Envoy CDX
- Club Admin
- Posts: 9681
- Joined: Sun Sep 23, 2007 3:51 pm
- Location: Jarrow, Newcastle Upon Tyne
Re: My VERY RUSTY VW T25 Camper Van Project
That's great progress, get the laptop sent up to me Rob, I'll get it sorted
Re: My VERY RUSTY VW T25 Camper Van Project
I am not sure what happened to the laptop.
I eventually managed to turn it off, and after that it has booted up okay.
It just did not like my early version of Visio.
Pity it waited until I had nearly finished the drawing before it crashed.
Back to evenings again next week, so progress will be a bit slower.
I had managed to do about 22hrs in three days.
Back to 5 hrs per week.
-
Envoy CDX
- Club Admin
- Posts: 9681
- Joined: Sun Sep 23, 2007 3:51 pm
- Location: Jarrow, Newcastle Upon Tyne
Re: My VERY RUSTY VW T25 Camper Van Project
Progress of any form is progress Rob, I can remember when I had the unit (co-shared in Darlington about 80 mile round trip) and I used to spend longer on the road than I did in the actual unit some nights, so don't beat yourself up too much. You're certainly getting more confident around the tools, that much does show in your work - keep at it, you'll get there and it'll be rewarding I am sure
Re: My VERY RUSTY VW T25 Camper Van Project
Wish I had the motivation and the energy to spend 3 days on my project, at this rate you'll probably have it finished for Easter.
Re: My VERY RUSTY VW T25 Camper Van Project
Easter !!..
Hmmm - what year ?
At my normal snail's pace, we are talking a good few years.
I get the feeling that it isn't a lack of motivation.
It is more like being mentally overwhelmed by the sheer volume of work that still needs doing.
A nudge in the right direction from Troy gave me a period of clarity - and a plan of action.
Re: My VERY RUSTY VW T25 Camper Van Project
I have been threatening to set fire to the van for years, but tonight I put my money where my mouth was...
Or at least the MAPP gas torch.
This looks a lot tamer than reality with flames and billowing smoke everywhere.
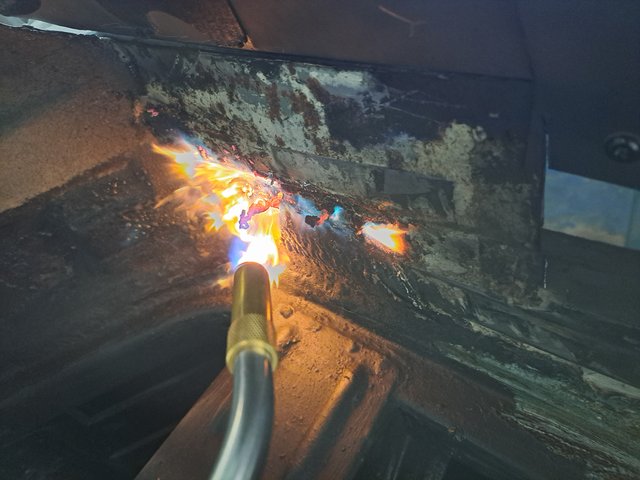
I hadn't lost the plot or finally snapped... it is common knowledge that the easiest way to get thick underseal off is to burn it.
At best it will peel away, but today I had to scrape it off the rear wheel arch area
Or at least the MAPP gas torch.
This looks a lot tamer than reality with flames and billowing smoke everywhere.
I hadn't lost the plot or finally snapped... it is common knowledge that the easiest way to get thick underseal off is to burn it.
At best it will peel away, but today I had to scrape it off the rear wheel arch area
Re: My VERY RUSTY VW T25 Camper Van Project
Next job was to bead blast the engine carrier - sorry but I failed to photograph it.
Then onto the exhaust, yet again.
I fitted some shiney new stainless exhaust studs, along with copper coated steel nuts.
Annoyingly one nut decided to bind, and whilst removing it to clean the threads, the stud sheared off.
Some Anglo-Saxon phrases erupted from my mouth.
A lot of times...
Drilling out this stud for the second time, I was surprised that the thread in the flange was still okay. Just a quick clean with an M8 tap, and all was good.
I also had to scratch my head over the position and orientation of the steady bars. The online catalog 7zap soon allowed me to work that out.
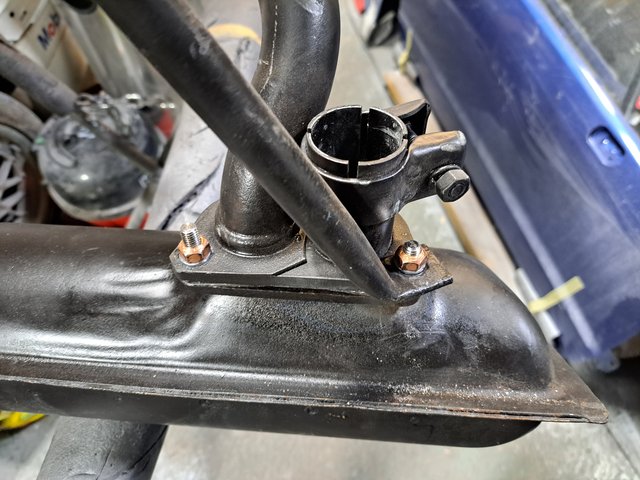

And finally fitting the manifolds to the exhaust.
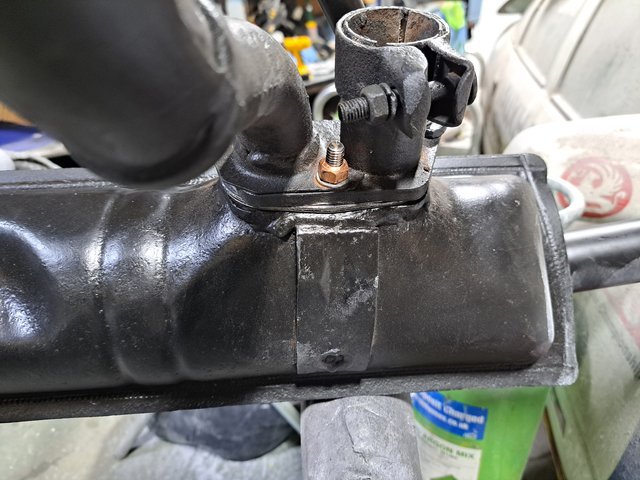
You will see one hex-head bolt.
That is because there is no room to get a spanner on a stud and nut. And I was not one stud down.
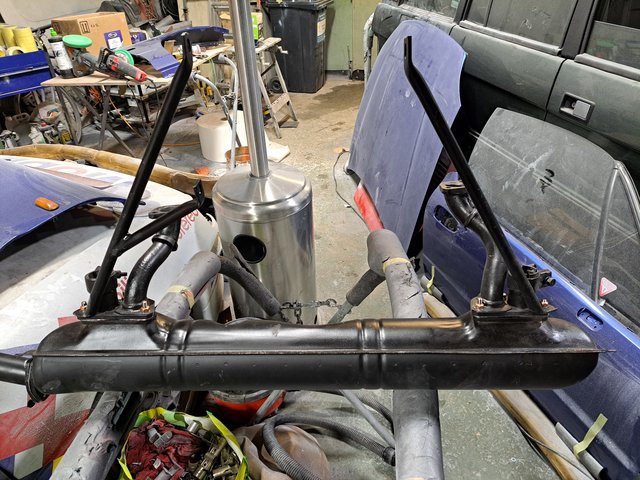
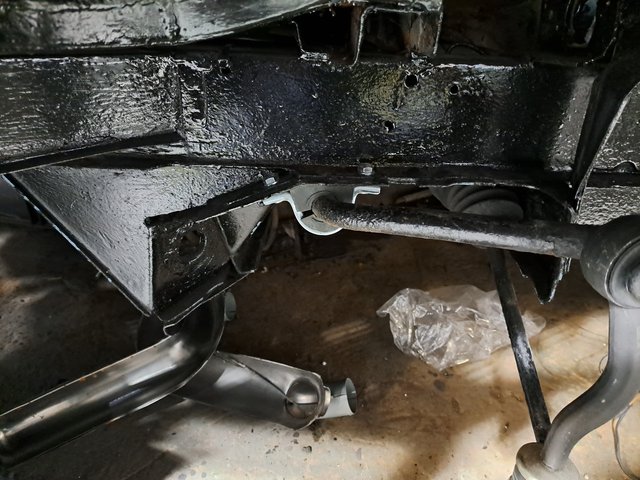
Last job of the night was to fit the anti-roll bar bush and clamp.
I presume the split will close up with use.
The bar was very secure in it's location with no movement at all.
A good amount of work despite the sheared stud fiasco.
Then onto the exhaust, yet again.
I fitted some shiney new stainless exhaust studs, along with copper coated steel nuts.
Annoyingly one nut decided to bind, and whilst removing it to clean the threads, the stud sheared off.
Some Anglo-Saxon phrases erupted from my mouth.
A lot of times...
Drilling out this stud for the second time, I was surprised that the thread in the flange was still okay. Just a quick clean with an M8 tap, and all was good.
I also had to scratch my head over the position and orientation of the steady bars. The online catalog 7zap soon allowed me to work that out.
And finally fitting the manifolds to the exhaust.
You will see one hex-head bolt.
That is because there is no room to get a spanner on a stud and nut. And I was not one stud down.
Last job of the night was to fit the anti-roll bar bush and clamp.
I presume the split will close up with use.
The bar was very secure in it's location with no movement at all.
A good amount of work despite the sheared stud fiasco.
-
Envoy CDX
- Club Admin
- Posts: 9681
- Joined: Sun Sep 23, 2007 3:51 pm
- Location: Jarrow, Newcastle Upon Tyne
Re: My VERY RUSTY VW T25 Camper Van Project
Looks promising, sadly sheared things are a part of life with these things. But overcame and got it done - sometimes I wonder if bolts would be better on these things. As for sound deadening, I was watching a My Mechanics video and he was using dry ice to remove the sound deadening with good results.
Re: My VERY RUSTY VW T25 Camper Van Project
I was more cheesed off because the bolt that sheared was a brand new stainless steel exhaust stud.
So only fitted about five minutes.
For some reason all the studs were tight at their tips when tightening the self locking exhaust nuts, but seemed to ease-off a little when on the main part of the thread... all but one.
That one just bound up completely.
Ah well, that bit is done for now.
Next challenge is why does one J shaped manifold pipe look longer than the other.
I won't find out if they are different, or a trick on the eyes, until I get the engine to the unit and try assembling it.
At this time, there is no room in the unit to put the engine so that I can build it up. There is still a lot of welding to do around the periphery of the engine bay, so I cannot fit it in the van yet.
Re: My VERY RUSTY VW T25 Camper Van Project
I've found welding close to thick underseal is a very effective way to remove it, lol. That's why I always keep wet cloths and a fire extinguisher to hand, a few times its been burning well after letting in a few patches, close by. Once put out it just falls off. I doubt the fumes are very good for you, though.
Re: My VERY RUSTY VW T25 Camper Van Project
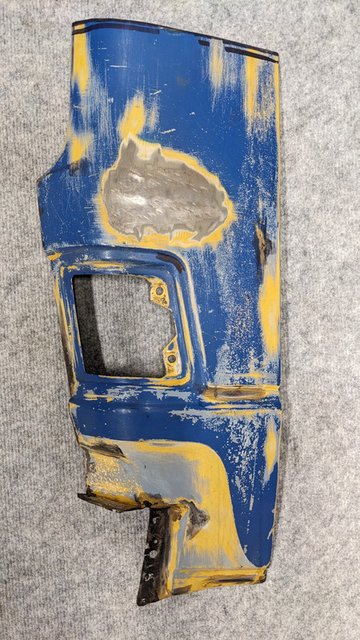
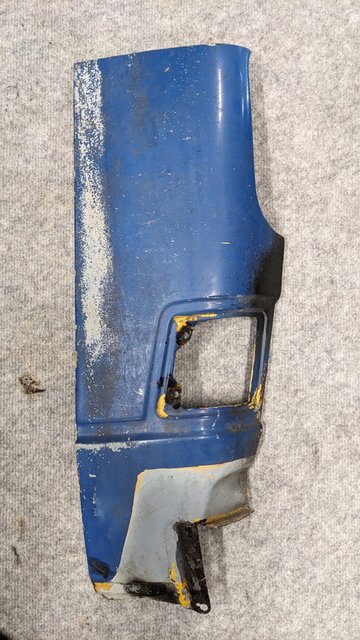
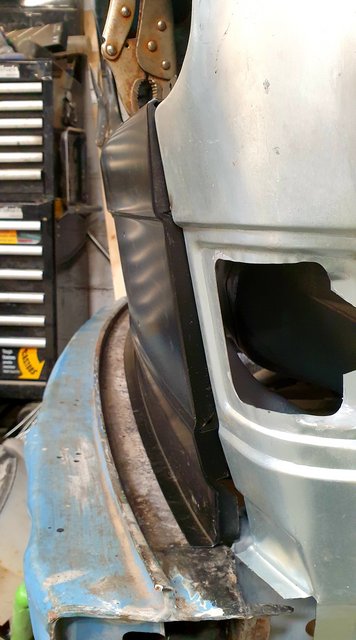
I managed to get a couple of panel cuts for the bottom A pillar corners.
I was totally fed up of badly fitting pattern panels.
The cuts don't look fantastic, but I hope a bit of shot blasting and descaling the paint might help.
Before - as they arrived.
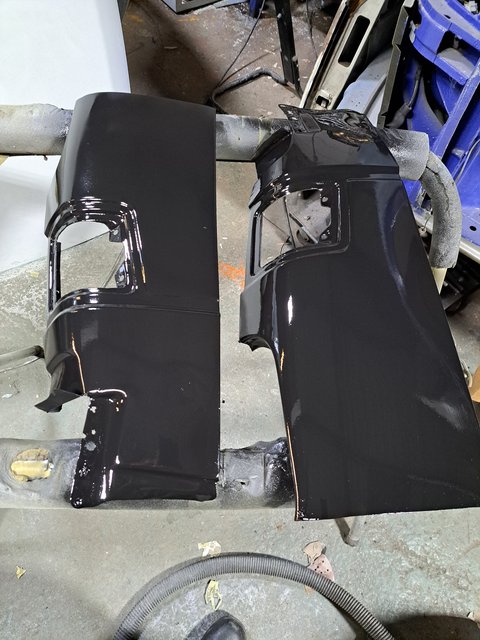
After shot blasting, etc... and then a blow over with a few coats of Rustoleum direct to rust black primer.
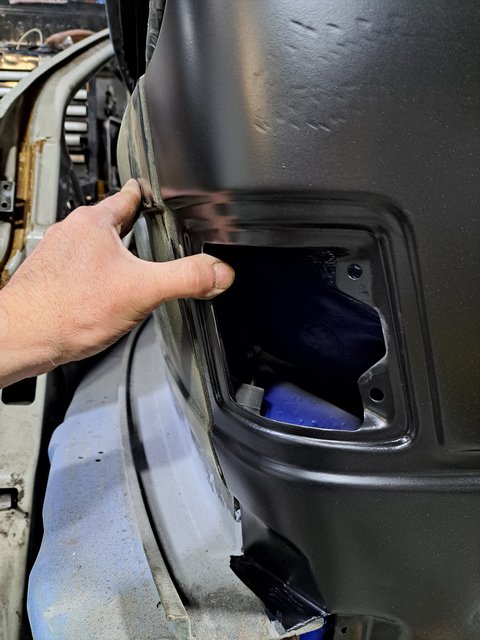
A trial fit showed that the poor fit before was purely down to crappy panels.
The body-cut panel fits perfectly.
-----------------------
The only other job tonight was to paint the engine carrier casting. This was silver smooth Hammerite.
 .
.
Hammerite is okay for alloy castings, but no good on steel. As per most other chemicals, Hammerite was much better on steel 30 years ago, compared to the modern stuff.
UPDATE - I should probably point out at this point, that the best way to paint alloy castings, is to warm them sufficiently so that any internal moisture evaporates away...
I used my MAPP gas torch for this - you can see the alloy "sweat" the moisture out and slightly change a few shades in colour.
Once dried, the alloy will almost suck the paint into it's surface pores, giving a much stronger adherence.
I was totally fed up of badly fitting pattern panels.
The cuts don't look fantastic, but I hope a bit of shot blasting and descaling the paint might help.
Before - as they arrived.
After shot blasting, etc... and then a blow over with a few coats of Rustoleum direct to rust black primer.
A trial fit showed that the poor fit before was purely down to crappy panels.
The body-cut panel fits perfectly.
-----------------------
The only other job tonight was to paint the engine carrier casting. This was silver smooth Hammerite.
.Hammerite is okay for alloy castings, but no good on steel. As per most other chemicals, Hammerite was much better on steel 30 years ago, compared to the modern stuff.
UPDATE - I should probably point out at this point, that the best way to paint alloy castings, is to warm them sufficiently so that any internal moisture evaporates away...
I used my MAPP gas torch for this - you can see the alloy "sweat" the moisture out and slightly change a few shades in colour.
Once dried, the alloy will almost suck the paint into it's surface pores, giving a much stronger adherence.
Re: My VERY RUSTY VW T25 Camper Van Project
The body cuts look a good fit, I can never understand why in this day and age with modern computers and their 3d scanning capabilities that firms cannot produce pattern panels that actually fit.
Re: My VERY RUSTY VW T25 Camper Van Project
I don't know...
but these pattern panels are the worst I have ever seen.
A huge 16 to 19mm (5/8" to 3/4") out at the bottom.
Only Klokkerholme in Denmark make them.
So even the best UK suppliers, Heritage and Brickwerks have to sell them as there is no alternative.
---‐---‐-----------
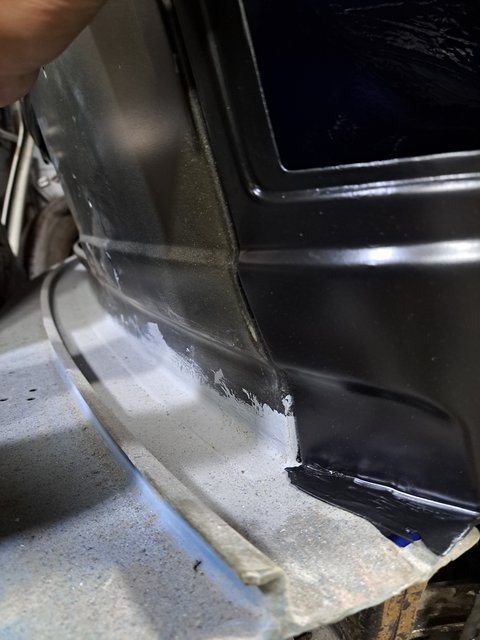
The body cut for the left / near side has a fair bit of hammer rash, but this can all be dealt with during final body prep. I am not too concerned at the moment.
Better than the rusty original parts, and as said, a hugely better fit than new parts.
but these pattern panels are the worst I have ever seen.
A huge 16 to 19mm (5/8" to 3/4") out at the bottom.
Only Klokkerholme in Denmark make them.
So even the best UK suppliers, Heritage and Brickwerks have to sell them as there is no alternative.
---‐---‐-----------
The body cut for the left / near side has a fair bit of hammer rash, but this can all be dealt with during final body prep. I am not too concerned at the moment.
Better than the rusty original parts, and as said, a hugely better fit than new parts.
Re: My VERY RUSTY VW T25 Camper Van Project
Yes you can really see the difference. Even the quality of the pressing is a lot worse. As you know I've just had exactly the same issues with the o/s wing on my van. I can find a fair few repairable n/s genuine wings, but their seems to be absolutely no o/s genuine in the world. I always thought the n/s of vehicles in the UK was more prone to rot. But obviously not in this case.
Re: My VERY RUSTY VW T25 Camper Van Project
Stupid question here, but...
Are there any Daewoo Nexia used panels out there?
Essentially, a Nexia (or Le Mans as it is in some countries) was a mk2 Astra.
I recall seeing a Nexia in Ellesmere Port in 2015-ish, with the astra badging on it.
Scrub that, I just noticed that the profile around the indicators is different. Darn it!!
Re: My VERY RUSTY VW T25 Camper Van Project
I remember the Daewoo Nexia well. I was very tempted by a 3 year old one once, way back. The horror stories surrounding trying to sell them on again however stopped me at the last minute on buying one. ( A few years later I purchased a 3 year old Rover 45 instead, not sure it was the wisest decision in the end) .Robsey wrote: ↑Sat Mar 09, 2024 1:11 pm Stupid question here, but...
Are there any Daewoo Nexia used panels out there?
Essentially, a Nexia (or Le Mans as it is in some countries) was a mk2 Astra.
I recall seeing a Nexia in Ellesmere Port in 2015-ish, with the astra badging on it.
Scrub that, I just noticed that the profile around the indicators is different. Darn it!!
When I started my van back in 2018 I came up with the idea of purchasing a nexia for spares, however even then they were almost non existant and now tbh I can't remember the last time I actually saw one. I was thinking that the wings could be adapted, but it seems they are even rarer than the mk2 Astra. * According to howmanyleft there's only 16 on uk roads*