How2 - Fit an F28 to the v6 engines

An index of useful guides designed to help you care for and maintain your Mk3 Cavalier

Moderator: Robsey

Locked
User avatar
Squig
Registered user
Posts: 4171
Joined: Sun Sep 23, 2007 1:03 am
Location: Stockport

How2 - Fit an F28 to the v6 engines

Post by Squig »

This How2 will look at fitting the F28 6-speed GETRAG gearbox into a v6 cavalier, 2 assumptions will be made before continuing. Firstly; the gearbox will be assumed to have been converted into 2wd prior to using this guide (see LMF for 2wd conversion kit), and secondly; the car being fitted with this is, or has, a v6 with an F25 gearbox as per factory fitting.
All torque settings will NOT be covered in this guide, I would strongly recommend the Haynes Omega/Vectra manual and the Cavalier manual for the torque settings.

Tools and Parts required;
  • 1. F28 gearbox converted to 2wd,
    2. F28/turbo gear linkage,
    3. F28/turbo passenger side gearbox mount,
    4. F28/turbo flywheel and clutch assembly,
    5. 1.8/2.0 drivers side driveshaft with counterbalance weight not mounted to the block (if possible buy one with ABS toothed ring at hub end),
    6. 6 x M7x25mm, 3 x M10x140mm bolts,
    7. M10 washers, lots of them... or some custom spacers 3 x 23mm and 2 x 9mm,
    8. Full socket and spanner set plus Torx bits and allen keys and jacks and axle stands and engine crane and anything I've missed... basically you'll need a fairly complete tool set to complete this job. I'll try to remember sizes as I go here...
First of all the process will be broken down into the basic steps each being covered in depth by a new thread...

Basic steps;
  • 1. Raise vehicle by 2'/50cm and support,
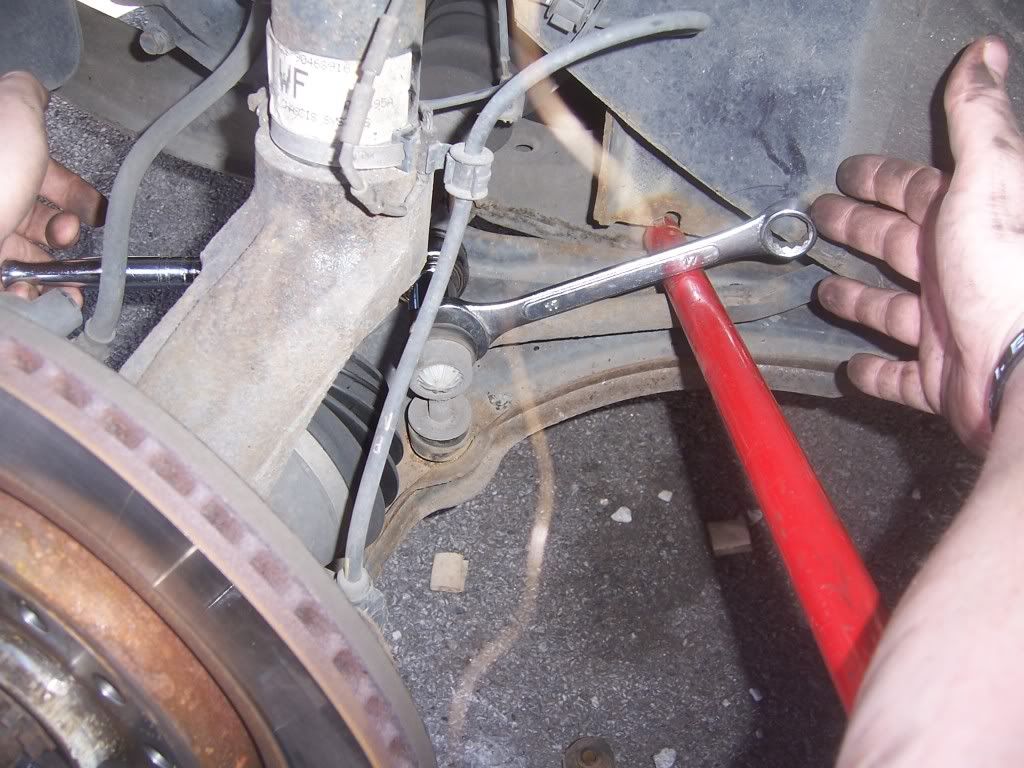
    2. Split suspension and track rod ends, and remove driveshafts from hubs,
    3. Support engine, remove exhaust downpipes and remove subframe,
    4. Disconnect engine from vehicle, inc plumbing and electrics, and lower to floor,
    5. Remove F25, flywheel and clutch assembly and replace with turbo items and F28,
    6. Fit modified v6 linkage mount and turbo linkage,
    7. Remove engine mount and refit with spacers/washers then refit engine and gearbox including gearbox spacers,
    8. Fit new driveshaft removing balance weight,
    9. Refit subframe and rebuild suspension, inc driveshafts,
    10. Rebuild wiring, exhaust and plumbing.
Elwood Blues: "Our Lady of Blessed Acceleration, don't fail me now!"

Image

Gaz loses sleep for my car and helps me with parts at ungodly hours of the day. Awesome
User avatar
Squig
Registered user
Posts: 4171
Joined: Sun Sep 23, 2007 1:03 am
Location: Stockport

Re: How2 - Fit an F28 to the v6 engines

Post by Squig »

Work in progress, and will be finished soon... please do NOT reply to this topic as all replies will be deleted, instead please discuss in the discussions forum.
Elwood Blues: "Our Lady of Blessed Acceleration, don't fail me now!"

Image

Gaz loses sleep for my car and helps me with parts at ungodly hours of the day. Awesome
User avatar
Squig
Registered user
Posts: 4171
Joined: Sun Sep 23, 2007 1:03 am
Location: Stockport

Raise vehicle by 2'/50cm and support

Post by Squig »

I accomplished this by jacking the vehicle on the sill jacking point and supporting the Cavalier on axle stands placed at the usual jacking point towards the front of the vehicle.
Once the full extent of the jack is reached then place the axle stands under the stated point and build up under the jack using a solid material e.g. breeze blocks. Re-jack and adjust the axle stands. The ideal height is approximately 2 foot or 50cm, which should give enough room to work under the vehicle without withdrawing the engine entirely. However if you prefer or have the inclination raise another foot and you should be able to withdraw the complete engine, this guide has been written assuming the engine isn't being completely withdrawn.
Elwood Blues: "Our Lady of Blessed Acceleration, don't fail me now!"

Image

Gaz loses sleep for my car and helps me with parts at ungodly hours of the day. Awesome
User avatar
Squig
Registered user
Posts: 4171
Joined: Sun Sep 23, 2007 1:03 am
Location: Stockport

Split suspension and track rod ends, and remove driveshafts

Post by Squig »

Remove the road wheels and starting on the passenger side remove the hub nut split pin, then, with the brakes locked or an assistant applying the brake pedal, use a 1/2" drive 32mm socket to remove the hub nut. Once the hub nut has been removed undo the ARB links to the wishbone, whilst levering the ARB down to reduce tension, this will require a 13mm socket or spanner.

Image

Now undo the track rod to strut (19mm) and pop the ball joint, preferably by using the below type splitter...

PIC TO FOLLOW SOON

At this point the only thing connecting the wishbone to the suspension will be the lower ball joint which on a v6 requires a tuning fork splitter and a 19mm spanner. Splitting will likely bugger the rubber ball joint seal meaning replacing the wishbone (approx £15 per side) before the next MOT.
However this will allow the driveshaft to be removed from the hub, tapping with a hammer against the driveshaft thread buffered by some wood. Be careful, if you hammer directly onto the shaft you can screw up the thread.
Once driveshaft is separated then pull sharply on the main part of the driveshaft which should pop the shaft out of the gearbox, this does require some force to be exerted and it is well recommended that you double check the car is well supported... 1300kg of metal falling on your legs might hurt a smidge.

Repeat this on the other side however leave the driveshaft located in the gearbox as removal is easier with engine removed.
Elwood Blues: "Our Lady of Blessed Acceleration, don't fail me now!"

Image

Gaz loses sleep for my car and helps me with parts at ungodly hours of the day. Awesome
User avatar
Squig
Registered user
Posts: 4171
Joined: Sun Sep 23, 2007 1:03 am
Location: Stockport

Support engine, remove exhaust downpipes and remove subframe

Post by Squig »

Start at Lambda sensor either removing from the exhaust or unplugging from the engine bay, then at the cat end of the downpipes remove the 3 bolts and nuts using a pair of 13mm spanners, retain the gasket. Then separate the downpipes from the manifolds using a 16mm (unsure as I can't remember) socket on an extension bar, please bear in mind one or two of these nuts will need a 1/2" drive knuckle joint.
Once everything is unbolted the downpipes should be easily withdrawn.

Prior to continuing the engine must be supported. An engine crane can be used but tends to make the subframe removal more difficult.

The subframe is attached to the body by two 19mm bolts and four 17mm bolts (I would recommend a healthy dose of penetrating fluid with high tension black 6 point 1/2" sockets, as these bolts have mullered standard 12 point 1/2" sockets of mine in the past) and attached to the rear gearbox mount by two 17mm nuts. In Cavaliers fitted with air-con there will be a line strapped to the subframe on the driver side, and will need to be unclipped too.
Elwood Blues: "Our Lady of Blessed Acceleration, don't fail me now!"

Image

Gaz loses sleep for my car and helps me with parts at ungodly hours of the day. Awesome
User avatar
Squig
Registered user
Posts: 4171
Joined: Sun Sep 23, 2007 1:03 am
Location: Stockport

Disconnect engine from vehicle and lower to floor

Post by Squig »

Now I cheated a little here as the engine was only being dropped slightly for gearbox removal so I only disconnected what I had too, this isn't really recommended, but if you do decide this is the way forward then unsheath the wires in the plastic case attached to the inlet manifold and remove the case carefully, as it is easily broken and not easy to find.
Separate the engine loom from the car loom at the large twist lock connector in the engine bay, remove all earth leads (I had two, one on the front of the block and one from rad to inlet manifold). Remove the vacuum hose off the inlet manifold, unplug water temp sensor, reverse light switch and any other plumbing or electrics that prevent removal, inc, the heater matrix feeds from the engine, the header tank hose from the same area, and the top and bottom radiator hoses. The oil lines from the pump on the front of the block will need disconnecting as will the air con lines from the compressor, if fitted.

Crack off the gearbox engine bolts but DO NOT remove them at this point, then loosen the gear linkage from the gearstick rod, and separate (don't worry about knocking things out of gear as we will sort that later).

Disconnect the engine/chassis mount and gearbox/chassis mount and lower away... lower the engine onto a wooden surface and pack out the raised area of the sump with wood to spread the weight as evenly as possible, this is important as dropping the full weight of the engine and gearbox onto the sump on concrete/tarmac can crack the sump rendering it useless.
Elwood Blues: "Our Lady of Blessed Acceleration, don't fail me now!"

Image

Gaz loses sleep for my car and helps me with parts at ungodly hours of the day. Awesome
User avatar
Squig
Registered user
Posts: 4171
Joined: Sun Sep 23, 2007 1:03 am
Location: Stockport

Remove F25, flywheel and clutch assembly and replace

Post by Squig »

Remove the loosened gearbox bolts and gearbox complete with linkage and linkage mount, then separate the linkage and mount from each other and the gearbox. Remove the v6 clutch assembly and flywheel, replacing with the lighter turbo flywheel and turbo clutch assembly. This is the point that the M7 bolts will be needed if you didn't get them with the flywheel off the donor car.
Fit the F28.

At this point you may notice the v6 linkage mount will not fit the F28, this is because the original v6 linkage mount will need to have one of the original bolt holes widened. I accomplished this in a vice with a variety of drill bits gradually working the hole wider, but if you don't fancy that have an engineering firm do the work. Once the hole has been widened fit the new mount with the turbo linkage to the F28.
Elwood Blues: "Our Lady of Blessed Acceleration, don't fail me now!"

Image

Gaz loses sleep for my car and helps me with parts at ungodly hours of the day. Awesome
User avatar
Squig
Registered user
Posts: 4171
Joined: Sun Sep 23, 2007 1:03 am
Location: Stockport

Rebuild...

Post by Squig »

Realistically, once the above steps have been accomplished it's largely just a case of rebuilding the drivetrain and refitting those bits that have to come off to lower the engine and gearbox.

A few points to note are;

1. The sourced driveshaft will need the counter weight removing as it simply doesn't fit, and will need the ABS ring fitting, or the entire cv swapping from the v6 shaft across to the replacement. I would advise this as it is easily accomplished with a pair of circlip pliers while the driveshaft is held in a vice... but it's very messy and will need repacking with cv grease, probably a good idea to replace the cv boot as a replacement kit comes with all the needed grease and a replacement fastening, most times a zip-tie just doesn't work.

2. The reverse light plug and the fan switch plug are identical, so once everything is rebuilt engage reverse, if the fan comes on you've got them the wrong way around and you need to swap them over.

3. Aligning the gear selector is very simple as the F28 has a hole you can use to align *******at this point I can't remember which gear is set by this method so will need to ask Dan to confirm*******, however if before fitting the gearbox you twist the selector rod to the left as far as possible and pull it toward you to should feel it clunk into gear, this should be reverse.

4. Remember to fit the longer bolts and spacers to the drivers-side engine mount... otherwise the engine mount doesn't meet the bolt holes and annoyance ensues.

Unfortunately, owing to a few mistakes made while I fitted mine (and the reason for this guide), it has been several months in being finished as I make the reverse light/fan switch mistake resulting in blown head gaskets and split oil cooler, which put mine off the road while I saved to fix my beloved. Anyhow I'm back on the road and happy to say the fault lay not with the mechanical work, but purely the cock-up made with the electrics.

The results are pretty spectacular, motorway economy is up to 47-54 mpg, round town I can see well over 50 mpg at 30mph in 6th, 0-60 is changed from 7.2 averaged over 3 runs on a specific national limit road down to 6.9, and the general feel of the car is changed from a lazy cruiser to a much sportier feel. Torque steer at the moment seems to be an issue, but I am yet to have the wheels aligned correctly (due next week)... so hopefully once the wheels are aligned I can answer this too and finally finish this guide....

Torque steer now a none issue. Many months on and still putting a smile on my face!
Last edited by Squig on Tue Jul 05, 2011 2:23 am, edited 2 times in total.
Reason: Forgot to mention the spacers... sorry humbucker
Elwood Blues: "Our Lady of Blessed Acceleration, don't fail me now!"

Image

Gaz loses sleep for my car and helps me with parts at ungodly hours of the day. Awesome
User avatar
TurboDan
Registered user
Posts: 3712
Joined: Thu May 29, 2008 9:46 pm
Location: Manchester

Re: How2 - Fit an F28 to the v6 engines

Post by TurboDan »

You drop the right drill bit in the hole on the top and then twist the selector fork over to the left and the drill bit will drop into a hole and it will hold it there, this holds it over between 1st and 2nd. You then go inside the car and pull the leather gaitor up and then move the stick over and drop a drill bit/screw driver into the hole which you will see and that then holds it all tight. Then go tighten the 13mm bolt up under the bonnet and thats it, perfectly aligned gears everytime!

Ps. if you need to use the biggest/snuggish fitting drill bit for the job, this makes the gears line up perfectly.
Locked