Fitting Cruise Control to a Cav Mk3 - The electrics.
Posted: Sun Mar 04, 2018 4:13 am
I am writing this thread, as it is my plan to fit cruise control to my 4 Pot Cavalier (C20NE).
There are many other How 2's around covering this project / adaptation / Upgrade.
This one can be discussed here: -
viewtopic.php?f=15&t=16368
There is one on here that Squig wrote back in the day, which was for his V6 Cavalier, and you can use this to look at how he physically installed it into his car.
Squigs V6 Cruise Install.
viewtopic.php?f=70&t=2263
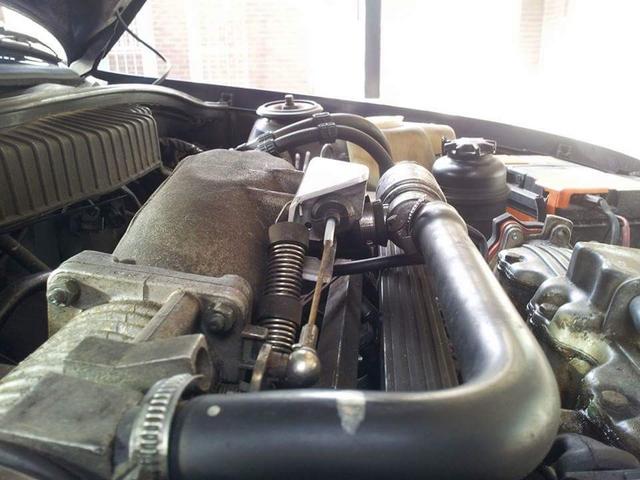
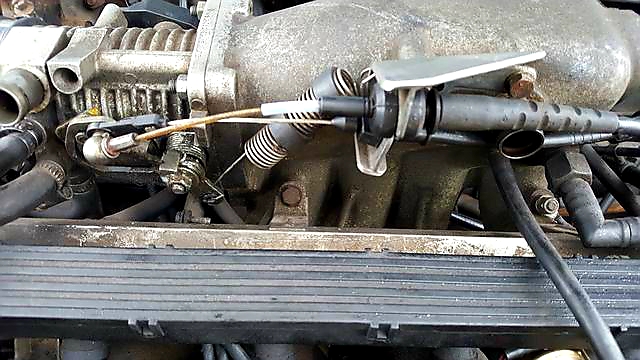
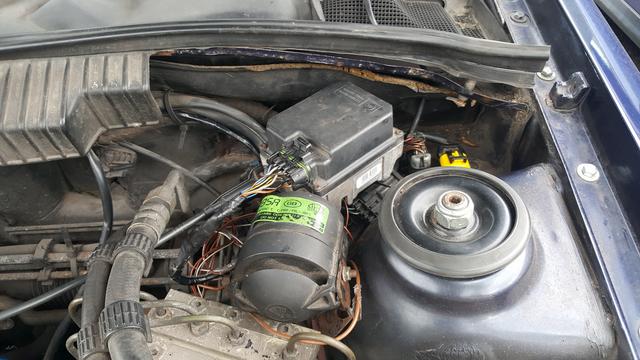
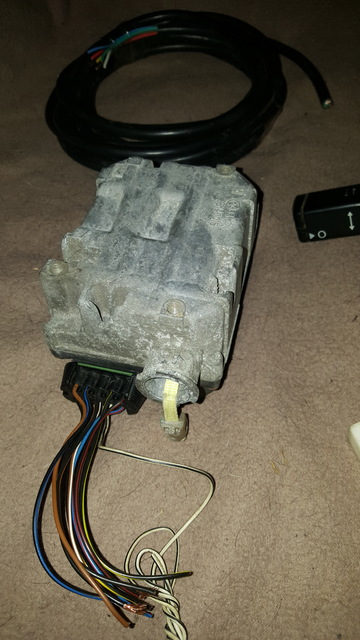
For me the hardest task is deciding where to mount the control module or Cruise Control ECU. This is up to your own poetic license.
On the whole, the process and wiring is identical, except that there are two different sets of modules.
You guessed it 4-pot and V6.
This is relevant as the speed pulses for a V6 are different to those for a standard 4 cylinder car.
Using the wrong module will cause the car to only allow cruise to engage at the wrong speed range.
From what I understand, the wiring for all modules between 1995 and 2002 are the same, however approx 2000 onward saw the use of fly-by-wire electronics, so wiring information may vary slightly dependent upon where you look in books and on-line.
From what I have read in various places, it appears that diesel fuelled Vectras and Omega had the cruise control built into the ECU, so no need for a separate module.
For my installation, I am using a 1995 4 Cylinder Vectra-B module.
Also - again, because it is me, I will be looking at ALL the wires in the system, not just the bare essentials.
I have a manual box (F18) on my car, but if you have an auto, then don't worry - I will post up the auto box wire information.
So to start with, I will post up all the wiring diagrams and connector views.
For information, the standard notation for Cruise Control is "CRC".
Do not confuse this with "CC", as this is for Check Control.
If you have a Haynes manual, then standard notations are.
AT = Auto Transmission
CLS= Clutch Switch
DIAG = Diagnostic Connector
INS = Instrument Cluster
MT = Manual Transmission
SLS = Stop Light Switch (Obviously brake light switch)
WEG = Road Speed Signal (Weg is German for wheel)
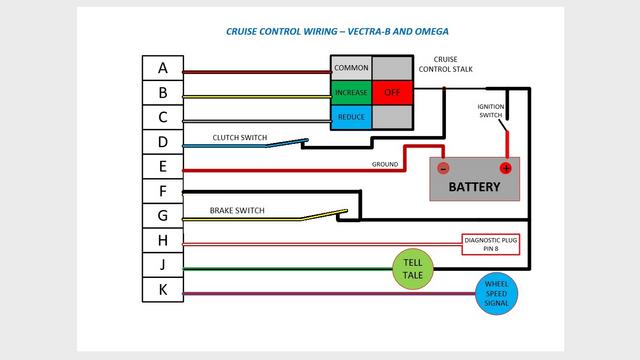
Firstly my simple-pimple diagram.
Note that N/C means the switch is normally closed (cuts the circuit when the switch is operated).
N/O means the switch is normally open (closes / makes the circuit when the switch is operated).
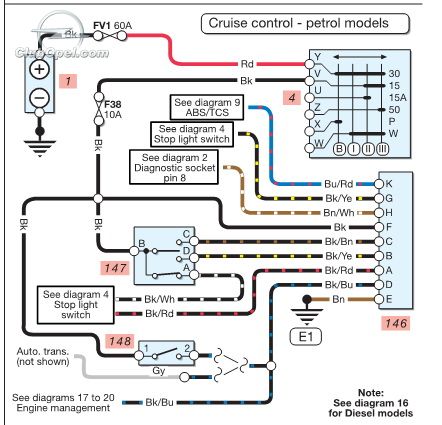
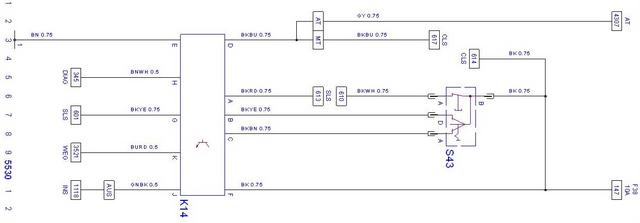
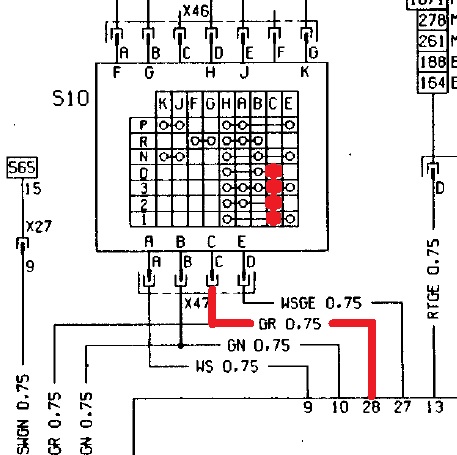
An early Omega-B Haynes Diagram
A Later Haynes Diagram
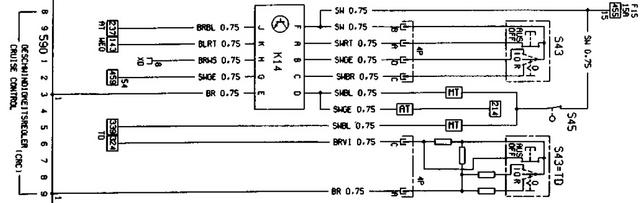
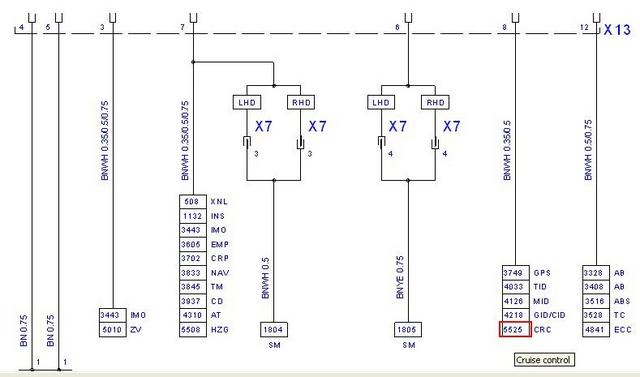
The TIS2000 Diagram for a Vectra-B
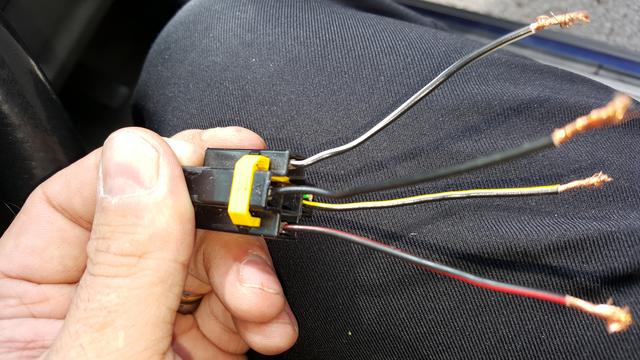
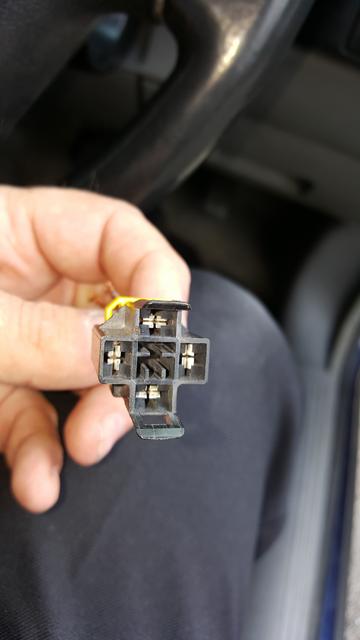
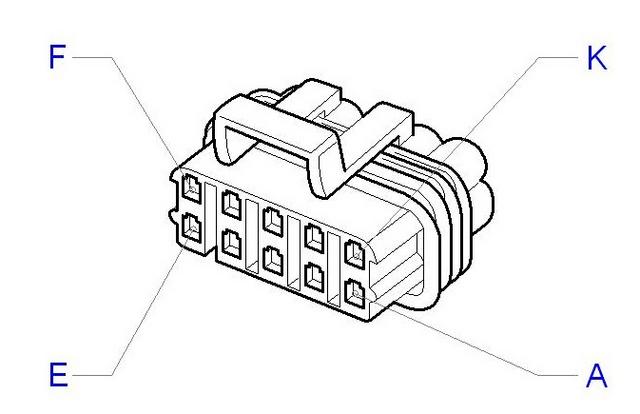
Now for the Connectors!!
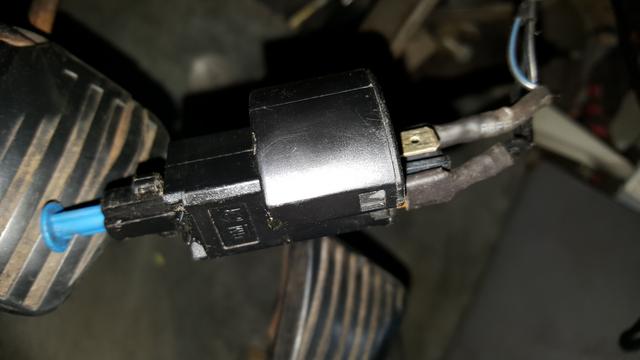
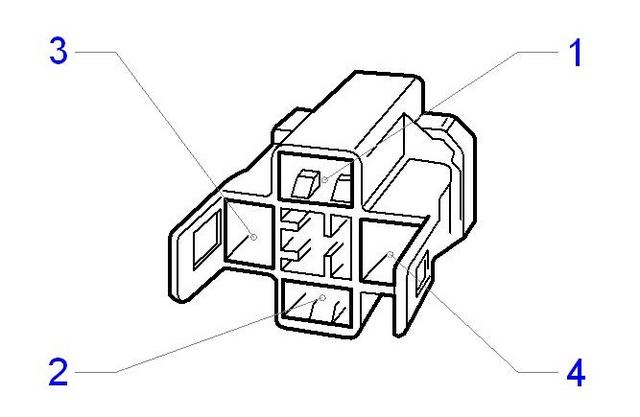
Here is a picture of the parts that you need.
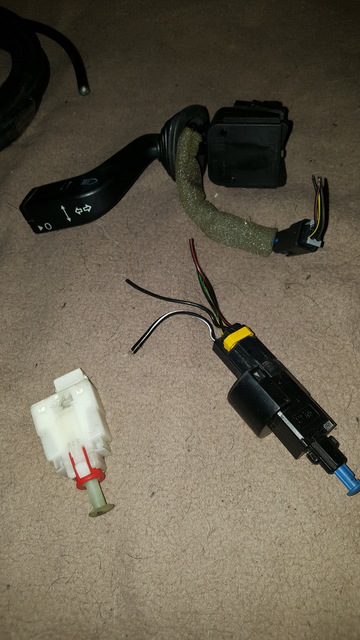
The main ten pin connector, which is the same as the ALDL diagnostic plug fitted all cars upto 1994..and phased out completely by 1996.
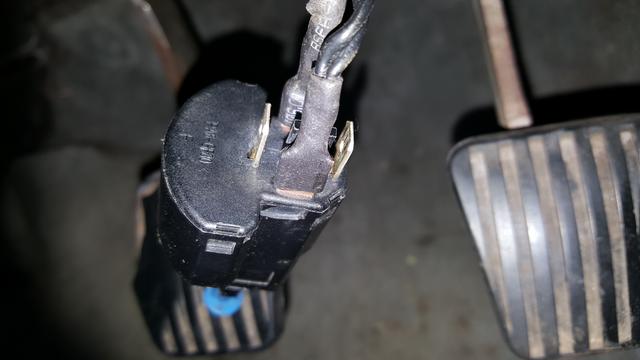
The brake switch.
Use the existing brake switch, and join the wire from module pin G to the black / yellow wire of the switch.
The 4 pin brake switch. (Use this for the Clutch Switch...
And the brake switch circuit.
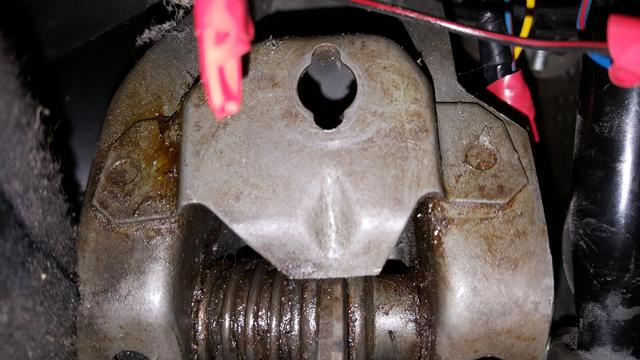
The clutch switch.
Use the 4 pin brake switch for your clutch switch.
Ignore the white clutch switch in the image above. It will not fit a Cavalier.
Here is the wiring diagram for the switch.
In my diagram I said that the switch is normally open.
But the diagram below shows a normally closed switch. Both are sort of correct, as the switch at rest is an open circuit, however when the clutch pedal is at rest, it is pressing the switch into the closed position, due to the location of the switch in relation to the clutch pedal pivot point.
So the simple rule for this is - as we are wiring into a Cavalier, use two opposing pins in the clutch switch.
You will see a plastic "T" shaped peg at the bottom of the switch.
We want the pins above and below the "T" peg. The two pins either side can be ignored.
The Stalk Switches.
The Cruise buttons on the stalk have a separate 4-wire flying lead.
Now in one of the diagrams (The official TIS2000 image), there is a bit of a blooper where it states that two pins are identified as pin A.
Ignore this, as there are pins A, B, C and D in the stalk connector.
Just use my colour diagram above to wire this up. (The coloured blocks in my diagram match the colours of the wires within the stalk flying lead)
If you have an Auto-Box, then you need to connect the grey wire from the auto box switch in place of the clutch switch connection (It prevents the cruise from being engaged if not in one of the forward drive settings).
For clarity, this is module pin D
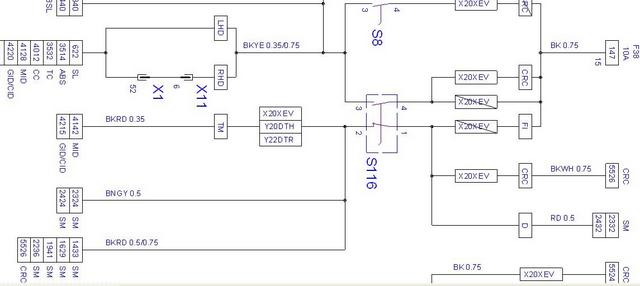
So first the schematic for the Vectra-B
And the grey wire as fitted to the Cavalier / Vectra-A
Now then - Two wires that people never seem to fit.
Diangostic Wire.
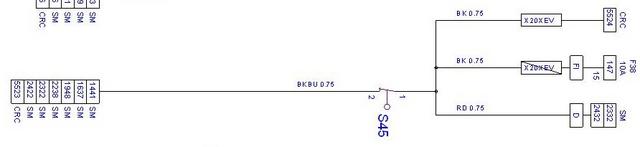
The most relevant if things go pear shaped is the diagnostic wire. Pin H
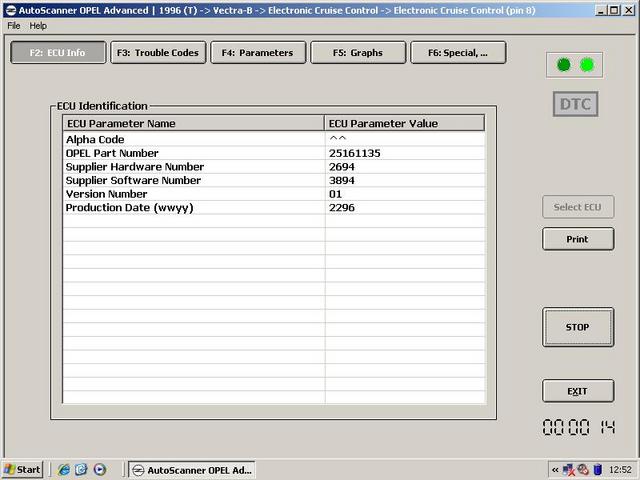
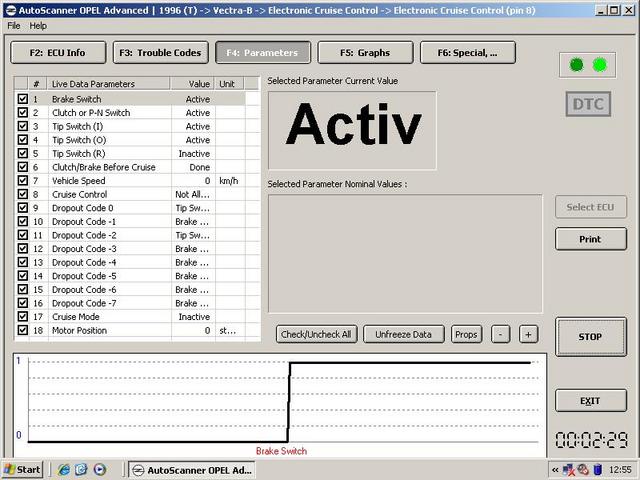
This will go to pin 8 of a 16 pin EOBD connector, to allow connection of your friendly Tech 2, OpCom / Vauxcom or AutoScanner diagnostic / programming tool. (Again this is the Vectra B schematic). It is possible to connect a test tool to your car, as long as you use: -
Pin 16 = +12 volt wire,
Pin 4 and / or pin 5 = ground wire(s) and
Pin 8 = the diagnostic wire.
The diagram below shows the connections to pins 4,5 and 8 of the 16 pin connector.
Dash Light
The final wire is the dash tell tale wire. Pin J
For some reason, in the Vectra-B, this was only fitted to "Australia" models. There is no mention at all in the Omega listing. Very odd.
Anyway - general gist is to have an ignition live supply to the tell tale bulb, and then the other wire is connected to the cruise control module.
My colour diagram shows this as wired independently from the instrument cluster.
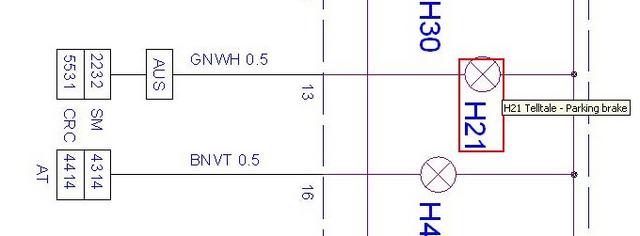
If you were using the instrument cluster, then the cruise wire is connected to the hand brake tell tale pin.
This is the diagram below if connecting to the dash. (Vectra-B pin number shown)
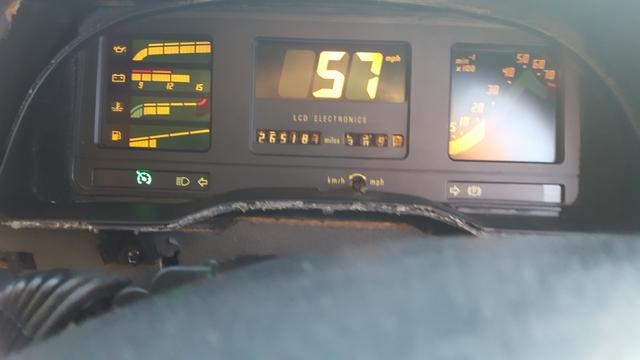
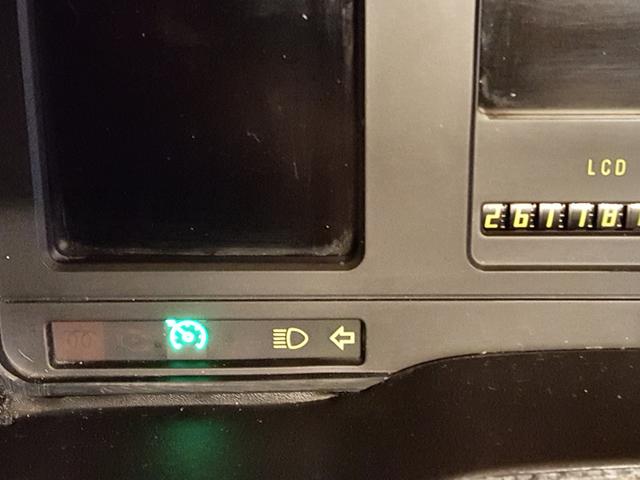
This is my tell tale wired in to my Astra GTE Digi Dash.
The emblem is from a Vectra-C speedo face sticker.
I will continue this thread as my installation progresses...
Stay tuned.
There are many other How 2's around covering this project / adaptation / Upgrade.
This one can be discussed here: -
viewtopic.php?f=15&t=16368
There is one on here that Squig wrote back in the day, which was for his V6 Cavalier, and you can use this to look at how he physically installed it into his car.
Squigs V6 Cruise Install.
viewtopic.php?f=70&t=2263
For me the hardest task is deciding where to mount the control module or Cruise Control ECU. This is up to your own poetic license.
On the whole, the process and wiring is identical, except that there are two different sets of modules.
You guessed it 4-pot and V6.
This is relevant as the speed pulses for a V6 are different to those for a standard 4 cylinder car.
Using the wrong module will cause the car to only allow cruise to engage at the wrong speed range.
From what I understand, the wiring for all modules between 1995 and 2002 are the same, however approx 2000 onward saw the use of fly-by-wire electronics, so wiring information may vary slightly dependent upon where you look in books and on-line.
From what I have read in various places, it appears that diesel fuelled Vectras and Omega had the cruise control built into the ECU, so no need for a separate module.
For my installation, I am using a 1995 4 Cylinder Vectra-B module.
Also - again, because it is me, I will be looking at ALL the wires in the system, not just the bare essentials.
I have a manual box (F18) on my car, but if you have an auto, then don't worry - I will post up the auto box wire information.
So to start with, I will post up all the wiring diagrams and connector views.
For information, the standard notation for Cruise Control is "CRC".
Do not confuse this with "CC", as this is for Check Control.
If you have a Haynes manual, then standard notations are.
AT = Auto Transmission
CLS= Clutch Switch
DIAG = Diagnostic Connector
INS = Instrument Cluster
MT = Manual Transmission
SLS = Stop Light Switch (Obviously brake light switch)
WEG = Road Speed Signal (Weg is German for wheel)
Firstly my simple-pimple diagram.
Note that N/C means the switch is normally closed (cuts the circuit when the switch is operated).
N/O means the switch is normally open (closes / makes the circuit when the switch is operated).
An early Omega-B Haynes Diagram
A Later Haynes Diagram
The TIS2000 Diagram for a Vectra-B
Now for the Connectors!!
Here is a picture of the parts that you need.
The main ten pin connector, which is the same as the ALDL diagnostic plug fitted all cars upto 1994..and phased out completely by 1996.
The brake switch.
Use the existing brake switch, and join the wire from module pin G to the black / yellow wire of the switch.
The 4 pin brake switch. (Use this for the Clutch Switch...
And the brake switch circuit.
The clutch switch.
Use the 4 pin brake switch for your clutch switch.
Ignore the white clutch switch in the image above. It will not fit a Cavalier.
Here is the wiring diagram for the switch.
In my diagram I said that the switch is normally open.
But the diagram below shows a normally closed switch. Both are sort of correct, as the switch at rest is an open circuit, however when the clutch pedal is at rest, it is pressing the switch into the closed position, due to the location of the switch in relation to the clutch pedal pivot point.
So the simple rule for this is - as we are wiring into a Cavalier, use two opposing pins in the clutch switch.
You will see a plastic "T" shaped peg at the bottom of the switch.
We want the pins above and below the "T" peg. The two pins either side can be ignored.
The Stalk Switches.
The Cruise buttons on the stalk have a separate 4-wire flying lead.
Now in one of the diagrams (The official TIS2000 image), there is a bit of a blooper where it states that two pins are identified as pin A.
Ignore this, as there are pins A, B, C and D in the stalk connector.
Just use my colour diagram above to wire this up. (The coloured blocks in my diagram match the colours of the wires within the stalk flying lead)
If you have an Auto-Box, then you need to connect the grey wire from the auto box switch in place of the clutch switch connection (It prevents the cruise from being engaged if not in one of the forward drive settings).
For clarity, this is module pin D
So first the schematic for the Vectra-B
And the grey wire as fitted to the Cavalier / Vectra-A
Now then - Two wires that people never seem to fit.
Diangostic Wire.
The most relevant if things go pear shaped is the diagnostic wire. Pin H
This will go to pin 8 of a 16 pin EOBD connector, to allow connection of your friendly Tech 2, OpCom / Vauxcom or AutoScanner diagnostic / programming tool. (Again this is the Vectra B schematic). It is possible to connect a test tool to your car, as long as you use: -
Pin 16 = +12 volt wire,
Pin 4 and / or pin 5 = ground wire(s) and
Pin 8 = the diagnostic wire.
The diagram below shows the connections to pins 4,5 and 8 of the 16 pin connector.
Dash Light
The final wire is the dash tell tale wire. Pin J
For some reason, in the Vectra-B, this was only fitted to "Australia" models. There is no mention at all in the Omega listing. Very odd.
Anyway - general gist is to have an ignition live supply to the tell tale bulb, and then the other wire is connected to the cruise control module.
My colour diagram shows this as wired independently from the instrument cluster.
If you were using the instrument cluster, then the cruise wire is connected to the hand brake tell tale pin.
This is the diagram below if connecting to the dash. (Vectra-B pin number shown)
This is my tell tale wired in to my Astra GTE Digi Dash.
The emblem is from a Vectra-C speedo face sticker.
I will continue this thread as my installation progresses...
Stay tuned.