
The discussion thread is located here.
viewtopic.php?f=15&t=16699
BLOWER MOTOR ISSUES.
BACKGROUND INFORMATION / CAUSES.
MECHANICAL ISSUES. -
Motor bearings getting dry / stiff.
Symptoms of a blower motor about to die due to duff bearings.
1 - Most obvious is a continual howl, screach or generally loud noise coming from the blower motor.
2 - The fan sounds slow or sluggish.
3 - The fan randomly decides not to run, but usually after a cold start or standing.
My issue was that I had an intermittent chirping noise for just a few seconds, normally on a cold start.
(This could easily be confused with a slipping alternator drive belt if you have the older style 'V' belt.
Later cars had a sprung tensioner and multi-vee flat drive belt and will only make a noise if one of the pulley bearings are worn).
If left unattended, the noise gets rougher or louder and the motor eventually seizes up due to dry bearings.
The most appropriate "fix" is to replace the whole blower motor assembly, but this is hugely expensive.
An almost free fix is detailed below, however this is not guaranteed to solve your issue, depending on how bad yours has managed to get.
Removing, Lubing / Fixing a Blower Motor
Moderator: Robsey
Re: Removing, Lubing / Fixing a Blower Motor
ELECTRICAL ISSUES.
FAN SUDDENLY STOPS WORKING OR DOES NOT WORK AS EXPECTED.
FUSE BLOWN.
This is the least likely thing to fail on the Cavalier.
For air-con cars, the fuse is number 38 in the engine bay fuse box.
For non air-con cars, the fuse is number 4 in the dash panel fuse box.
Obviously a blown fuse cuts all power from the blower motor, and so none of the speeds will work.
BURNT / MELTED FUSE HOLDER.
This indicates very hot wiring due to a high current load caused by a stiff motor or very high resistance in the fuse holder contacts themselves.
The only repair is to make up a new "inline" fused connection, cutting out the original fuse holder altogether.
FAULTY / DIRTY BLOWER MOTOR SWITCH.
Usually only one or two speeds will work.
The cause is the copper rub plates inside the switch are dirty, and so not conducting electricity.
Repair is by means of stripping the switch down and cleaning all the copper strips inside.
RESISTOR PACK RESISTORS FAULTY.
It is very easy to confuse this with a faulty switch as only some speeds will work.
However a possible indicator could be that some of the fan switch positions give the same blower motor speed, and therefore air flow through the vents.
The only repair is a replacement resistor pack.
RESISTOR PACK THERMAL FUSE FAILED.
By far the most likely cause of a dead blower motor.
Always due to a blower motor's bearings becoming dry or stiff, resulting in the resistor pack overheating.
Standard "burn out" temperature is 216°C.
To confirm a failed thermal fuse, briefly short across the fuse with a piece of stout wire.
If the fan suddenly springs into life (with the ignition on), then the thermal fuse is indeed burnt out.
There are two potential repairs.
A complete resistor pack, costing around £20, or replace the thermal fuse for a couple of quid.
IN THE CASES OF A FAILED FUSE, THERMAL FUSE OR MELTED FUSE HOLDER -
Repair or replace the motor if it is suspect, otherwise the new pack or fuse will simply fail again very quickly.
Re: Removing, Lubing / Fixing a Blower Motor
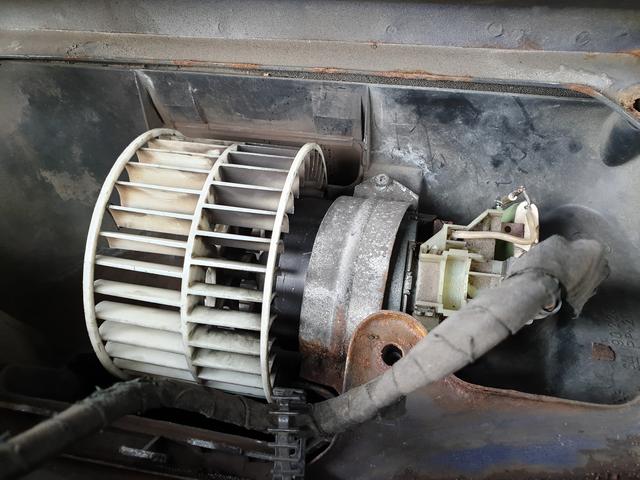
GETTING THE BLOWER MOTOR OUT FOR INSPECTION.
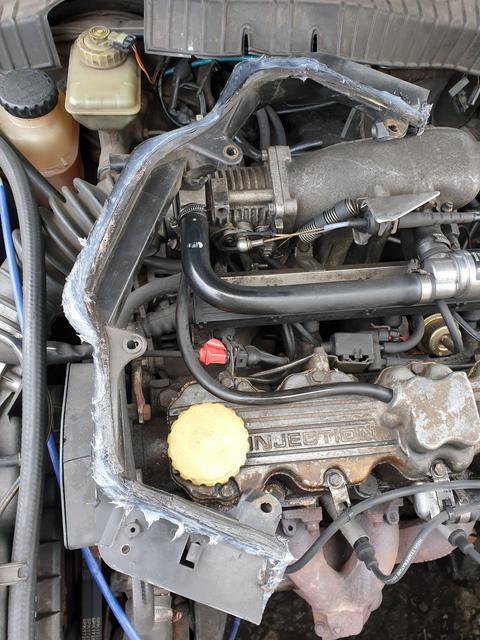
The motor is located under the plastic scuttle panel at the rear of the engine bay.
The official method is to completely remove the scuttle panel, which would also require the removal of the wiper arms, and officially the wiper motor / linkage assembly too.
But I avoided this, as it isn't much more fiddly to get the blower motor out with the rear part of the scuttle panel in place.
1 - Remove the rubber seal / strip from the front of the scuttle panel.
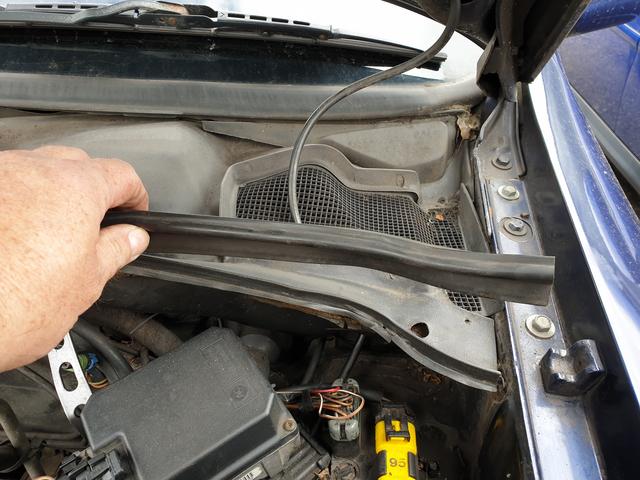
Set this aside.
2 - lift up the front edge of the scuttle panel from the bulkhead of the car.
To show this lot hiding underneath.

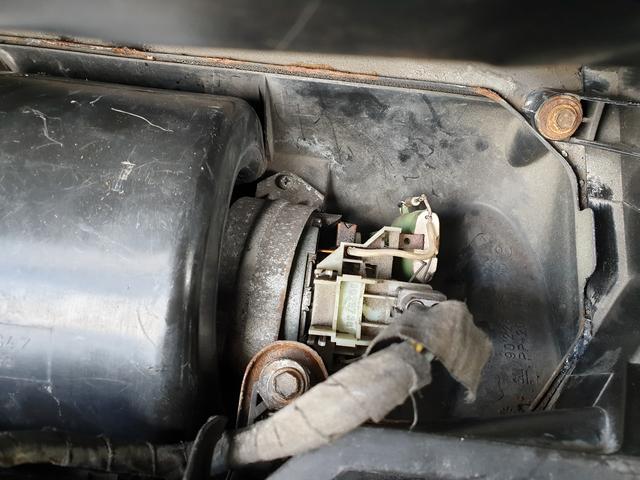
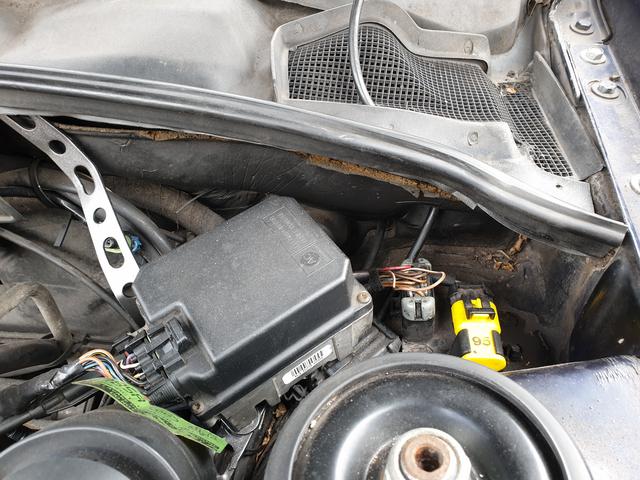
3 - Unplug the electrical connector from the resistor pack. And tuck safely out of the way.
4 - Using an 8mm socket on a modestly long extension, undo 4 hex head bolts that locate a water deflector panel.
The two on the UK passenger side are shown here.
Remove the deflector from the scuttle channel and set aside out of the way.
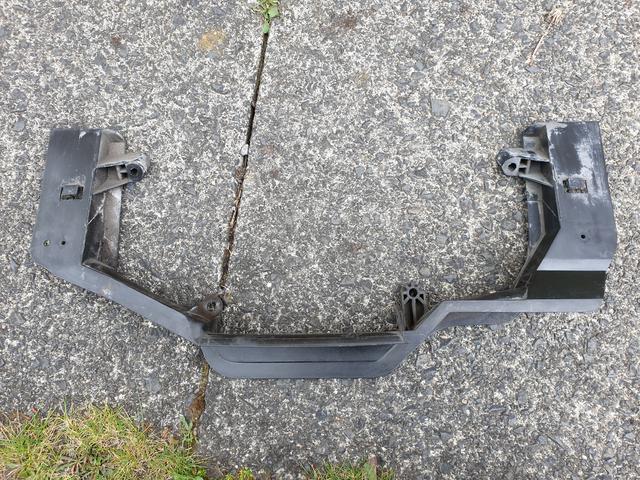
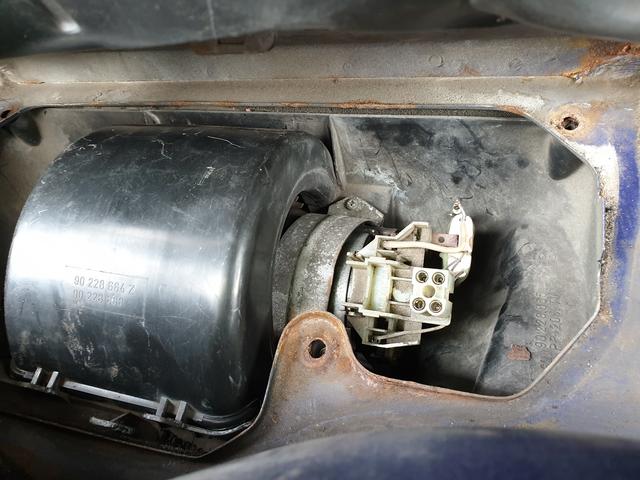
5 - Remove the fan assembly cover/ cowling.
This is simply clipped into place.
Two pairs of tangs on the front of the cowling. Just gently lever these clear of the location frame and lift up and back to unclip from its rear location slot.
Wriggle the cowling out of the scuttle channel.
6 - Last job is to unscrew two Philips number 2 self tapping screws to realease the bowed motor retaining clamp.
Once the clamp is removed and set aside, the whole motor assembly complete with fan can be wriggled out of the scuttle channel.
Take the motor with the resistor pack still attached, to a place where you can work on them.
The motor is located under the plastic scuttle panel at the rear of the engine bay.
The official method is to completely remove the scuttle panel, which would also require the removal of the wiper arms, and officially the wiper motor / linkage assembly too.
But I avoided this, as it isn't much more fiddly to get the blower motor out with the rear part of the scuttle panel in place.
1 - Remove the rubber seal / strip from the front of the scuttle panel.
Set this aside.
2 - lift up the front edge of the scuttle panel from the bulkhead of the car.
To show this lot hiding underneath.
3 - Unplug the electrical connector from the resistor pack. And tuck safely out of the way.
4 - Using an 8mm socket on a modestly long extension, undo 4 hex head bolts that locate a water deflector panel.
The two on the UK passenger side are shown here.
Remove the deflector from the scuttle channel and set aside out of the way.
5 - Remove the fan assembly cover/ cowling.
This is simply clipped into place.
Two pairs of tangs on the front of the cowling. Just gently lever these clear of the location frame and lift up and back to unclip from its rear location slot.
Wriggle the cowling out of the scuttle channel.
6 - Last job is to unscrew two Philips number 2 self tapping screws to realease the bowed motor retaining clamp.
Once the clamp is removed and set aside, the whole motor assembly complete with fan can be wriggled out of the scuttle channel.
Take the motor with the resistor pack still attached, to a place where you can work on them.
Re: Removing, Lubing / Fixing a Blower Motor
Stripping and Lubing the Motor Assembly.
Read that as " Cleaning and Lubing", because GM do not intend for the motor or fan assembly to be stripped down and worked on.
They would prefer you to pay £238 for a new one.
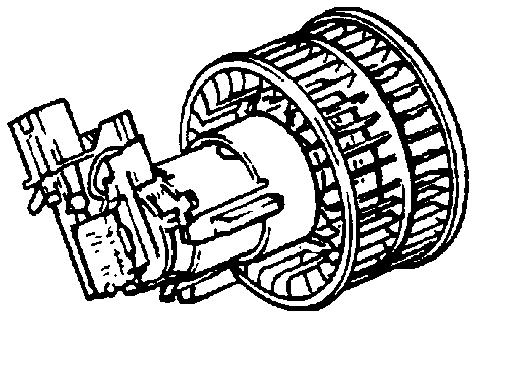
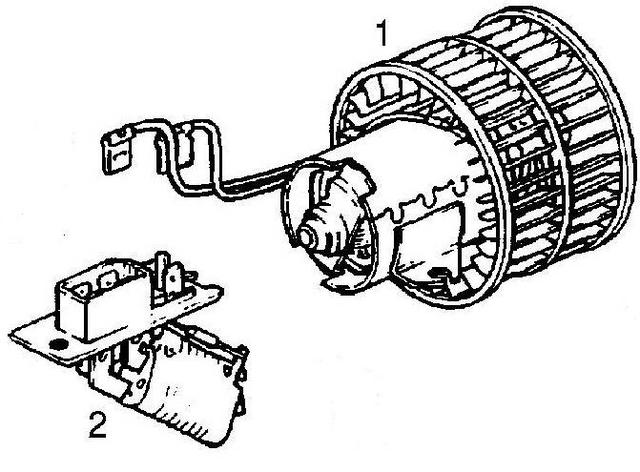
The only thing that can be removed is the resistor pack.
The resistor pack is clipped onto the motor body, and is released by squeezing two tangs - one on each side, then wriggle / pull / slide the resistor pack off the motor body.
Chances are, the fan will feel quite rough and stiff, indicating dry or worn bearings.
The bearings are enclosed, so it is hard to access them properly.
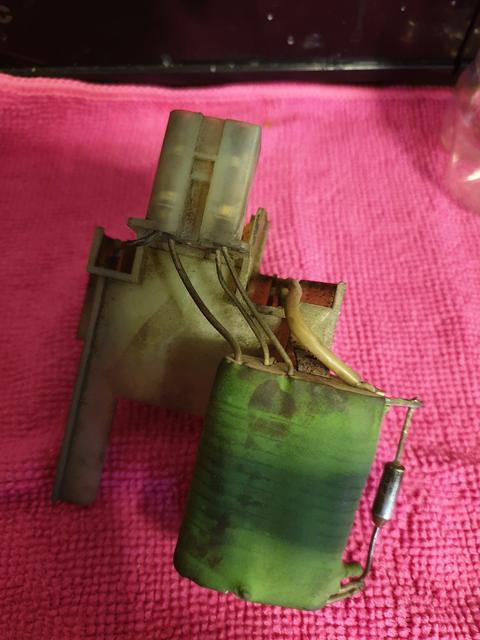
So here is my assembly.
Very black and mucky...
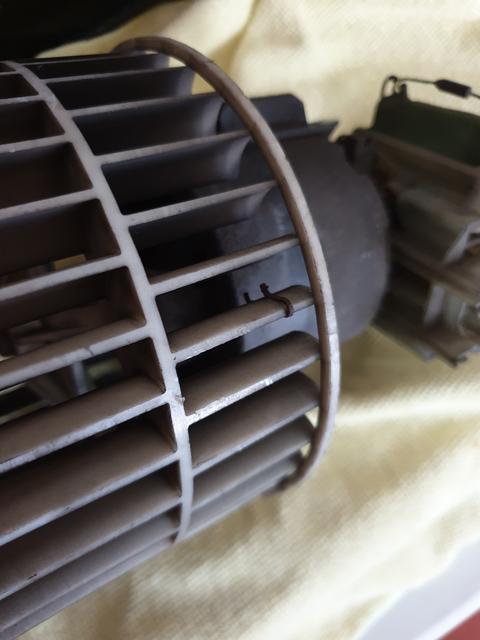
Note the little metal balance weights / staple-like clips, wrapped around the plastic blades.
Strip and clean as much dirt and crud from the motor with a pan scrubber, and rinse out any grease and dust with contact cleaner spray.
This will require a spray with a straw, so that the fluid jets out directly upon the motor spindle on both sides of both bearing assemblies. As close as you can.
Ensure it is all evaporated or drained out, before blasting the bearings with spray 3in1 oil.
I also used a q-tip / cotton bud to clean where I could.
And again spray the spindle as close to the bearings as possible.
Regularly spin the fan blades back and forth by hand to work the oil in and to hopefully free everything up.
Another spray, wipe down and drain.
The final stage was to coat the spindle and bearings with motor oil - (I used Castrol GTX).
Again using a cotton bud to drizzle oil as close to the bearings as possible).
Leave the oil to absorb / creep into the bearings overnight.
Remove any excess oil, and leave to stand the whole motor assembly on its end.
With the fan-blade 'drum' facing down.
Next day, again wipe away any dribbles or excess remnants of the oil.
Any excess oil will end up being jetisoned from the motor or fan blades, forming an oil mist, which will then end up being sprayed into the cabin.
At best the cabin will smell of oil,
At worst oily particles could be fired at your face from the air vents.
Now for another part number session.
(My car is non-aircon, which is relevant for getting the correct the resistor pack part number).
Cars upto 'L' reg, the part number for the blower motor assembly is -
90 228 667.
(For chassis numbers upto W0L000089P or W0L000087P)
Mine is an 'M'reg, so the part number is
90 464 660.
(For chassis numbers from W0L000089R or W0L00087R onwards)
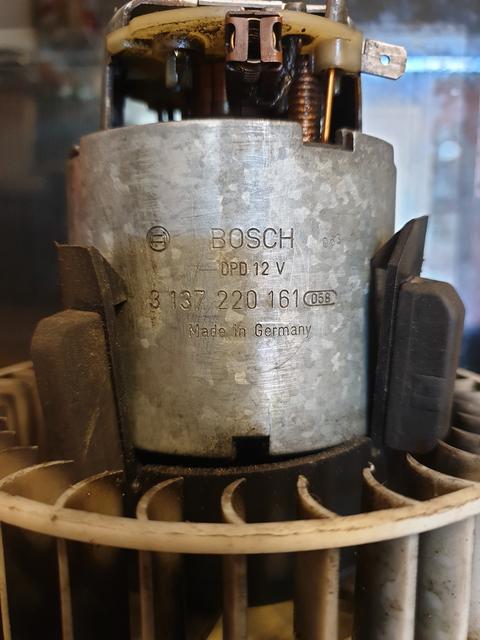
My motor should be a Bosch 3 137 220 060, according to EPC.
But as per usual my Bosch part number has to be different - 3 137 220 161.
And my non air-con resistor pack part number.
90 297 361

Read that as " Cleaning and Lubing", because GM do not intend for the motor or fan assembly to be stripped down and worked on.
They would prefer you to pay £238 for a new one.
The only thing that can be removed is the resistor pack.
The resistor pack is clipped onto the motor body, and is released by squeezing two tangs - one on each side, then wriggle / pull / slide the resistor pack off the motor body.
Chances are, the fan will feel quite rough and stiff, indicating dry or worn bearings.
The bearings are enclosed, so it is hard to access them properly.
So here is my assembly.
Very black and mucky...
Note the little metal balance weights / staple-like clips, wrapped around the plastic blades.
Strip and clean as much dirt and crud from the motor with a pan scrubber, and rinse out any grease and dust with contact cleaner spray.
This will require a spray with a straw, so that the fluid jets out directly upon the motor spindle on both sides of both bearing assemblies. As close as you can.
Ensure it is all evaporated or drained out, before blasting the bearings with spray 3in1 oil.
I also used a q-tip / cotton bud to clean where I could.
And again spray the spindle as close to the bearings as possible.
Regularly spin the fan blades back and forth by hand to work the oil in and to hopefully free everything up.
Another spray, wipe down and drain.
The final stage was to coat the spindle and bearings with motor oil - (I used Castrol GTX).
Again using a cotton bud to drizzle oil as close to the bearings as possible).
Leave the oil to absorb / creep into the bearings overnight.
Remove any excess oil, and leave to stand the whole motor assembly on its end.
With the fan-blade 'drum' facing down.
Next day, again wipe away any dribbles or excess remnants of the oil.
Any excess oil will end up being jetisoned from the motor or fan blades, forming an oil mist, which will then end up being sprayed into the cabin.
At best the cabin will smell of oil,
At worst oily particles could be fired at your face from the air vents.
Now for another part number session.
(My car is non-aircon, which is relevant for getting the correct the resistor pack part number).
Cars upto 'L' reg, the part number for the blower motor assembly is -
90 228 667.
(For chassis numbers upto W0L000089P or W0L000087P)
Mine is an 'M'reg, so the part number is
90 464 660.
(For chassis numbers from W0L000089R or W0L00087R onwards)
My motor should be a Bosch 3 137 220 060, according to EPC.
But as per usual my Bosch part number has to be different - 3 137 220 161.
And my non air-con resistor pack part number.
90 297 361
Re: Removing, Lubing / Fixing a Blower Motor
REPAIRING OR REPLACING THE RESISTOR PACK?
If your resistor pack or thermal fuse are faulty, and you do not wish to do any more faffing, that is fine.
A new resistor pack should effect a full repair, and simply needs to be fitted in place of the old one.
REPAIRING THE RESISTOR PACK BY REPLACING THE THERMAL FUSE.
If you have burnt out the thermal fuse,
and like me you are too tight to buy a new one,
here is how I repaired mine.
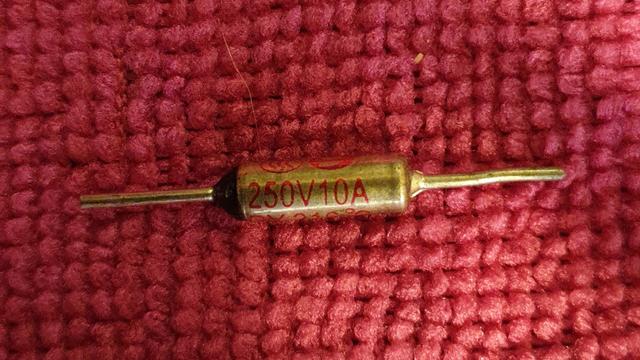
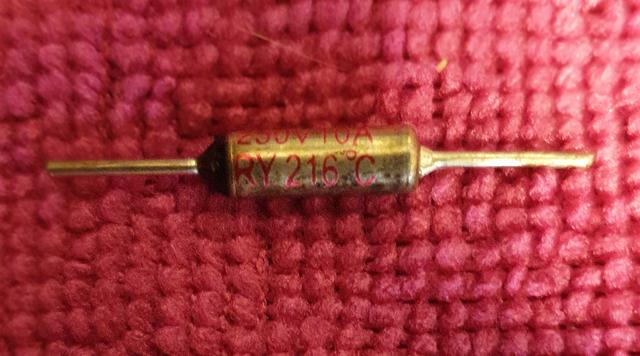
Firstly the Thermal Fuse details.
Here is a thermal fuse intended for the job.
The markings state that it is rated at 250 volts, 10 amps and 216°C
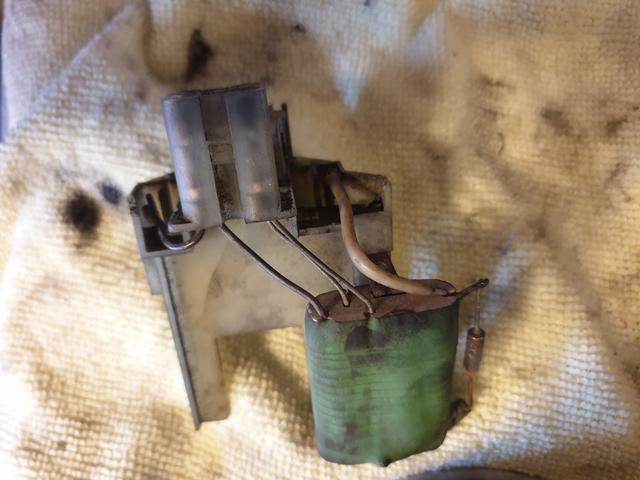
So here is a non air-con resistor pack.
Cut out the duff thermal fuse.
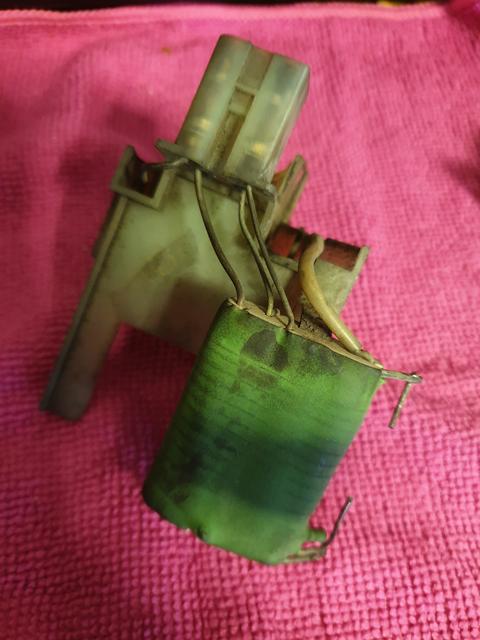
Now to fit a new thermal fuse.
The usual prescribed method for fixing a new fuse to the resistor pack is to use the internal metal terminals from a terminal block, or "choccy block".
I tried this but the terminals were too big.
(I used terminals from a 15 amp rated block)
They looked clumsy, and may slow the heating of the thermal fuse due to the big bulky metal blocks absorbing some of the heat in the resistor pack.
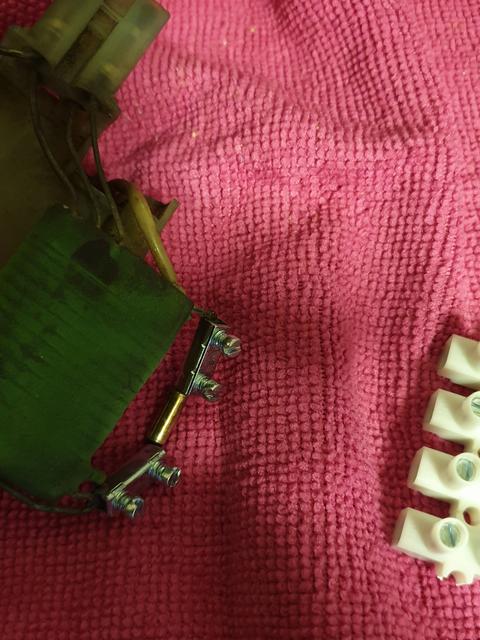
So I did a re-think on this, and decided to remove the clamp blocks.
The new repair used 4.7mm male spade crimps to join the fuse to the resistor pack.
One was only the crimp section (no male spade), but the other spade was complete.
I then soldered the crimps in place to prevent them from shaking loose.

Not too shabby in my opinion.
Ready for refitting to the jalopy.
If your resistor pack or thermal fuse are faulty, and you do not wish to do any more faffing, that is fine.
A new resistor pack should effect a full repair, and simply needs to be fitted in place of the old one.
REPAIRING THE RESISTOR PACK BY REPLACING THE THERMAL FUSE.
If you have burnt out the thermal fuse,
and like me you are too tight to buy a new one,
here is how I repaired mine.
Firstly the Thermal Fuse details.
Here is a thermal fuse intended for the job.
The markings state that it is rated at 250 volts, 10 amps and 216°C
So here is a non air-con resistor pack.
Cut out the duff thermal fuse.
Now to fit a new thermal fuse.
The usual prescribed method for fixing a new fuse to the resistor pack is to use the internal metal terminals from a terminal block, or "choccy block".
I tried this but the terminals were too big.
(I used terminals from a 15 amp rated block)
They looked clumsy, and may slow the heating of the thermal fuse due to the big bulky metal blocks absorbing some of the heat in the resistor pack.
So I did a re-think on this, and decided to remove the clamp blocks.
The new repair used 4.7mm male spade crimps to join the fuse to the resistor pack.
One was only the crimp section (no male spade), but the other spade was complete.
I then soldered the crimps in place to prevent them from shaking loose.
Not too shabby in my opinion.
Ready for refitting to the jalopy.
Re: Removing, Lubing / Fixing a Blower Motor
REFITTING IT ALL AGAIN.
As such, it is mainly a matter of the standard Haynes term "a reversal of the removal procedure"
But I will cover it properly.
1 - Refit the resistor pack to the blower motor.
2 - Refit the motor into the scuttle channel, noting the presence of the three rectangular rubber location boots.
One points down into a box like recess, and there are rectangular cut-outs in-front and behind the motor's "locations" within the scuttle channel.
Wriggle the motor into position, ensuring that you push the rubber boots into their sockets.
Re-fit and screw down the motor body location clamp, using the two Philips number 2 screws.
Refit the the deflector casting.
Remember to ensure that the seal strip underneath is intact.
Mine was cracked, so I smeared a generous bead of Silicone bathroom seal around the outer edges of the original seal strip.
Not too much, so that no loose gel bits get sucked into the fan intake.
Screw down into place with the four hex head self tapping screws with your 8mm socket on a long extension.
Re-clip the fan casing into place.
Insert the rear part into it's location slot, then lower the front into place until the tangs at the front click into place.
Connect up the power loom to the resistor pack.
Ensure that the cable is routed as before and clipped into place, to avoid chafing, vibration or contact with the wiper linkage mechanism.
Then you can re-locate your scuttle panel so that it sits over the front of the scuttle channel.

Last of all, fit the rubber seal over the rib across the front of the scuttle panel.
Job done.
As such, it is mainly a matter of the standard Haynes term "a reversal of the removal procedure"
But I will cover it properly.
1 - Refit the resistor pack to the blower motor.
2 - Refit the motor into the scuttle channel, noting the presence of the three rectangular rubber location boots.
One points down into a box like recess, and there are rectangular cut-outs in-front and behind the motor's "locations" within the scuttle channel.
Wriggle the motor into position, ensuring that you push the rubber boots into their sockets.
Re-fit and screw down the motor body location clamp, using the two Philips number 2 screws.
Refit the the deflector casting.
Remember to ensure that the seal strip underneath is intact.
Mine was cracked, so I smeared a generous bead of Silicone bathroom seal around the outer edges of the original seal strip.
Not too much, so that no loose gel bits get sucked into the fan intake.
Screw down into place with the four hex head self tapping screws with your 8mm socket on a long extension.
Re-clip the fan casing into place.
Insert the rear part into it's location slot, then lower the front into place until the tangs at the front click into place.
Connect up the power loom to the resistor pack.
Ensure that the cable is routed as before and clipped into place, to avoid chafing, vibration or contact with the wiper linkage mechanism.
Then you can re-locate your scuttle panel so that it sits over the front of the scuttle channel.
Last of all, fit the rubber seal over the rib across the front of the scuttle panel.
Job done.
Re: Removing, Lubing / Fixing a Blower Motor
Now test your handy-work.
Fan to speed 1 and turn on the ignition.
Then change up the speeds one by one until it is going full belt.
Watch for any crud or dust being blown out of the vents (into your face / eyes), caused by the sudden increase in the rush of air from the vents.
I did this on mine, and noted a huge improvement in air speed / output through the vents.
And no rude noises or vibrations.
So in summary, lubricating the motor bearings can give significant improvements,
And save you spending £238 on a new motor assembly.
And an 80p thermal fuse can save you spending £20+ on a resistor pack.
All in, about an hours work, if you do a good thorough lubrication job on the bearings.
15 minutes to remove everything from the car.
30 minutes to lube the bearings.
(Even better to leave to soak in oil over night).
15 minutes to replace the thermal fuse.
15 minutes to refit everything.
Quick, cheap and very satisfying.
Re: Removing, Lubing / Fixing a Blower Motor
As a further update,
There are 4 resistor packs available for the Cavalier.
Two for standard heating and ventilation.
And Two for Air-Conditioning equipped vehicles.
There are also 5 versions of motor assembly.
Two for standard heating and ventilation,
And three for Air Conditioning units.
-------------------------------------------------
For Standard Heating And Ventilation.
Resistor Packs -
90 297 361 is upto mid 1993 (end of K reg)
Upto chassis numbers -
-P1155308
-P5236501
-P7599283
90 486 793 is from mid 1993 (L reg onwards)
From chassis numbers -
P1155309-
P5236502-
P7599284-
Motor Assemblies.
Motor Assembly = 90 228 667
Chassis Number Range
-P1155308
-P5236501
-P7599283
Motor Assembly = 90 464 660
Chassis Number Range
P1155309-
P5236502-
P7599284-
----------------------------------------------------
For Air Conditioning.
- with the angled resistor pack,
Resistor Packs.
90 228 759 is upto1993 - Upto P chassis number
Upto chassis numbers -
-P1999999
-P5999999
-P7999999
90 450 998 ( replaced with 90 383 817 )
is from 1994 - R chassis number onwards.
From Chassis Numbers -
R1000001-
R5000001-
P7500001- although this could be an error.
Motor Assemblies.
Motor Assembly = 90 228 758
Chassis Number Range
-P1999999
-P5999999
-P7999999
Motor Assembly = 90 451 605
Chassis Number Range
R1000001- R1234567
R5000001- R5234567
R7500001- R7523456
Motor Assembly = 90 506 193 (NLS.- USE 90 589 511)
Chassis Number Range
R1234568-
R5234568-
R7523457-
Be aware though, that online sellers get confused between part numbers.
I have seen air-con resistor packs listed under non air-con part numbers.
And late resistor packs with early part numbers.
Re: Removing, Lubing / Fixing a Blower Motor
Replacing the blower motor complete.
If like me, the motor has suffered dried bearings a few times,
The only proper fix is a replacement motor assembly, that usually comes with a resistor pack.
Quoting another thread: -
I bought a German aftermarket fan for my 1994 non-aircon jalopy.
One word of warning...
For some reason aftermarket fans have slightly longer fan drums.
You will probably have to modify the black plastic casings to fit the longer drums.
The plastic is quite easy to cut, so not a biggy.
Re: Removing, Lubing / Fixing a Blower Motor
Trimming the cowling.
This trimming is required where the casing curls back in on itself to enclose the ends of the drum blades.
I removed about 3mm (1/8th inch) of plastic on all casings to clear the drum.
It is easier to understand when you are there looking at it.
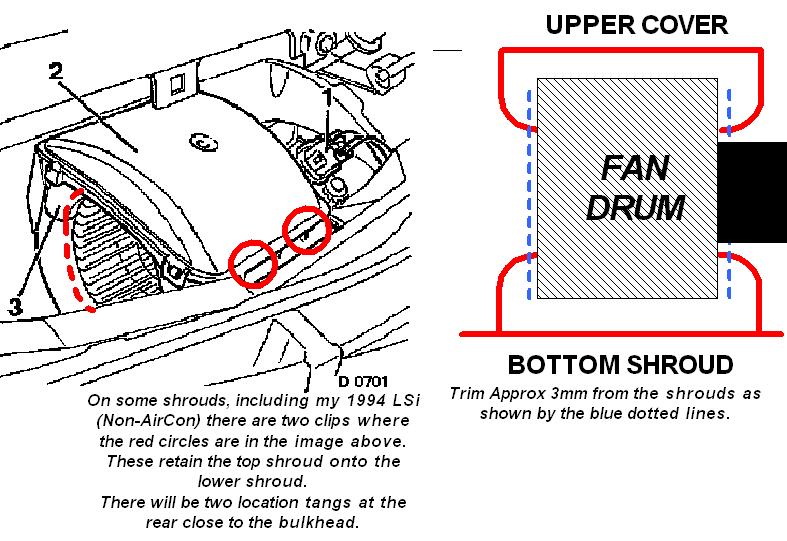
If you do not, the casing rubs on the drum ends causing a louder howl, or seizes the drum altogether.
As for tooling, I used edge cutters and worked my way from front to back, and then tidied it all up with a file / emery cloth and then clean up with a wet wipe or similar.
I am sure this is where a dremell would come in handy with a rotary burr, carburundum tip or a small cutting disk.
Despite my way sounding a bit rough-ass, it looks okay and sounds okay. There is a bit of motor drone at top speed, but I presume that is due to thinner looking rubber boots on the three location ribs.
Choose the best three rubber boots from the two motors.
If I was mounting the day before, I may be tempted to put a dab of bathroom seal silicone in the sockets and perhaps the boots to remove any air gap around / in the boots.
I said the day before, because I would not want to "use the motor in anger" whilst the silicone is still soft / semi-liquid.
Just run it long enough to settle the motor in place.
This trimming is required where the casing curls back in on itself to enclose the ends of the drum blades.
I removed about 3mm (1/8th inch) of plastic on all casings to clear the drum.
It is easier to understand when you are there looking at it.
If you do not, the casing rubs on the drum ends causing a louder howl, or seizes the drum altogether.
As for tooling, I used edge cutters and worked my way from front to back, and then tidied it all up with a file / emery cloth and then clean up with a wet wipe or similar.
I am sure this is where a dremell would come in handy with a rotary burr, carburundum tip or a small cutting disk.
Despite my way sounding a bit rough-ass, it looks okay and sounds okay. There is a bit of motor drone at top speed, but I presume that is due to thinner looking rubber boots on the three location ribs.
Choose the best three rubber boots from the two motors.
If I was mounting the day before, I may be tempted to put a dab of bathroom seal silicone in the sockets and perhaps the boots to remove any air gap around / in the boots.
I said the day before, because I would not want to "use the motor in anger" whilst the silicone is still soft / semi-liquid.
Just run it long enough to settle the motor in place.