Retro-Fitting Front Fog Lights.

An index of useful guides designed to help you care for and maintain your Mk3 Cavalier

Moderator: Robsey

Locked
User avatar
Robsey
Club Admin
Posts: 10619
Joined: Fri Dec 12, 2008 1:42 pm
Location: East Manchester

Retro-Fitting Front Fog Lights.

Post by Robsey »

I am sure that there is a How 2 somewhere, but if not,
Well, I have written this one.

Which can be discussed here.
viewtopic.php?f=15&t=16765&p=169750

This is in response to a recent question about a pre-facelift car having front fog lights.

Vauxhall has always been a bit hit and miss between trim levels and model years as to what is fitted as standard, as an option, or not at all.

Waffle over, here goes.
------------‐----------------------------------
Before starting anything.
Remove your radiator grille.


If you have a two-pin connector taped up on each side of the grille, you have no need to add any wiring.

You simply need to fit:-
Front Fog Lights.
Front Fog Relay.
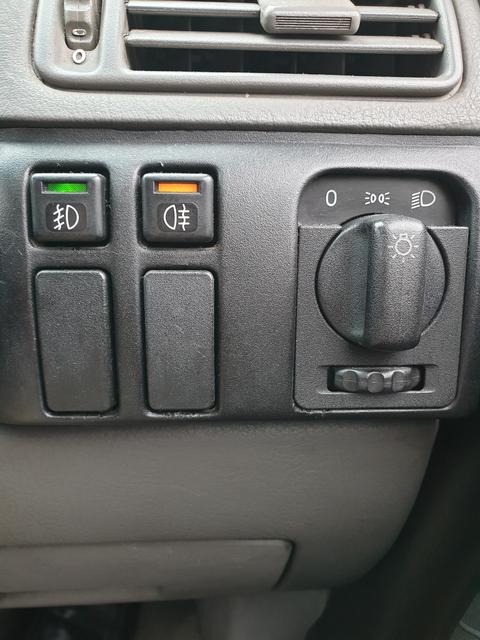
Front Fog Switch with green tell-tale light.
20 amp fuse in slot 13.

And that is it.

If the plugs are not there, sorry but you have some work to do. - Read On.
----------------------------------------------
There are three types of wiring on the Vectra-A / Cavalier where front fog lights have not been fitted.

1 - No wiring at all for front fogs.

2 - Wiring is fitted only as far as the big X 6 plug in the left foot-well kick-panel.

3 - Wiring is fitted all the way to the front bumper close to the radiator grille.

--------------------------------------------------
I have a facelift 1994 Cavalier LSi.
It was fitted with wiring down to the X6 connector in the left foot-well.

Image

Image

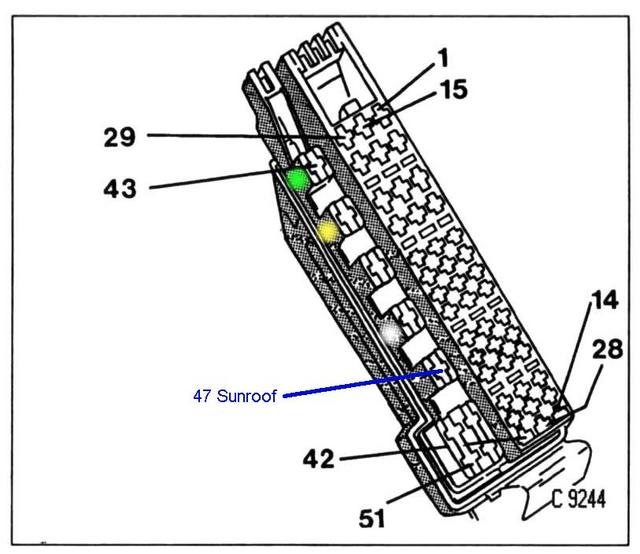
The pin you need is pin 31
3rd pin down on 3rd column from the flat side of the connector drawing.
Noting that the socket is roughly "L" shaped.

I had to add the rest of the wiring into the engine bay.
------------------------------------------------
To retro-fit front fogs with the dash wiring already present -

1 -Get a suitable length of 1.5mm black wire to reach from the X6 connector, and run this through the bulk head and forward to the left front fog light.
(Make sure it passes through a protective grommit).

2 - Join a suitable length of 1mm black wire and run this from the end of the thicker black wire (at the left fog light) to the right fog light.
This creates a "parallel circuit" for the two front fog lights.

3 - Get 2 connectors and solder and sleeve these to the end of the two black wires.
These are your 12 volt feeds to the fog lights.

4 - Get two suitable lengths of 1mm brown wire. To reach the grounding bolt on the left inner wing.

5 - Get 2 connectors and solder and sleeve these to the end of the two brown wires.
These are your ground wires for the fog lights.

6 - Connect the other ends of the brown wires to the brown inner wing bolt.

7 - Fit and connect up the fog lights.

That is the engine bay done.
‐------------------------------------------
In the Cabin, put a fuse in slot 13 rated at 20 amps (yellow fuse).

Fit a front fog switch into the slot on the dash.

Image

It is an option to fit a relay in the slot in the top right corner of the fuse panel.

Image

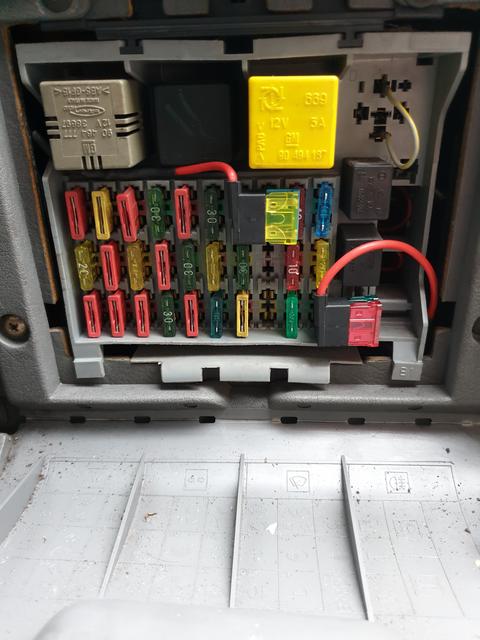
On my car, I have left a factory-fitted grey/yellow wire in the top relay socket.
But fitted the narrow relay in the socket below it.
My front and rear fogs work fine.

If you fit the top right fog relay, some people have reported that the front fogs did not work.

With the relay fitted,
The side lights must be on for the rear fogs to light up.
The rear fogs must be on for the fronts to light up.

Because I have the grey / yellow wire fitted, my front fogs will work even if the rear fogs are turned off.
--------------------------------------------
User avatar
Robsey
Club Admin
Posts: 10619
Joined: Fri Dec 12, 2008 1:42 pm
Location: East Manchester

Re: Retro-Fitting Front Fog Lights.

Post by Robsey »

If you have no wiring at all fitted, then there is a factory method of installing the wiring correctly,
Or
you can fit a totally independent circuit, using a driving lights fitting kit from your local general car parts shop.
User avatar
Robsey
Club Admin
Posts: 10619
Joined: Fri Dec 12, 2008 1:42 pm
Location: East Manchester

Re: Retro-Fitting Front Fog Lights.

Post by Robsey »

If you are OCD about being exactly to factory specification, then this is quite long and drawn out.

The official blurb is to link the input from fuse 8 to the input of fuse 13.

The output of fuse 13 would go out to the 30 terminal of the front fog relay.
(Don't forget to fit the fuse when the wiring is finished)

Front Fog Relay terminal 87 goes out to pin 31 of the X6 connector.

And then from X6 pin 31 it goes out to the left fog light.

And from the left fog light it links to the right fog light.

Then both fog lights are grounded to the big earth bolt on the left inner wing next to the battery.
------------------------------------------
Now for the faffy bit.

To operate the front fogs ONLY when the rear fogs are on (dependent upon local laws).
You need to have a relay in the top right relay slot.

this is the rear fog relay position although it is often confused as being the front relay - even by me

The front fog relay slot is the narrow relay position below it in the fuse box.

Image
This is my fuse box today -
the two fuses with piggy-back fuses are Fuse 7 for my cruise control and
Fuse 30 for my Vectra-B ATWS Megamos remote central locking).


To operate the front fogs independent of the rears, just link the top and bottom slots of the rear fog relay socket with a grey / yellow wire.
The wire is often fitted like this in the factory for cars without front fogs.
--------------------------------------

The Switched Control.
Connect a wire from terminal 87 of the top right relay to the input side of the front fog switch.

The output side of the switch would go to terminal 86 of the front fog relay.

Terminal 85 is wired to ground.
------------------------------------------------

A quick wiring method would be to wire a totally separate relay that would use the side light voltage to trigger the relay

Image

In the image, the accessory switch is the front fog light switch.
--------------------------------------
Looking at the Haynes Manual,
Wiring is as follows: -

Front Fog Relay "K5".

1 - Brown (Term 85) - To Ground
2 - not connected
3 - Black / Green (Term 86) - From Switch (Term X49) plug pin 1, switch pin 2.
4 - Black (Term 87) - Output to Connector "X6" Pin 31, and Switch Pin 5 (plug pin 3)
5 - Red (Term 30) - Input from Fuse 13.
---------------------------------------
Front Fog Switch "S21"

1 - plug pin 4 - Brown - Output to Ground
2 - plug pin 1 "X49" - Black / Green to Front Fog Relay pin 3 (Term 87)
3 - plug pin 2 "X49" - Grey / Green - Input from Fuse 9
4 - plug pin 5 - linked to 3 (plug pin 2) and fuse 9
5 - plug pin 3 - Black - Output to Relay Pin 4 (Term 87) and Connector "X6" pin 31.
------------------------------------
User avatar
Robsey
Club Admin
Posts: 10619
Joined: Fri Dec 12, 2008 1:42 pm
Location: East Manchester

Re: Retro-Fitting Front Fog Lights.

Post by Robsey »

The physical fitting of fog lights is not particularly difficult.

On the inside of the bumper skin, you should see two rectangles embossed on to the plastic.

These are the templates for your cutting lines.
I suggest drilling a 1/2" (13mm) hole, and then carefully jig-saw or hack-saw a hole a little smaller than the fog-lights that you plan to fit.

Tidy up the edges and get the final desired fit with a file and deburring tool.
(Or a dremmel type implement).

There are three mounting lugs per fog-light cast into the bumper skin.

You simply need to get some J-nuts and self tapping screws to attach the fog-lights to the bumper skin.

Finally connect up the wiring that you prepared earlier.

Now test your handy work.

Image
Locked