How2 - C25XE Oil Cooler Part Numbers for renewal

An index of useful guides designed to help you care for and maintain your Mk3 Cavalier

Moderator: Robsey

Locked
User avatar
humbucker
Club Admin
Posts: 9298
Joined: Tue Aug 19, 2008 10:42 pm
Location: Cobra Kai Dojo
Contact:

How2 - C25XE Oil Cooler Part Numbers for renewal

Post by humbucker »

Oil cooler failure seems to be quite a common occurence with the V6 lump if the wrong mixture of coolant and water is used. Hopefully the following will help anyone who encounters this particular problem; illustration and part numbers:

Image

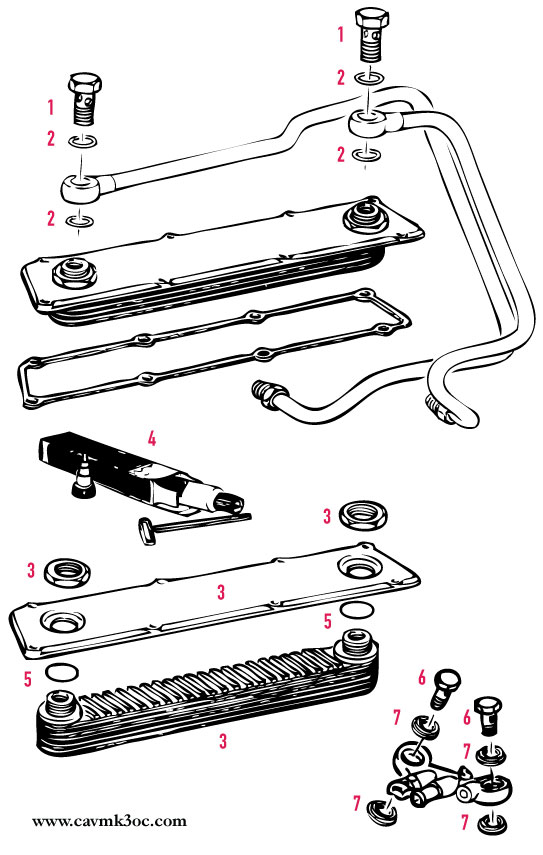
1. 90424578 HOLLOW CHANNEL BOLT FOR COOLER RADIATOR (x2)
2. 11076852 METAL COOLER O-RING (x4)
3. 93176626 COOLER RADIATOR AND COOLER PLATE (INCLUDES NUTS) (x1)
4. 93165267 SEALANT (MAKE SURE IT'S THE GREY STUFF (MAY COME IN DIFFERENT PACKAGING)) (x1)
5. 90409175 O-RING BETWEEN COOLER PLATE AND COOLER RADIATOR (x2)
6. 12992646 HOLLOW CHANNEL BOLT FOR COOLER BRIDGE (x2)
7. 12992647 COOLER BRIDGE SEAL (x4)

ALSO THE FOLLOWING (optional, not pictured)

8. 90502201 THERMOSTAT (x1)
9. 9128363 THERMOSTAT O-RING (x1)
10. 9129999 COOLANT TRANSFER PIPE O-RING (FEEDS INTO THERMOSTAT HOUSING. x2)

I would advise doing the thermostat at the same time as this job as you're already in the affected area, however, if you're convinced yours is fine then this info can be ignored.

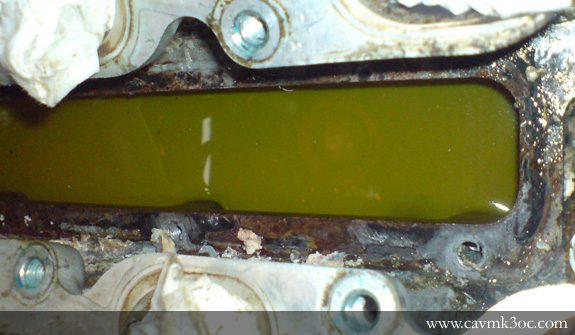
The illustration also features a gasket sitting beneath the cooler plate. This is not required as is no longer supplied by VX as the correct sealant will do the job, however, I have included it in case you find one when you take your cooler plate off and wonder what it is.

Finally, a point re items 1 and 6 (the hollow channel bolts). These are not essential items to replace as they may well be in good condition on your vehicle, however, considering the low cost involved in replacing them I have included the part numbers here.

Oh and don't forget the new coolant ;)
User avatar
humbucker
Club Admin
Posts: 9298
Joined: Tue Aug 19, 2008 10:42 pm
Location: Cobra Kai Dojo
Contact:

Re: Oil Cooler Replacement Parts and Part Numbers V6

Post by humbucker »

oh and in case you need it, coolant part number (5 litres): 93165162. this is not pre mixed coolant. dilute with water to 50/50 mix.
User avatar
humbucker
Club Admin
Posts: 9298
Joined: Tue Aug 19, 2008 10:42 pm
Location: Cobra Kai Dojo
Contact:

Re: How2 - C25XE Oil Cooler Part Numbers for renewal

Post by humbucker »

Following some recent discussion on the boards about the oil cooler failure on the V6, I thought it would be a good idea to show you the following photographs as a point of reference. But first...

IF YOU HAVE OIL IN YOUR WATER THEN THIS IS A SIGN OF OIL COOLER FAILURE
IF YOU HAVE WATER IN YOUR OIL THEN THIS IS A SIGN OF HEAD GASKET FAILURE


The two are often mistaken for one another, with most garages mis-diagnosing oil cooler failure as HG failure. I dread to think how many decent engines have been scrapped due to this ill informed diagnosis.

In case you don't already know, the V6 oil cooler is plonked between the heads in the middle of the V. In order to inspect it you will need to remove the inlet manifold, fuel rail and lower inlet divider. Once you have done this you will be able to see the oil cooler and the pipes that lead into it clearly.

The following image shows an oil cooler failure (after the oil cooler has been removed). If you are trying to work out if your oil cooler has failed then look for the scuzzy limescaley looking gunge around the outside of the oil cooler seal. As you can see from the following picture, the area surrounding the oil cooler looks like its a build up of water and engine cak, so this is a sure fire sign that the oil cooler has been leaking:

Image

You do not need to remove the heads in order to replace the oil cooler (although you will need to unbolt the coolant transfer bridge). This image shows the oil cooler in my Cavalier, in the centre of the V, with the heads still in situ. The oil cooler plate and the union pipes are visible, and a peek inside the V will allow you to inspect the condition of your oil cooler:

Image

Similarly, you can remove the heads without removing the oil cooler. This image shows the oil cooler in place with the heads of my Cavalier removed. Again the oil cooler sandwich plate and the union pipes are visible:

Image

As ever, use the discussion thread (link below) if you have any questions or want clarification on any of this How2 guide.

:)
Locked