How2 - Gsi rear bumper to a hatchback

An index of useful guides designed to help you care for and maintain your Mk3 Cavalier

Moderator: Robsey

Locked
User avatar
branny361
Registered user
Posts: 1009
Joined: Tue Oct 02, 2007 12:02 am
Location: Birkenhead Wirral

How2 - Gsi rear bumper to a hatchback

Post by branny361 »

Squig ...feel free to move or modify the post to suit

anyone who fancies modifying the rear bumper off a GSI to fit the hatchback .. how to

The width of the gsi skin is the same as standard but has a tighter radius on the corners and is longer down the sides .The few hatchbacks I have seen have cut the middle of the longer sides removed the piece and joined it back together .
my method is going to be slightly different ... i dont want to spoil the lines of the bumper so intend to remove the wheel arch lip


Firstly, modified the clip slots by recutting the inner hatch skin to suit the outer gsi skin

DSCN1779.jpg

The radius is slightly tighter on the gsi bumper so, slightly modify it on the corners to neatly fit the inner hatch skin

DSCN1783.jpg
once your happy with the fit mark off the excess against the inner skin and cut it off.

DSCN1780.jpg

Now the gsi bumper is close to the size it needs to be, but without the lip. Next trim the offcut down the original seam and mark its position on the bumper then trim to suit.

Offcut trimmed to size.
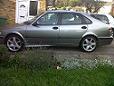
DSCN1781.jpg
this is the offcut that needs grafting onto the end but as you can see its too long and the middle swage line is out
DSCN1782.jpg
DSCN1783.jpg
the only way i could think of was to split the offcut and remove the excess

DSCN1790.jpg
DSCN1792.jpg
I use the bits and pieces of bumper to make stiffeners. countersink the heads (pop rivits or scews) or use some gripfill to add extra support....you could use anything you have to hand to give it some ridgidity

DSCN1799.jpg
you might have to fiddle about to get it nice and tight against the inner skin but thats the thick of it done...
DSCN1802.jpg
DSCN1804.jpg
all thats left to do is the prep work to get it looking like it was never cut
DSCN1808.jpg
DSCN1807.jpg
DSCN1813.jpg
after a lot of sanding the bumper was re-fitted to my car with a couple of coats of base colour
04010115.jpg
finishing off with 5 coats of laquer
DSCN2074.jpg
DSCN2069.jpg
DSCN2079.jpg


and thats it ...

Hope this how to gives a helping hand to anyone wanting to do this to their car , was it worth it ? defo!!
Attachments
DSCN1785.jpg
now running a swedish vauxhall...

the old cav vid
http://www.youtube.com/watch?v=YYC4wHjqAhw

the new saab vid
http://www.youtube.com/watch?v=h-K5L6UDGFk
Locked