Witter product codes for each model:
Cavalier Mk3 Hatchback: G48A
Cavalier Mk3 Saloon: G47A
You will need:
(It is likely that your towbar will come complete with these items)
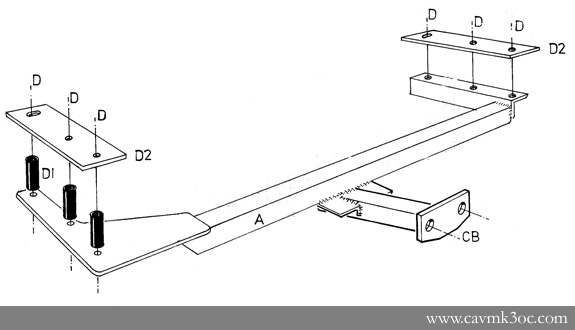
A 1 x Towbar frame with international facing to ISO 3853 (BS AU114)
D 6 x M10 x 90mm Bolts, Nuts and Lock Washers
D1 6 x Bushes (60mm long, 17mm O.D.)
D2 2 x Flat Spreader Plates
CB 2 x M16 x 50mm Coupling Bolts, Nuts and Lock Washers
6 x M10 Bolt Caps
Refer to diagram below for key.
Electrics supplied separately
(If buying second hand then is likely that your towbar will come complete with electrics. If not then any towbar/trailer retailer will be able to supply you universal electric fitments at a reasonable cost)
Fitting:
No need to remove bumper or cut bumper.
1 Lift the floor covering in the boot (if for a hatchback then you will also need to remove the trim on the rear lip of the boot (carefully prise up the plastic moulding to avoid damaging the clips)). Find the three dimples provided in the floor each side. (On the left cut away the mastic compound to reveal the dimples and ensure correct seating of the Spreader Plate). At the dimples drill holes of just sufficient size to insert Bushes (D1) into the frame (top surface only).
2 Some of the holes are provided in the under frame. Attach the towbar at the existing holes and use as a jig to drill up the remaining holes. Attach the remaining bolts and bushes with Plates (D2) above the floor, and finally tighten all bolts.
***Please refer to the vehicle specification for the trailer weight and nose limits, which must be observed.***
Recommended torque settings:
M8 - 27Nm
M10 - 53 Nm
M12 - 95 Nm
M14 - 150 Nm
M16 - 214 Nm