Working on the Bosch starter Motor

An index of useful guides designed to help you care for and maintain your Mk3 Cavalier

Moderator: Robsey

Locked
User avatar
Robsey
Club Admin
Posts: 10619
Joined: Fri Dec 12, 2008 1:42 pm
Location: East Manchester

Working on the Bosch starter Motor

Post by Robsey »

Stripping and Cleaning a Bosch Starter Motor

STRIPPING.


1) Remove the 13mm nut (M8 Thread), which holds the Starter braided link wire, to the rear of the solenoid.
assemble 15.jpg
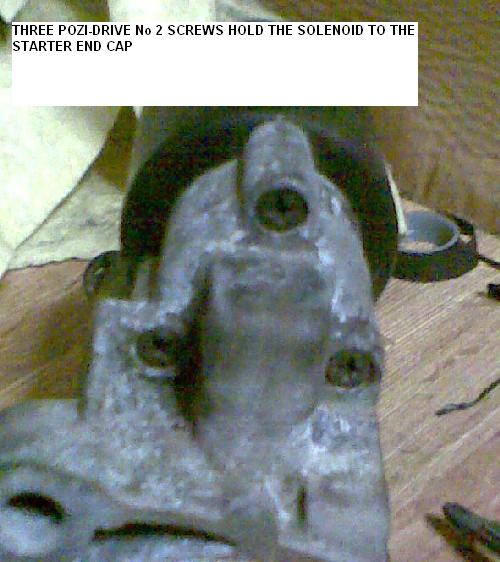
You can strip the solenoid, by extracting the three No2 Pozidrive screws.. however there is little need to do this.
assemble 14.jpg
assemble 14.jpg (46.15 KiB) Viewed 685 times
2) Remove the two long M4 studs, which hold the alloy casting onto the starter motor barrel (7mm socket)


3) Split the alloy casting from the starter motor barrel / body

4a) Now that the two long M4 studs have been removed, you can now split off the motor end cap... I used a flat bladed screwdriver to get between the end-plate and the barrel.
assemble 6.jpg
4b) The motor is attached to the end plate, and the motor is held in place by the magnetic effect of the field magnets in the barrel casing. Give the end plate a firm pull, and the armature, brushpack and end plate will all "break free" from the motor casing.
User avatar
Robsey
Club Admin
Posts: 10619
Joined: Fri Dec 12, 2008 1:42 pm
Location: East Manchester

Re: Working on the Bosch starter Motor

Post by Robsey »

5) Now remove the two No 2 Posidrive screws that hold the armature end cap onto the end plate.

6) Remove the loosely fitted circlip, and the flat steel washer.
endbits1.jpg
7) Remove the end plate, exposing the brush pack and the felt washer
arm n brush.jpg
8) Slide the brush-pack off the end of the armature, however I would do this inside a plastic bag, as the brushes will shoot out of their guides, causing their thrust springs to be ejected from the guides. Without a bag around the armature and brush pack, you may find that the springs will make a bid for freedom, and be lost for ever.... knowing your luck.
armature1.jpg
9) You can now clean the rubbing surfaces of the armature, removing traces of carbon brush residue and burnt on deposits. Be careful to ensure that the rubbing surfaces nd the guleys between them are clear of any crud / filings etc.
User avatar
Robsey
Club Admin
Posts: 10619
Joined: Fri Dec 12, 2008 1:42 pm
Location: East Manchester

Re: Working on the Bosch starter Motor

Post by Robsey »

10) Now turn your attention to the brushes themselves . There are four brushes (2 x 12V feed and 2 x chassis / ground). If you have plenty of brush length, then just give the ends a gentle clean / de-glaze.
brushpak2.jpg
11) If they are quite small, then you need to cut these off. Then with quite a strong soldering iron you need to solder on 4 new brushes.
brushes.JPG
This is the official info from Vauxhall's TIS Database.
User avatar
Robsey
Club Admin
Posts: 10619
Joined: Fri Dec 12, 2008 1:42 pm
Location: East Manchester

Re: Working on the Bosch starter Motor

Post by Robsey »

REBUILDING

12) You can now re-assemble the brush pack - do one brush at a time.

a) Fit the copper coloured brush guide into pack ring.
b) Insert the thrust spring
c) Push the brush into it's guide

Now for the trick bit...I used a twisted wire bag tie / tie wrap to hold the brush into it's guide

Repeat this for the other brushes.
brushpak1.jpg
13) Slide the brush pack back onto the armature - you may have to just slide the brush pack only partially over the armature, just enough to allow you to remove the tie wraps without the brushes and springs firing back out again.
assemble1.jpg
assemble1.jpg (50.65 KiB) Viewed 684 times
14) Refit the felt washer / ring, then the end plate, steel washer, circlip and armature end cap.
assemble3.jpg
User avatar
Robsey
Club Admin
Posts: 10619
Joined: Fri Dec 12, 2008 1:42 pm
Location: East Manchester

Re: Working on the Bosch starter Motor

Post by Robsey »

assemble 4.jpg
assemble 5.jpg
15) Assembly is now the reversal of the stripping process.

16) Note, when pushing the armature back into the barrel, it will have to be lined up with the splines on the shaft and the drive gear.

I rotated the spindle (casting / drive-gear end), to line the splines / gear cogs up.
The motor will drop completely into the barrel.
assemble 8.jpg
17) Thread the alloy casting over the motor casing, and then re-fit the two long M4 studs

(and reassemble the solenoid if you stripped it down)
User avatar
Robsey
Club Admin
Posts: 10619
Joined: Fri Dec 12, 2008 1:42 pm
Location: East Manchester

Re: Working on the Bosch starter Motor

Post by Robsey »

You will need to line up the solenoid actuated arm etc; before the alloy cap will fit in place.
assemble 10.jpg
assemble 11.jpg
18) Final job is to re-connect up the motor link braided wire.

19) You can now re-fit the starter motor,

20) and connect up the heavy gauge electric wires.

Job done :)
User avatar
Envoy CDX
Club Admin
Posts: 9681
Joined: Sun Sep 23, 2007 3:51 pm
Location: Jarrow, Newcastle Upon Tyne

Re: Working on the Bosch starter Motor

Post by Envoy CDX »

Excellent write up Rob, I'll lock this and move it to the How2 section ;)
Check the Rules!

Raw 8v Power! - Bad Cav, Naughty Cav... Cav want's to do 90!

The How2 Index
User avatar
Robsey
Club Admin
Posts: 10619
Joined: Fri Dec 12, 2008 1:42 pm
Location: East Manchester

Discussion: Working on your Starter Motor - By Robsey

Post by Robsey »

SUPPLEMENTAL INFO

The Solenoid Components
solenoid 2.jpg
The attachment of the Solenoid to the starter.
assemble 12.jpg
assemble 13.jpg
assemble 13.jpg (45.09 KiB) Viewed 680 times
Hope this helps :)
Locked