
In short, the crankcase breather system catches some of the gasses caused by engine combustion and feeds them through to the inlet manifold to be burned up and pumped out of the exhaust. At the same time, oil vapours are also fed through the breather system and it is these that can cause blockages, particularly if your oil changes aren’t too frequent.
The consequences of these blockages is that pressure can build up within the crankcase, and without the proper channels to be expelled will try and force its way out elsewhere. More often than not, the pressure finds its way out around the cam covers and is almost always the cause of cam cover leaks. Many owners will misdiagnose this symptom as ‘warped cam covers’ and replace them with the metal cam covers found on Vectras, but the metal cam covers are a lot less prepared to permit the pressure to escape and so with these fitted the pressure will try to force its way out through the crank seal. This can be a difficult fault to deal with, so if you are suffering with leaky cam covers then ALWAYS check your breather system as the first point of repair/troubleshooting. Metal cam covers are really just an aesthetic modification, not necessarily a cure to leaky cam covers.
Unblocking the system is a relatively quick ‘repair’ and you should notice a difference in throttle response in a car suffering from any blockage. It’s important to note that cleaning the breather system isn’t part of any official service inventory, so if you have a V6 Cavalier then I would recommend checking this out as soon as you get the car home.
First up, you’ll need some basic tools to help you with the job; a paperclip, a can of carb cleaner and a long screwdriver (preferably flatheaded) to help you with clean out any blockages found in hoses. A half decent toolkit with a selection of torx sockets and a ratchet will be useful. Oh and some paper towel might come in handy. And a mug of tea.
(A few of the removal steps below are lifted from my V6 Cam Cover Gasket replacement guide which you might want to take a look at if you’re cleaning the breather system as a result of leaky cam covers: viewtopic.php?f=42&t=2872 )
The crankcase breather box is located at the back of the engine on the right hand side directly underneath the upper inlet manifold. There are two pipes that stick out of the top of it, one of which goes directly into the bottom of the upper inlet manifold and another which feeds under the inlet manifold and mates to the throttle body.
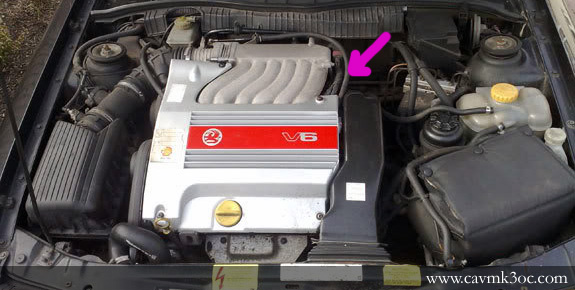
This image indicates the location of the crankcase breather box on the V6 when everything is in place under the bonnet. It is hidden from view as the upper inlet manifold sits above it:
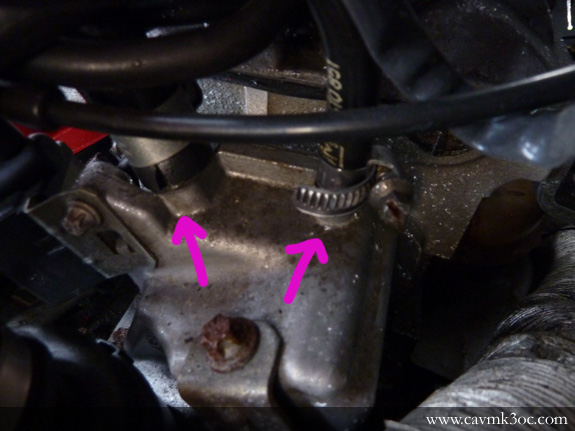
This is a shot taken from the passenger side of the vehicle, underneath the upper inlet manifold. The photo shows the two breather pipes sticking out of the top of the crankcase breather box. The bigger pipe on the left feeds its way underneath the upper inlet manifold to the throttle body, while the thinner pipe to the right plumbs directly into the upper inlet manifold:
To access the breather pipes and the crankcase breather box you must remove the torx bolts that hold on the engine cover (if original engine cover is still present) and remove from the engine bay. You will now need to remove the upper inlet manifold. To begin with, unclip the throttle cable by removing the wire pin holding the ball to the lever. Next, using a ratchet spanner, remove the two torx bolts holding the throttle assembly to the upper inlet manifold. Then undo the remaining torx bolts holding the wiring harness to the upper inlet manifold. Undo the jubilee clip that holds the throttle body to the main airflow pipe and remove the breather pipe from the side of the throttle body using the same method. Unplug the sensor on the side of the traction control/throttle body.
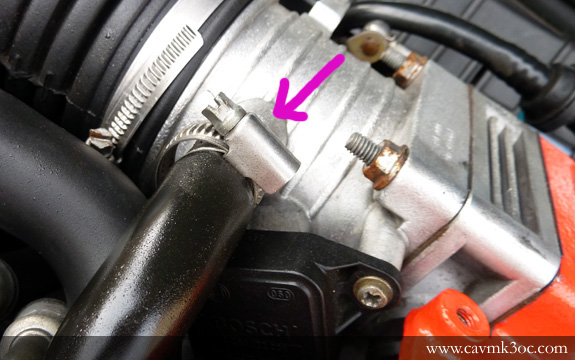
This pic shows the exit end of the larger breather pipe hose as it is attached to the throttle body (worth noting that these were not always attached with jubilee clips from the factory). To the right of the pipe you can see the sensor which will need unplugging:
Carefully undo each of the bolts that hold the upper inlet manifold in place. Some of these are longer than others so it should be obvious which ones go where when you need to put them back. You may need to unclip some of the sensor wires that are in place depending on how generous GM were with wire length the day your car left the production line! You will also need to take care for any other hoses attached to the inlet manifold that I have failed to mention (ICV or small breather pipe for example).
Carefully lift the upper inlet manifold out of the way and place a piece of tissue in each of the cavities leading to the heads; the last thing you want to do is drop something down there! You will be able to ascertain at this stage whether or not your upper inlet manifold gasket needs replacing (green gasket p/n 90412126).
You will now be able to see the crankcase breather box (vent housing) and its exit pipes. Remove the two hoses. You should be able to see straight away whether or not you have a blockage. You may need to wipe the area clean in order to see what you’re doing, and I would suggest at this point spraying carb cleaner on the blockages to assist with removal, particularly if the blockages are solid, but avoid putting too much down there as it might contaminate the oil if gallons of the stuff starts entering the system.
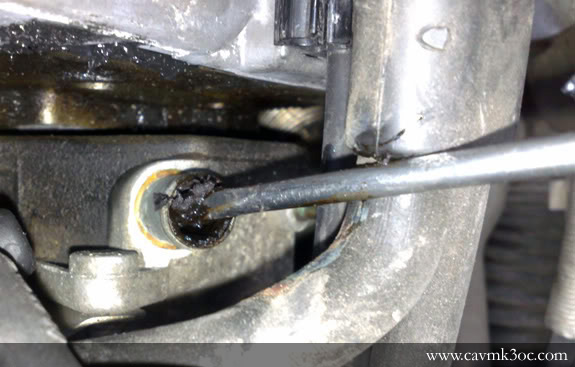
This pic shows my screwdriver buried deep in the crud blocking the larger exit pipe of the breather box. Carefully remove this cak while trying not to let any of it drop down into the breather box itself:
This pic shows the smaller of the two exit pipes. The blockage can feel very solid, so using a paperclip gently apply pressure on the hole until you successfully push through and you are sure that ventilation is possible. Be careful though, you absolutely don’t want to snap off the paperclip and let it drop into the breather box itself. If you have a screwdriver thin enough use that instead:

This photo shows the larger of the two breather box exit pipe hoses, the one that feeds into the throttle body. It was blocked, as was the smaller hose. The smaller hose is short, thin and straight so should clear with some carb cleaner and a prod with a Philips screwdriver. The larger hose is an odd shape and while it is possible to clean the blockages, be prepared to be at it for a while. Heavy blockages can require lots of carb cleaner and a long screwdriver (capable of getting around tight corners?!). It may prove more beneficial to invest in a new hose if the blockage won’t shift:

If you find that the breather exit pipe hoses are split (as can be seen in my picture above) then don’t worry; providing the split is no more than 10 or 20mm you should be able to snip a bit off of the end and reattach it. They’re fairly flexible and usually longer than they need to be. I would advise attaching jubilee clips when you refit them, especially if you’re trimming them to size. If you find significant damage/splits then don’t waste your time, just buy new items. The part number should be printed on the side of the hose. Make sure the hoses are dry before refitting.
While it’s all off, ensure the upper inlet manifold (particularly the feed into the smaller breather hose), the throttle body and other ‘breather’ items are clear of muck. Again, use carb cleaner for a quick and effective method of removal.
Reassembly is the reverse of the instructions above. Ensure you observe the correct torque settings for each of the nuts and bolts when refitting.
If the breather system on your car is as clogged up as mine was when I bought it then you should notice an improved response, not to mention better fuel ecomony, after cleaning. Blocked breathers aren’t restricted to the V6 engine, but it is a common fault with them. The principal applies to all engines, even if the design is different.
Check the breathers by just removing the hoses from the breather box each time you have the upper inlet manifold off to change the spark plugs. Consider it an integral part of your servicing routine. It’s a two minute check that can save you lots of time and money on cam cover gaskets. On an average mileage V6 lump you should check the breathers (and clean if necessary) at least every 18 months.