How2 - Convert from C18NZ SPi to C20NE MPi
Posted: Sun Oct 02, 2011 6:57 pm
The Robsey Way - How to convert from 1.8 SPi to 2.0 MPi
Information before you start.
Section 1 - Why change the Engine.
Section 2 - What is Needed
Section 3 - Insurance and DVLA information.
Section 4 - Removing the 1.8 SPi
Section 5 - Fitting the 2.0 MPi
Section 6 - Teething Problems
Section 1 - Why Change the Engine?
There are two main reasons for changing your engine.
a) To replace a faulty /worn / broken engine
b) To get a bit more Ooomph
Anyone who has been reading my very long bizarre Work in Progress thread, will know that I changed my engine, because I was convinced that it was now very old and worn out, The 1.8 lump had done 225,000 miles and I was getting a low engine oil pressure light on the dash at idle when the engine was warm.
Despite top end and bottom end work, I decided that it would not be worth throwing any more money at the old engine to have the crank-shaft, bearings,shell, rings and the various other bolts and seals replaced that would be required to do the job properly.
Approx £350 to £500 in my estimate - more than my battered old Cav was worth!!
So I threw in the towel and opted to get an alternative engine...
Another 1.8 SPi would have been very simple, and could have been done within the day, with the correct equipment.
But there was nothing available at the right time for the right money.
So in the end I shelled out less than 100 notes for a complete 2.0 litre MPi set-up...well almost complete... Total cost was approx £250 including service parts and other spares that became apparent on the way.
Section 2 - What is Needed
This is a rough list of everything that I came across.
1) Electrics.
a) The correct ECU Loom and the Power Loom- Note that these are diferent between manual and auto models.
b) An ECU - Motronic 1.5.Usually Alpha Code GE for C20NE or 20NE.
Most are non-immobiliser units. If yours is a very late Immobilised set-up, then ensure that you have the correct matched key transponder, pick-up ring barrel and immobiliser unit etc.
c) Black Injection / Fuel Pump relay - Different from the purple SPi relay.
d) All the sensors - Crank Angle Sensor (CAS), Coolant Temperature Sensor (CTS)
e) The correct coil - usually Alpha Code WE for the NE engines.
f) The correct Yellow Octane coding plug.
2) The Engine itself
a) A known good engine,
b) starter and matched flywheel or flex-plate as required
c) Get a fresh gasket set for things like manifold gaskets, pump seals etc.
d) The C18NZ alternator, Power steering pump and other ancillary components can be fitted to the C20NE.
e) Clutch Assembly, whilst the engine and box are apart. Check which flywheel you have, as this will affect which pressure plate you need. (Flat or Pot flywheel).
3) The Induction side of things
a) The inlet manifold
b) The throttle body complete with Throttle Position Sensor
c) Idle control Valve
d) Vacuum hoses, breather pipes and brake servo vacuum pipe
e) The correct Intake Pipe (Bigger internal diameter than the SPi set-up)
f) The Air filter housing complete with the Air Flow Meter and filter
g) It is a good idea to get gaskets for the throttle-body and induction manifold components
4) Exhaust side of things
a) manifold with Gaskets, seals etc
b) Correct front pipe with Oxygen / Lambda sensor
(I used the manifold and front pipe from the NZ, I just fitted the multi-wired Lambda sensor into the NZ exhaust manifold in place of the single wire sensor.)
5) Fuel Stuff
a) Multi-Point Fuel Pump
b) Tank vent valve
c) New fuel pipe clamps etc and 8mm bore fuel hose.
6) Equipment / Tools / Misc
a) Engine Crane - Essential due to the weight of an engine.
b) Wide range of sockets and spanners, screwdrivers, etc.
Includes "E" External torx Sockets, Trolley Jack and Axle stands.
c) PVC / Electrical tape and / or Cable-Ties for tidying up looms etc.
7) Chemicals
a) Oil, water, Anti-freeze.
b) RTV or gasket paste.(Blue or grey paste... the red stuff is not as good)
Do not use any paste on the induction side of the engine. - it may get sucked in and block vacuum or fuel flow.
c) Thread Locking paste - Loctite 342 or similar for ALL fixtures that you don't want to work loose.
d) Coppa-Slip for all threads that you may wish to undo later
e) White Petroleum Jelly / Vaseline for all electrical connectors, but you can also use Coppa-Slip.
Section 3 - Insurance and DVLA information.
Please consider the effect of carrying out an engine transplant.
1) The vehicle insurance premiums MAY increase, as engine changes are considered to be too risky for most companies to consider providing cover... that and Alloy wheels.
I just declare the correct engine size when renewing my policies. In my case the prices did not increase compared to the 1.8 prices.
2) If you do have an accident, and it is blatantly obvious that you have not declared the correct engine in your vehicle, then the insurance company will do their best not to pay out.
Your insurance may be declared void - Leading to other potential legal issues.
Insurers will want to know everything about the car that the donor engine came from - Model, year, trim level, auto/manual and so on.
3) The DVLA will need to know that you have changed the engine, however evidence for the purchase of the engine will be required.
Especially if the engine is of a different size.
Do not consider reducing the size of the engine to below 1500cc, as the red-tape / politics is a total ball-ache.
They will wish to know
Engine Capacity (cc) and also the Engine Number.
Declaring / advising of the change of engine details is FREE of charge.
Well that is the boring waffle bit done with...
Now for what happened...
Section 4 - Removing the 1.8 SPi
I did this in a rather unorthodox method - read on.
The first thing is to drain the fluids,
That is : -
a) Drain the oil from the sump.
b) Drain the coolant, and then disconnect the hoses from the header tank and matrix stubs.
c) Remove the coolant header tank from the inner wing.
d) Disconnect the fuel lines from the throttle body and plug with an 8mm diameter rod or bolt. (make a note which is inlet and which is return)
Disconnect and remove the air filter housing and all the trunking along with the throttle body "top-hat" cover., vacuum pipe and the hot-air duct tube from the exhaust manifold.
Disconnect the electrics.. There are three connection points.
a) The big Barrel shaped connector in front of the Battery.
In the Haynes manual this is referred to as X5, and supplies electrical current to the starter and also the ignition live to the ECU loom.
b) The heavy red cable on the red battery terminal (mine had a thick black sleeve over it), this supplies battery live to the ignition / fuel pump relay.
c) The main earth tag bolted either to the gearbox end-plate, or in my case, it was held on by one of the top bell-housing to engine block bolts.
Disconnect the ECU loom from the engine, sensors, coil, amplifier, and it's termination connection at the ancillary loom (thick black wire).
Then disconnect the ancillary loom from the starter, coolant sensor (gauges), oil pressure switch (gauges), starter, reverse light switch on the gearbox.
Now the mechanicals....
Jack up the front of the car and sit on axle stands.
Remove the exhaust front pipe (at the cat box flange), and unbolt the exhaust manifold
Drop this out, remove under the front of the car.
Disconnect the hoses from the radiator, and remove the radiator.
Remove the alternator and power steering drive belt
It is about now that you should disconnect your bottom ball joints on the wishbones... this did not happen for me, as despite having 3 different ball joint splitters, none of them would go into the gap between the leg and the wishbone.
So instead I cleared as much as possible from the timing belt end of the engine..
So off came the Alternator complete with steady brackets, power steering pump, alternator drive belt tensioner and crankshaft pulley (not the sprocket).
Now we need to support the engine, and remove the mounting from the timing belt end.
I had to remove all the bolts holding the bell housing to the engine block, so also includes the fly-wheel inspection cover plate (gearbox end of the sump).
There are two dowels that hold the gearbox onto the engine.
I rocked the engine firmly, and then pulled the engine away from the box... there is JUST enough space to clear the out put shaft.
Once clear of the gearbox, I pulled the whole engine toward the front of the car, and then swung the timing belt end rearward.
The engine was then hoisted up, clear of the engine bay using a medical hoist, as found in nursing homes.
With the engine bay clear, I was able to clean the bay, replace my clutch release bearing, and also rip-out my fuel lines.
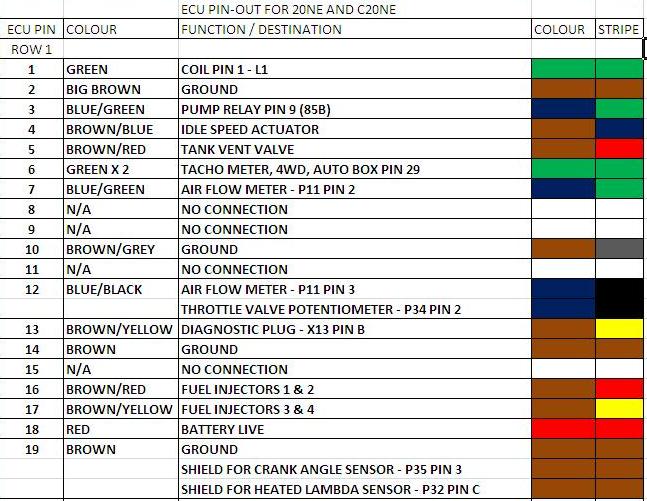
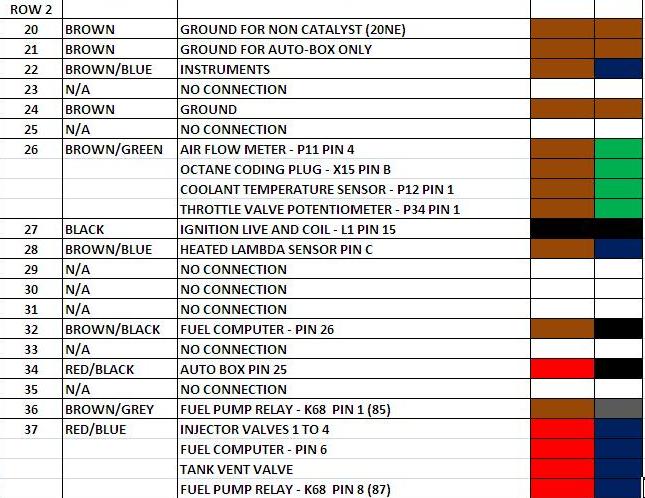
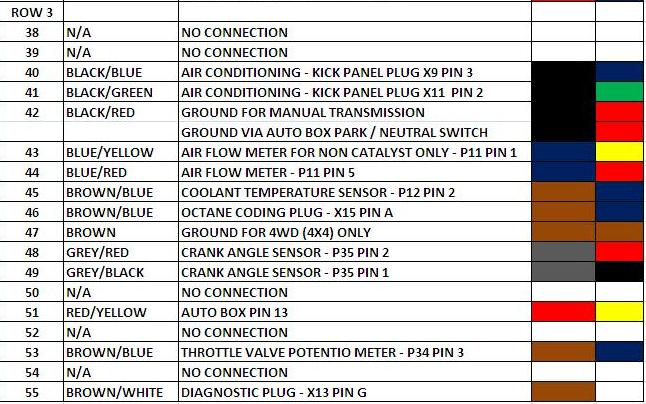
Last thing to remove is the ECU Loom. This requires the driver's kick panel being removed, then unscrew the ECU from the side wall.
Disconnect the ECU plugs (2 on the C18NZ), along with the three small square connectors for the Diagnostics, Road speed signal and the air-con connections where fitted.
Then it is just a matter of withdrawing the whole loom through the bulk head (behind where the coolant header tank was located).
Bye Bye all traces of the C18NZ........
next part is the C20NE going in 
Information before you start.
Section 1 - Why change the Engine.
Section 2 - What is Needed
Section 3 - Insurance and DVLA information.
Section 4 - Removing the 1.8 SPi
Section 5 - Fitting the 2.0 MPi
Section 6 - Teething Problems
Section 1 - Why Change the Engine?
There are two main reasons for changing your engine.
a) To replace a faulty /worn / broken engine
b) To get a bit more Ooomph
Anyone who has been reading my very long bizarre Work in Progress thread, will know that I changed my engine, because I was convinced that it was now very old and worn out, The 1.8 lump had done 225,000 miles and I was getting a low engine oil pressure light on the dash at idle when the engine was warm.
Despite top end and bottom end work, I decided that it would not be worth throwing any more money at the old engine to have the crank-shaft, bearings,shell, rings and the various other bolts and seals replaced that would be required to do the job properly.
Approx £350 to £500 in my estimate - more than my battered old Cav was worth!!
So I threw in the towel and opted to get an alternative engine...
Another 1.8 SPi would have been very simple, and could have been done within the day, with the correct equipment.
But there was nothing available at the right time for the right money.
So in the end I shelled out less than 100 notes for a complete 2.0 litre MPi set-up...well almost complete... Total cost was approx £250 including service parts and other spares that became apparent on the way.
Section 2 - What is Needed
This is a rough list of everything that I came across.
1) Electrics.
a) The correct ECU Loom and the Power Loom- Note that these are diferent between manual and auto models.
b) An ECU - Motronic 1.5.Usually Alpha Code GE for C20NE or 20NE.
Most are non-immobiliser units. If yours is a very late Immobilised set-up, then ensure that you have the correct matched key transponder, pick-up ring barrel and immobiliser unit etc.
c) Black Injection / Fuel Pump relay - Different from the purple SPi relay.
d) All the sensors - Crank Angle Sensor (CAS), Coolant Temperature Sensor (CTS)
e) The correct coil - usually Alpha Code WE for the NE engines.
f) The correct Yellow Octane coding plug.
2) The Engine itself
a) A known good engine,
b) starter and matched flywheel or flex-plate as required
c) Get a fresh gasket set for things like manifold gaskets, pump seals etc.
d) The C18NZ alternator, Power steering pump and other ancillary components can be fitted to the C20NE.
e) Clutch Assembly, whilst the engine and box are apart. Check which flywheel you have, as this will affect which pressure plate you need. (Flat or Pot flywheel).
3) The Induction side of things
a) The inlet manifold
b) The throttle body complete with Throttle Position Sensor
c) Idle control Valve
d) Vacuum hoses, breather pipes and brake servo vacuum pipe
e) The correct Intake Pipe (Bigger internal diameter than the SPi set-up)
f) The Air filter housing complete with the Air Flow Meter and filter
g) It is a good idea to get gaskets for the throttle-body and induction manifold components
4) Exhaust side of things
a) manifold with Gaskets, seals etc
b) Correct front pipe with Oxygen / Lambda sensor
(I used the manifold and front pipe from the NZ, I just fitted the multi-wired Lambda sensor into the NZ exhaust manifold in place of the single wire sensor.)
5) Fuel Stuff
a) Multi-Point Fuel Pump
b) Tank vent valve
c) New fuel pipe clamps etc and 8mm bore fuel hose.
6) Equipment / Tools / Misc
a) Engine Crane - Essential due to the weight of an engine.
b) Wide range of sockets and spanners, screwdrivers, etc.
Includes "E" External torx Sockets, Trolley Jack and Axle stands.
c) PVC / Electrical tape and / or Cable-Ties for tidying up looms etc.
7) Chemicals
a) Oil, water, Anti-freeze.
b) RTV or gasket paste.(Blue or grey paste... the red stuff is not as good)
Do not use any paste on the induction side of the engine. - it may get sucked in and block vacuum or fuel flow.
c) Thread Locking paste - Loctite 342 or similar for ALL fixtures that you don't want to work loose.
d) Coppa-Slip for all threads that you may wish to undo later
e) White Petroleum Jelly / Vaseline for all electrical connectors, but you can also use Coppa-Slip.
Section 3 - Insurance and DVLA information.
Please consider the effect of carrying out an engine transplant.
1) The vehicle insurance premiums MAY increase, as engine changes are considered to be too risky for most companies to consider providing cover... that and Alloy wheels.
I just declare the correct engine size when renewing my policies. In my case the prices did not increase compared to the 1.8 prices.
2) If you do have an accident, and it is blatantly obvious that you have not declared the correct engine in your vehicle, then the insurance company will do their best not to pay out.
Your insurance may be declared void - Leading to other potential legal issues.
Insurers will want to know everything about the car that the donor engine came from - Model, year, trim level, auto/manual and so on.
3) The DVLA will need to know that you have changed the engine, however evidence for the purchase of the engine will be required.
Especially if the engine is of a different size.
Do not consider reducing the size of the engine to below 1500cc, as the red-tape / politics is a total ball-ache.
They will wish to know
Engine Capacity (cc) and also the Engine Number.
Declaring / advising of the change of engine details is FREE of charge.
Well that is the boring waffle bit done with...
Now for what happened...
Section 4 - Removing the 1.8 SPi
I did this in a rather unorthodox method - read on.
- c18nz engine.JPG (51.82 KiB) Viewed 3620 times
That is : -
a) Drain the oil from the sump.
b) Drain the coolant, and then disconnect the hoses from the header tank and matrix stubs.
c) Remove the coolant header tank from the inner wing.
d) Disconnect the fuel lines from the throttle body and plug with an 8mm diameter rod or bolt. (make a note which is inlet and which is return)
Disconnect and remove the air filter housing and all the trunking along with the throttle body "top-hat" cover., vacuum pipe and the hot-air duct tube from the exhaust manifold.
Disconnect the electrics.. There are three connection points.
a) The big Barrel shaped connector in front of the Battery.
In the Haynes manual this is referred to as X5, and supplies electrical current to the starter and also the ignition live to the ECU loom.
b) The heavy red cable on the red battery terminal (mine had a thick black sleeve over it), this supplies battery live to the ignition / fuel pump relay.
c) The main earth tag bolted either to the gearbox end-plate, or in my case, it was held on by one of the top bell-housing to engine block bolts.
Disconnect the ECU loom from the engine, sensors, coil, amplifier, and it's termination connection at the ancillary loom (thick black wire).
Then disconnect the ancillary loom from the starter, coolant sensor (gauges), oil pressure switch (gauges), starter, reverse light switch on the gearbox.
Now the mechanicals....
Jack up the front of the car and sit on axle stands.
Remove the exhaust front pipe (at the cat box flange), and unbolt the exhaust manifold
Drop this out, remove under the front of the car.
Disconnect the hoses from the radiator, and remove the radiator.
Remove the alternator and power steering drive belt
It is about now that you should disconnect your bottom ball joints on the wishbones... this did not happen for me, as despite having 3 different ball joint splitters, none of them would go into the gap between the leg and the wishbone.
So instead I cleared as much as possible from the timing belt end of the engine..
So off came the Alternator complete with steady brackets, power steering pump, alternator drive belt tensioner and crankshaft pulley (not the sprocket).
Now we need to support the engine, and remove the mounting from the timing belt end.
I had to remove all the bolts holding the bell housing to the engine block, so also includes the fly-wheel inspection cover plate (gearbox end of the sump).
There are two dowels that hold the gearbox onto the engine.
I rocked the engine firmly, and then pulled the engine away from the box... there is JUST enough space to clear the out put shaft.
Once clear of the gearbox, I pulled the whole engine toward the front of the car, and then swung the timing belt end rearward.
The engine was then hoisted up, clear of the engine bay using a medical hoist, as found in nursing homes.
Last thing to remove is the ECU Loom. This requires the driver's kick panel being removed, then unscrew the ECU from the side wall.
Disconnect the ECU plugs (2 on the C18NZ), along with the three small square connectors for the Diagnostics, Road speed signal and the air-con connections where fitted.
Then it is just a matter of withdrawing the whole loom through the bulk head (behind where the coolant header tank was located).
Bye Bye all traces of the C18NZ........
- no engine.JPG (46.8 KiB) Viewed 3620 times