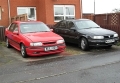
I did have a big sheet over the back to cover it against rain getting in, but that can be a curse or a blessing sometimes, but it seemed to work pretty well; also got a full weather cover over the whole car for good measure. I don't see any signs of rot creeping in where the welds are, only rust is leading edge of back panel, which probably had some surface rust anyway. Just gave it a quick rub down and reseal. Yes the 2 pack primer is way better at keeping rot at bay, especially if you are priming but not yet at the paint stage. I see what you mean about the 2 tone US cop car colour scheme, maybe it could be a bit of a blues mobile!3cav3 wrote: ↑Sun Jun 25, 2023 7:40 am Looking good. Got admit out the corner of my eye it looks a bit like one of those American police cars, particularly with the two tone colour scheme.
Your primer seems to be holding up well. When I was working under a sheet, I used to have a lot of issues with rain creeping underneath, even now in the winter months my canopy suffers badly with condensation at times, and thus some repairs had started rusting again.
Vauxhall Senator
-
cavalier1990
- Registered user
- Posts: 1526
- Joined: Wed Jun 29, 2011 9:15 pm
- Location: Paisley, Scotland
Re: Vauxhall Senator
-
cavalier1990
- Registered user
- Posts: 1526
- Joined: Wed Jun 29, 2011 9:15 pm
- Location: Paisley, Scotland
Re: Vauxhall Senator
Been a while since I got some work done on this beast what with the weather being sooo poor this Year so far and my other competing priorities. I had managed to get a cut off section or sections from a place in Germany that seems to amongst other things, cut old opels up with stihl saws so I managed to get the bulkhead side panel section for the N/S in 2 parts and then re-model it a bit to fit my own repair needs. There is a complete repair panel for the bulkhead side panel but I could not find the N/S one anywhere, but I do have the O/S one. I bought it a good few years ago thinking why would I need that lol, seems I was right to buy it as it's given me a sort of template/checker for the N/S repair. and a panel for the O/S should I decide to replace that side as well.
The top section I got is basically the bit round where the bonnet mount onto the inner wing then goes down the side of the inner wing with a section of the inner wing next to the strut tower and a bit that has the hole for the wiring loom that goes through bulkhead. I did make a complete repair panel for the front of the floor pan that stretched right up to the top of the bulkhead including a hole drilled for the loom hole, but the panel I got had the proper loom hole in it so I'd prefer to use that.
The other panel I got was the bit below this that runs down the side of the inner wing/bulkhead area to the iner sill front end. I'm pretty sure it was from the same car they cut up so it kind of slots up against the other panel but I did use the inner wing strengthening plate section off the top panel to make a little template for the drain hole section. I drilled the spot welds out and removed this section as I have a compeletly new inner wing strengthening plate anyway.
This section is like a jigsaw but having these two cut off panels mean't I could recreate that section and just add a few small repair sections in. As per ususal I never got any snaps of the work yesterday but will try and get that or a wee video showing it all coming together.
Cheers
Andy

Re: Vauxhall Senator
Yayy - fettling time has begun!! 
I am hopeful for a decent spring and summer this year, although April has not been very good so far.
I am looking forward to seeing more pictures of your beastie as it starts to come back together.
I am hopeful for a decent spring and summer this year, although April has not been very good so far.
I am looking forward to seeing more pictures of your beastie as it starts to come back together.
-
Envoy CDX

- Club Admin
- Posts: 9980
- Joined: Sun Sep 23, 2007 3:51 pm
- Location: Jarrow, Newcastle Upon Tyne
Re: Vauxhall Senator
Excellent stuff. Look forward to seeing the progress.
-
cavalier1990
- Registered user
- Posts: 1526
- Joined: Wed Jun 29, 2011 9:15 pm
- Location: Paisley, Scotland
Re: Vauxhall Senator
So I thought lol, I think April was just a write off and May, first half weather was tatty,and then I spent the last couple of weeks getting the omega ready for it's MOT. New back donut bushes, both back springs, all front arm bushes/ball joints/top strut mounts (Pedders from Australia who do the monaro ones). Also I bust one of the front to back brake lines when putting the rear subframe back into place (you have to drop that to get the springs out) and a small patch of welding on the front jacking bit.
Then the final job was to drill out the 4 busted bolts on the centre section to cat joins (there's 2 centre sections), which was truly a realy nightmare of a job.
Tbh I probably could have got away with replacing spring, the wee bit of weld and patching the exhaust (again) but the back bushes were creaking and while the fronts were "ok" they were on the cusp of starting to not be ok. Future proofed it by now.
Should be ramping up the work on the cavy and senator soon and got plenty of holidays booked into July to get stuff done. Saying that it's been quite cold of late here, windy, freezin had heating on again so hoping weather improves vastly!
Cheers
Andy
Re: Vauxhall Senator
We haven't had the best weather down here either, but haven't had to have the heating on since early April. Hopefully you'll get a break in the weather soon and be able to complete your work.
-
cavalier1990
- Registered user
- Posts: 1526
- Joined: Wed Jun 29, 2011 9:15 pm
- Location: Paisley, Scotland
Re: Vauxhall Senator
The weather didn't really improve much over july into august, basically a year without a summer!
However we finally got some better weather start of september so I managed to get the repairs done to the inner wing I'd literlly been mucking about with the last Year or so and I was never happy with it; I wasn't working on it for a year just during that time I didn't have much time to sit and work away on it. I think I kind of explained what was going in with it in previous posts, but for anyone that didn't know: I was trying to replace the whole dash side panel with the drain section and at this section there is a lot of twists/curves and wee tricky bits to fettle.
I thought I had secured a whole repair panel for it but this was not to be, luckily I had the repair panel but for the other side so initially I tried to remake most of the panel up using this as a template but the curves and other bits on it were just too hard to replicate. I done one panel thought it was ok, then realised I'd cut the bottom too short so scrapped it and started again.
My 2nd attempt was a bit better but was still not happy with it so during that time I managed to get some cut off bits from a site in germany who had taken a senator and cut all the panels off it. Luckily they had cut the side panel but had left a bit of the bottom off but the top bit was the really tricky bit. I then noticed they also had the bottom section and the front of the floor and inner sill as one part so I bought that as well. Took off the inner sill section and had the 2 bits that I could now fettle and weld onto the wing.
What I didn't have was the little drain panel section, which is more or less below the end of the A pillar where it leaves the bottom of the screen and goes down the door A post area, I used the cut off section of the lower floor to make up the drain section and eventually had all the bits set up ready to weld onto the inner wing between the turret and where the A post goes.
I spent about 2 day shifts lining up all the panel sections, cleaning all the little areas where I needed to weld, both on the panels and on the car. I had to fettle the panels quite a lot to satisfy myself all the bits were sitting snugly in place, and I had to strip the top of the strut plate off both sides so I could measure the gap between the two struts, which is 112 cm.
I now have the section that goes down towards the kickplate area to do next, that will then bring the lower floor repair section into the mix and the inner sill as well. So more fettling/measuring/coffees and staring at it for ages processing all the work I need to do and what to do next etc.
Will try and get some pics later I'm terrible for not taking snaps as I go along.
Cheers
Andy
Re: Vauxhall Senator
If it is any consolation, September has also been quite dire weather-wise down here in Manc-land.
No summer, and so far a poo autumn...
From your description, it sounds like a lot of progress has been made despite the weather's reluctance to play nice.
Ah... photos.
I probably take far too many and delete half of them, when I should really concentrate on the job at hand.
This is probably why I don't make much progress.
-
cavalier1990
- Registered user
- Posts: 1526
- Joined: Wed Jun 29, 2011 9:15 pm
- Location: Paisley, Scotland
Re: Vauxhall Senator
I think the weather is going to turn again next week so tried to do a bit more fettling and offering up of the inner sill against the A pillar side panel, spent most of the day measuring and adjusting/tweaking bits.
I'd also created a small video of the work I've done so far. To fit the section that has the bonnet mount holes there is a notch on the inner wing on the wing mounting rail that I lined this up against. Once I started trying to line up the lower a pillar panel I thought I had mucked up the line of the join with the little box section behind the strut turret.
This all came about when I was measuring the distance from top right to bottom left of the door aperture. The book says a certain value in mm, but on measuring the drivers side it is different to the value in the book. I can only guess the location you measure it from is not the very edge of the lip where the weather seal goes round but perhaps the crease behind it. Either way I used the measurement from drivers side and replicated that on the passenger side.
Adjustment of the door aperture gap was made by moving the lower A pillar side panel. I done this in combination with the new inner sill clamped in place, and also checking the distance from B pillar to B pillar as the inner sill butts up against the B pillar. I did have to move the B pillar outward about 5mm with a block of wood between the centre tunnel bit to the back of the B pillar.
When you clamp the inner sill to the floor edges it pulls the top of the inner sill out, which facilitates that extra 5mm or so for the B pillar.
As you can imagine this is probably the biggest metal jigsaw I've ever worked on and the descriptions don't do justice to the amount of checking/rechecking/fettling/thinking you have to do to convice yourself everything is lining up!
video below shows a small part of the inner wing repair. As I think I said I never had the complete repair panel for this area so had to put all these cut off parts together. I've also put in a wee patch on the floor i kept meaning to do this so it's done now, you'll see this in the video.
https://andrew-cars.s3.eu-west-2.amazon ... pair_1.mp4
Cheers
Andy
Re: Vauxhall Senator
I watched the video a few times.
I can see you are an avid fan of 1000-piece jigsaw puzzles.
It is looking pretty solid now. And going in the right direction.
Good work
I can see you are an avid fan of 1000-piece jigsaw puzzles.
It is looking pretty solid now. And going in the right direction.
Good work
-
cavalier1990
- Registered user
- Posts: 1526
- Joined: Wed Jun 29, 2011 9:15 pm
- Location: Paisley, Scotland
Re: Vauxhall Senator
Thanks Robsey
It's finally feeling like I am starting to make progress with this bit. I think what I am being ultra cautious over is the door pillar frame, which will be the last bit to go on there, if all these bits don't fit in neatly the A frame pillar bit won't sit nice and will skew the door out or in at the bottom.
Cheers
Andy
-
cavalier1990
- Registered user
- Posts: 1526
- Joined: Wed Jun 29, 2011 9:15 pm
- Location: Paisley, Scotland
Re: Vauxhall Senator
Got a few dry spells last couple of days so started putting together the pieces of cut off box section I had accumulated in order to make up one complete jacking section for the hear side.
I had originally acquired an A post side section that ran right down to the inner sill, this had a little bit of the jacking point on it. I noticed the same seller had a cut off of the floor section from the same side with the rest of the box section, although not from the same car, so I bought it.
Luckily the bit that was cut off was big enough to take up the remaining box section on the floor section. I was hoping this was the case. I had to trim some of the side of it off in order for it to come down to the right size.
I made a few videos of the work and uploaded to youtube. I had to weld on a small repair section in the 2nd video to the little floor extension at the end of the panel as it was crusty. This piece is tacked on to the edge of the inner sill right at the front of the sill. I had also originally made up to 2 large panels for the repair of the floor but was struggling to get it sitting right at the juncture where the horizontal floor panel met the bit coming downwards. The section where the jacking point box section was going to go I had no idea how I was going to rebuild this hence me getting the 2 pieces and welding them together. This also gives me the bit of floor section shape at this juncture and I can then just put new floor sections on this going either way (up and back) and not have to worry about the shaping round the box section area.
Video 1:
https://youtube.com/shorts/CQf52GbISn0?feature=share
Video 2:
https://youtube.com/shorts/l0WxIs-9-cU?feature=share
Video 3:
https://youtube.com/shorts/R-eWkMaIDfw?feature=share
Cheers
Andy
-
ilovedmymantas
- Registered user
- Posts: 1264
- Joined: Sat Jan 12, 2013 2:54 am
Re: Vauxhall Senator
Nice work there 
How do you manage to film without talking to yourself, I just can't do it . I always mean to remove the sound (hate hearing myself) and add explanatory text instead but the impetus goes .
How do you manage to film without talking to yourself, I just can't do it
" It's not rust. It's age-related patina " 
1980 vauxhall cavalier MK1 1.6L, 1982 opel manta berlinetta 1.8s, 1985 opel manta 2.0 gte, 1990 cavalier 2.0 gl ,1994 cavalier sri x20xev
-1995 cdx x20xev
---------------
Matt
1980 vauxhall cavalier MK1 1.6L, 1982 opel manta berlinetta 1.8s, 1985 opel manta 2.0 gte, 1990 cavalier 2.0 gl ,1994 cavalier sri x20xev
-1995 cdx x20xev
---------------
Matt
-
cavalier1990
- Registered user
- Posts: 1526
- Joined: Wed Jun 29, 2011 9:15 pm
- Location: Paisley, Scotland
Re: Vauxhall Senator
It's was just a short video and I usually don't do talking heavy videos anyway, usually just film the work I'm doing. Same here hate sound of my own voice I thought I sounded like a drunk Glaswegian (is there any other type of Glaswegian!)ilovedmymantas wrote: ↑Sun Oct 27, 2024 12:39 am Nice work there
How do you manage to film without talking to yourself, I just can't do it
So been playing about with my jigsaw of parts again. Now that I've got the bits for the jack box section welded together (was going to call it jack in a box), I then tried to offer it up to where it mount up against the side of the chassis leg under the front floor bit. As I was going along fixing up the box section I started to realise there was going to be a problem.
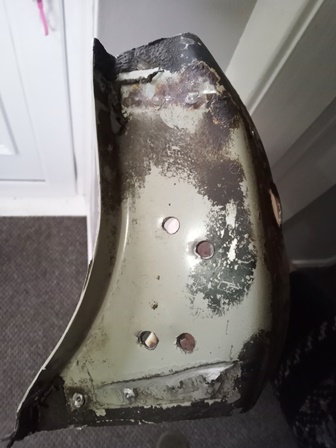
I had originally fixed the chassis leg and had made the lower reaching section of it too far up as it drops down a bit, then the outer lip of the box section attaches onto it. Here is the pic of the bit I fixed - note as you probably realise this is pre-the actual repair, but you can picture that I just put in a general panel repair not being too picky about the actual shape:

Realising that I could probably "super bodge" the box section onto the existing repair, and knowing it would probably take a while to get it all sitting ok, and that I would never be happy with it, I decided to cut out the section of chassis leg from the spare bit I bought, and remove my existing repair.
Luckily, the chassis bit on the spare chassis leg looked ok (ish) and it was more about needing the correct shape of the leg, I went ahead and made all my measurements against the existing leg, deciding where I was going to cut it etc. making sure I wasn't over-cutting or under cutting it and that I had plenty to work with on the remaining leg.
So drilled out all the spot welds holdingg on the remaining floor section on the spare leg, cut the bit of section off and then realised there is a double skin inside that bit of the chassis, not a big deal but could see inside the leg, at the double skin section, that it was starting to rust and had all those big chunks of flaky pastry between the 1st and 2nd plate. This double skin is the culprit that causes the carlton/senator/omega being notorious for chassis leg rust at the lower edge.
The skeptic in me would say that the double skin "assists" the rusting process inside an important structural point, and that they could have just made the single skin thicker for more strength perhaps, but then what do I know?
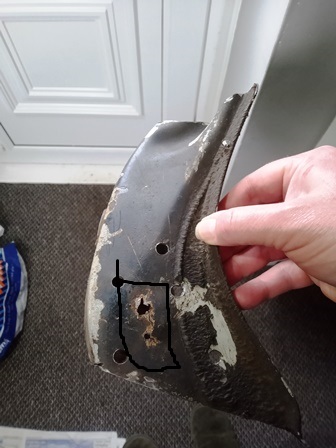
Pic inside the leg after the 2nd skin removed, you can see the rusty outline where the 2nd skin was inside the leg:
As I had to drill out about 15 spot welds to get the 2nd skin out and use my spot weld chisel to split it off the main leg, it then revealed a little bit of a hole through the side of the leg. This is where they always seem to go and it wasn't too big a bit, so can just put a small plate on that section and fill some of the spot weld holes while I'm at it.
The 2nd pic shows "the good side" of the leg, you can see the holes where I removed spot welds.
All in all, it's ok apart from the little bit of crust on the other side, mainly just covered in old underseal and factory stonechip. If you look at the bottom you can see about 4 old spot welds down the side, or bottom as you look at it in pic, and a small run of spots at the top, this is where the box section links on to.
The 3rd pic shows the offending rusty bit, highlighted in black.
I'll probably just replace metal out to where all the spot welds reach out to and fill or rubber grommet the other side spot weld holes but keep for underseal injection purposes.
The 4th pic is the underside, and is probably the bit I really needed this for. You can see the run of spot welds along the left of it, this is where the lower section of the box section extends out and butt up against the chassis leg. On my initial repair there was about a 3/4" gap from the leg to the lower ledge from the box section. As well as this the 2 upper bits of the box that butt up against the leg didn't look to neat either.
It only took me about 5 hours to get the spare chassis leg off the cut off section I had, take out the 2nd skin, and also remove the existing section of leg from the car. Lot neater doing it this way and much cleaner.
Cheers
Andy
Re: Vauxhall Senator
Well done for having the patience and perseverence.
5 hrs? That sounds like an awful long time.
Probably not too bad when you have a clear plan, and you are in the flow of things.
5 hrs? That sounds like an awful long time.
Probably not too bad when you have a clear plan, and you are in the flow of things.
-
cavalier1990
- Registered user
- Posts: 1526
- Joined: Wed Jun 29, 2011 9:15 pm
- Location: Paisley, Scotland
Re: Vauxhall Senator
I was probably being a bit generous to myself with the 5 hours, about an hour of that I was pulling the garage apart looking for a spare cut off section that was sitting in front of my nose lol. Probably about an hour to drill out the spot welds and chisel out the 2nd skin on the spare leg and the chassis section on the car, about another hour or 2 to remove the spot welds on both sides & then slicing and dicing it off. Had to relocate fuel lines as well so I wasn't cutting into them round the back of the leg.
I can take a bit of time to think about what I'm doing so I don't undercut the section. I've done this before when I was steaming ahead and not thinking properly about it, usually do a good 2 or 3 measure checks before cutting and re-checking as I'm cutting too.
Cheers
Andy
Re: Vauxhall Senator
Time can very easily run away with you when working on cars. Each time I go up to the unit I try to have 3-4 hours on my van, but often when I sit back afterwards I can't see much progress. Slowly though, over a period of a few months you can see that a bit more is done.
-
cavalier1990
- Registered user
- Posts: 1526
- Joined: Wed Jun 29, 2011 9:15 pm
- Location: Paisley, Scotland
Re: Vauxhall Senator
The illusion of no progress eh! A lot of the prep/measuring/offering up/re-tweaking/thinking takes up a huge chunk of the time. Once you get to actual welding that usually only takes a tenth of the time actually spent on the job at hand.3cav3 wrote: ↑Fri Nov 01, 2024 6:55 am Time can very easily run away with you when working on cars. Each time I go up to the unit I try to have 3-4 hours on my van, but often when I sit back afterwards I can't see much progress. Slowly though, over a period of a few months you can see that a bit more is done.
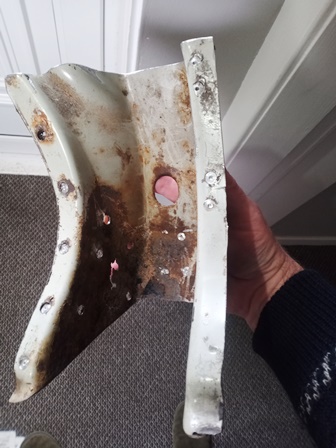
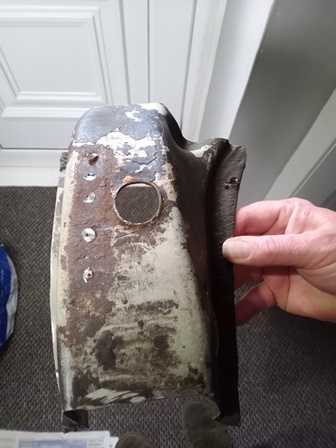
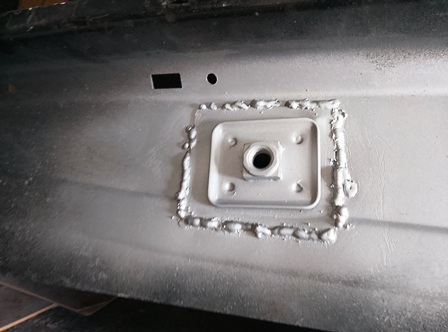
Wee update: I had to take the seat belt mount off of the old inner sill and weld it onto the new inner sill. Cannot figure for the life of me why they don't put it on to the new sill as I would imagine that the seat belt mount is an integral part of the cars structure. I basically just cut the old one off and patched it onto the new sill. You can see a dimple/spot weld at each corner of the seat belt plate, this is where they must join it on in the factory, but I just cut round that plate so I could weld it onto the new sill. Image below:
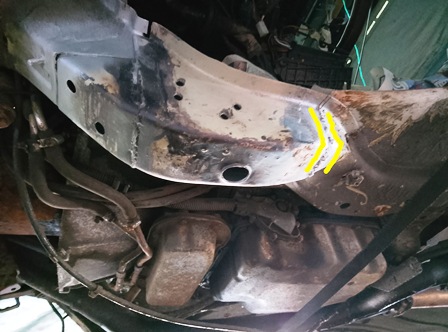
Nest job was to start putting on the chassis leg repair that I had repaired the front section with a cut off from a spare chassis leg so it's the like the chassis leg version of the bionic man! I've only started tacking the join at the back where I've highlighted in yellow if you can see it. This was a bit shaky this bit as I never had the best butt up against the existing bit of chassis leg, it was a bit bigger a gap than I'd of liked, so I had to sort of pulse the welder and build up the gap then overlay it with more of a continous weld. I've only done the outer facing side and yet to get in the back. I may leave that till such time I have better access and I can get the car up on a ramp or something so I can attack it from the back not squeezed in from the front trying to weld straight over my head.
So once I get this bit fully in place I can start putting on the floor/outrigger section as well and that will eventually lead to the new inner sill and other associated bits. Definitely a labour of love!
Cheers
Andy
Re: Vauxhall Senator
All part of cost cutting in production,
and bumping up the cost of having to buy two parts instead of one.
Parts are either a mile off from the original shape, missing sections or drillings, or made from thinner steel.
It all makes things far more complicated for us enthusiasts.
and bumping up the cost of having to buy two parts instead of one.
Parts are either a mile off from the original shape, missing sections or drillings, or made from thinner steel.
It all makes things far more complicated for us enthusiasts.
-
Envoy CDX
- Club Admin
- Posts: 9980
- Joined: Sun Sep 23, 2007 3:51 pm
- Location: Jarrow, Newcastle Upon Tyne
Re: Vauxhall Senator
Sadly, as Rob says. But some nice progress on this one